Laravel Breeze認証+Ineatia+Reactでアプリケーション構築するための基礎
最近Laravelを使い始めた人にとってはあまり関係ないことですが、Laravel8の認証でLaravel Breezeが登場した当初はJavaScript用のライブラリとしてAlpine.jsのみ利用されていました。Laravel Breezeでも日々更新が行われInertia.jsが選択できるようになり2021年5月にはInertia.jsのオプションにReactも加わりBreeze + Inertia + Reactで認証機能を持つLaravelアプリケーションを構築することができます。ReactではなくVueを選択することも可能ですが本文書ではReactを利用した場合はLaravel Breezeの動作確認とReact + Inertia環境でのCRUD(Create, Read, Update, Delete)の実装方法について解説を行っています。
本文書の公開時のLaravelのバージョンは8でしたが現在Laravel11で更新を行っています。
Laravel環境の構築
Laravelプロジェクトの作成
動作確認の環境を構築するためにLaravelプロジェクトの作成を行います。ここではlaravelコマンドを利用してbreeze_inertia_reactという名前でプロジェクトの作成を行っています。名前は任意なので好きなプロジェクト名を設定してください。
% laravel new breeze_inertia_react
Laravel8とLaravel11ではここからの手順に大きな違いがあり、Laravel11でプロジェクトの作成中にLaravel Breezeの選択、データベースの設定を行うことができます。下記ではLaravel8とLaravel11で手順を分けています。
Laravel11の場合
Laravel11の場合はlaravel newコマンドを実行すると最初にStarter Kitの選択を行うことができます。ここでBreezeを選択することができます。
   _                               _
  | |                             | |
  | |     __ _ _ __ __ ___   _____| |
  | |    / _` | '__/ _` \ \ / / _ \ |
  | |___| (_| | | | (_| |\ V /  __/ |
  |______\__,_|_|  \__,_| \_/ \___|_|


 ┌ Would you like to install a starter kit? ────────────────────┐
 │   ○ No starter kit                                           │
 │ › ● Laravel Breeze                                           │
 │   ○ Laravel Jetstream                                        │
 └──────────────────────────────────────────────────────────────┘
利用するStackを選択することができます。ここでは”React with Inertia”を選択します。
 ┌ Which Breeze stack would you like to install? ───────────────┐
 │   ○ Blade with Alpine                                      ┃ │
 │   ○ Livewire (Volt Class API) with Alpine                  │ │
 │   ○ Livewire (Volt Functional API) with Alpine             │ │
 │ › ● React with Inertia                                     │ │
 │   ○ Vue with Inertia                                       │ │
 └──────────────────────────────────────────────────────────────┘
追加機能を選択できますがここでは何も選択しません。テストのフレームワークは”Pest”を選択します。動作確認なのでGitは”No”を選択します。
 ┌ Would you like any optional features? ───────────────────────┐
 │ › ◻ Dark mode                                                │
 │   ◻ Inertia SSR                                              │
 │   ◻ TypeScript (experimental)                                │
 └──────────────────────────────────────────────────────────────┘

 ┌ Which testing framework do you prefer? ──────────────────────┐
 │ › ● Pest                                                     │
 │   ○ PHPUnit                                                  │
 └──────────────────────────────────────────────────────────────┘

 ┌ Would you like to initialize a Git repository? ──────────────┐
 │ ○ Yes / ● No                                                 │
 └──────────────────────────────────────────────────────────────┘
最後にデータベースの選択画面が表示されるので”SQLite”を選択します。
 ┌ Which database will your application use? ───────────────────┐
 │   ○ MySQL                                                    │
 │   ○ MariaDB                                                  │
 │   ○ PostgreSQL                                               │
 │ › ● SQLite                                                   │
 │   ○ SQL Server                                               │
 └──────────────────────────────────────────────────────────────┘
インストールを行ったLaravelバージョンはphp artisanコマンドで確認します。
 % cd breeze_inertia_react
 % php artisan -V
Laravel Framework 11.19.0
package.jsonファイルを確認してインストールしたJavaScriptライブラリとバージョンを確認しておきます。
{
    "private": true,
    "type": "module",
    "scripts": {
        "dev": "vite",
        "build": "vite build"
    },
    "devDependencies": {
        "@headlessui/react": "^2.0.0",
        "@inertiajs/react": "^1.0.0",
        "@tailwindcss/forms": "^0.5.3",
        "@vitejs/plugin-react": "^4.2.0",
        "autoprefixer": "^10.4.12",
        "axios": "^1.6.4",
        "laravel-vite-plugin": "^1.0",
        "postcss": "^8.4.31",
        "react": "^18.2.0",
        "react-dom": "^18.2.0",
        "tailwindcss": "^3.2.1",
        "vite": "^5.0"
    }
}
php artisan serveコマンドで開発サーバを起動します。
% php artisan serve

   INFO  Server running on [http://127.0.0.1:8000].
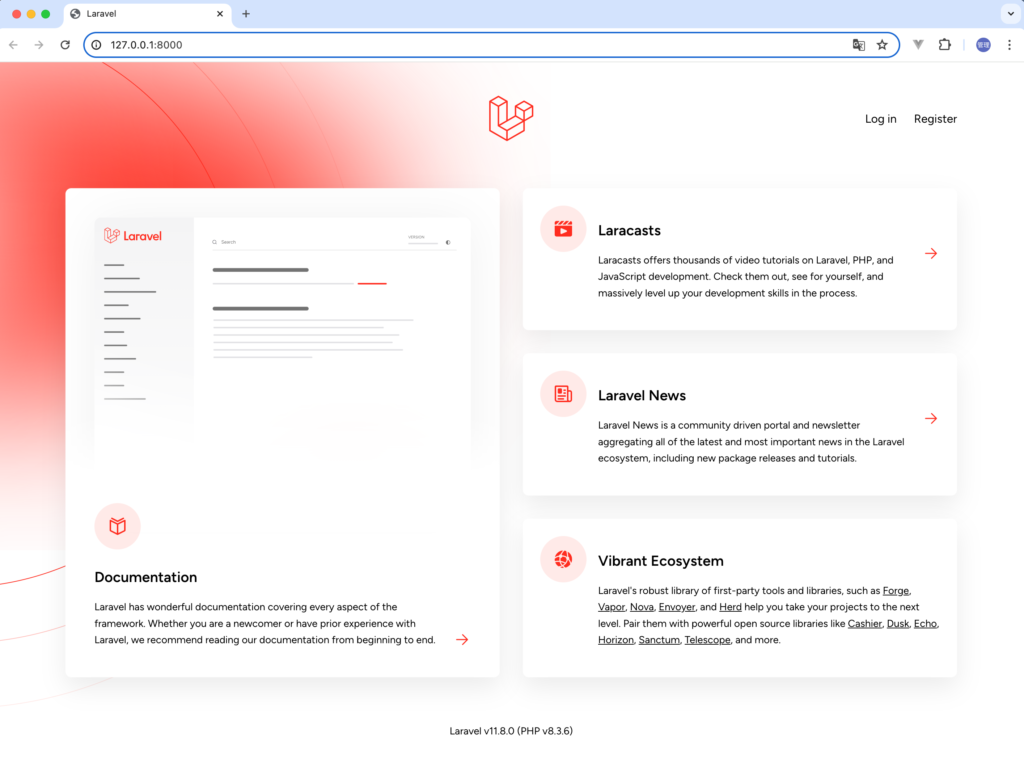
ブラウザからhttp://127.0.0.1:8000にアクセスするとLaravel11の初期画面が表示されます。
Laravel8の場合
インストールを行ったLaravelバージョンはphp artisanコマンドで確認します。
 % cd breeze_inertia_react
 % php artisan --version
Laravel Framework 8.55.0
Laravel Breezeのインストールと初期設定
Laravelプロジェクトの作成後、composerコマンドを利用してLaravel Breezeパッケージのインストールを行います。
% composer require laravel/breeze --dev
php artisanコマンドでbreezeのインストールを行いますがbreeze:installの後ろに何も設定していない場合はalpine.jsがインストールされます。reactを指定するとInertia.jsとReactがインストトールされます。Vueを利用したい場合はreactの代わりにvueを指定します。
% php artisan breeze:install react
Breezeをインストール後に作成されるpackage.jsonファイルを元にJavaScriptライブラリをインストール/ビルドするために”npm install && npm run dev”コマンドを実行します。
% npm install && npm run dev
ビルド完了後、Laravelの開発サーバの起動を行い行います。
 % php artisan serve
Starting Laravel development server: http://127.0.0.1:8000
[Sun Aug 22 09:13:43 2021] PHP 8.0.7 Development Server (http://127.0.0.1:8000) started
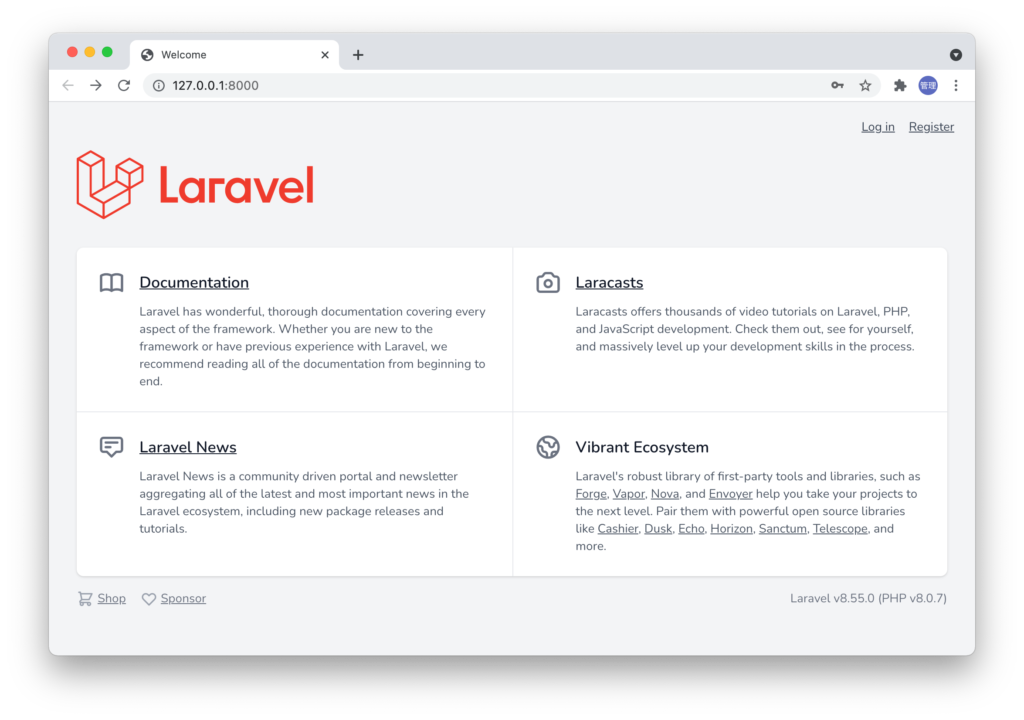
起動後にブラウザで127.0.0.1にアクセスするとLaravelの初期画面が表示されます。Breezeのインストールを行ったので、右上にはLog inとRegisterのリンクが表示されています。
データベースの設定
Breezeにより認証機能の追加が行われたのでユーザデータを保存すためにデータベースの設定を行います。簡易的に利用できるSQLiteを利用します。databaseフォルダの下にdatabase.sqliteファイルを作成します。
% touch database/database.sqlite
ファイルの作成が完了したら.envファイルを開いてDB_CONNECTIONの値をmysqlからsqliteに変更します。DB_CONNECTION以外の先頭にDB_がついた環境変数はすべて削除します。
設定前はDB_CONNECTIONにmysqlが設定されています。
DB_CONNECTION=mysql
DB_HOST=127.0.0.1
DB_PORT=3306
DB_DATABASE=breeze_inertia_react
DB_USERNAME=root
DB_PASSWORD=
設定後と下記のようになります。
DB_CONNECTION=sqlite
.envファイルの更新が完了したらphp artisan migrateコマンドで作成したデータベースにテーブルを作成します。
 % php artisan migrate
Migration table created successfully.
Migrating: 2014_10_12_000000_create_users_table
Migrated:  2014_10_12_000000_create_users_table (3.57ms)
Migrating: 2014_10_12_100000_create_password_resets_table
Migrated:  2014_10_12_100000_create_password_resets_table (2.38ms)
Migrating: 2019_08_19_000000_create_failed_jobs_table
Migrated:  2019_08_19_000000_create_failed_jobs_table (1.49ms)
Migrating: 2019_12_14_000001_create_personal_access_tokens_table
Migrated:  2019_12_14_000001_create_personal_access_tokens_table (2.17ms)
ユーザの作成
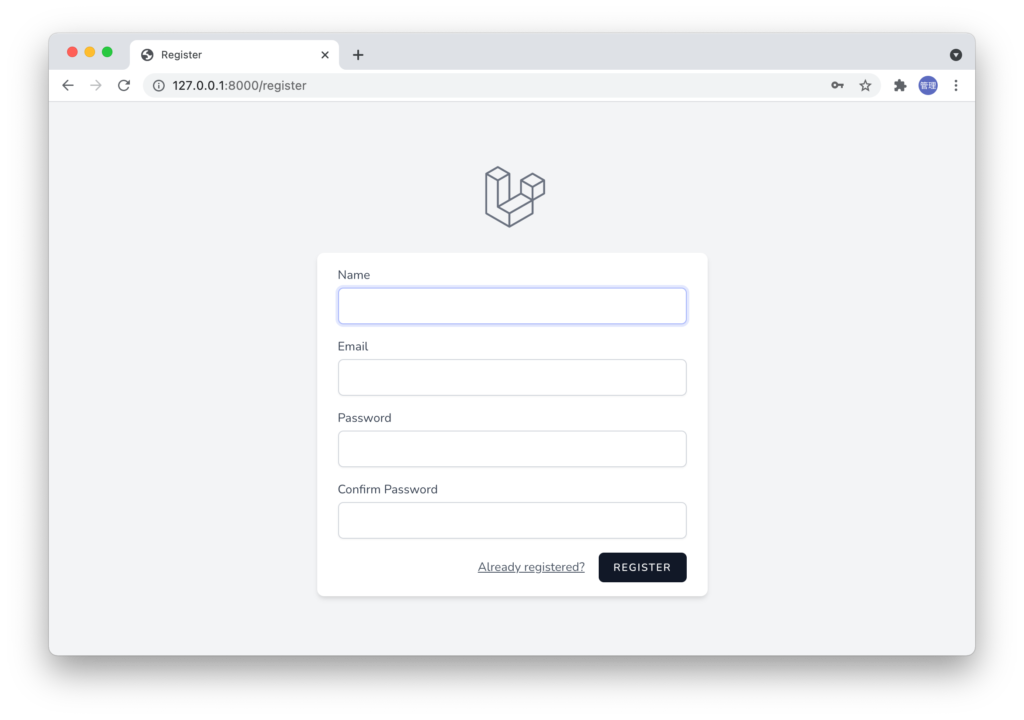
データベースにusersテーブルの作成ができたのでユーザの登録を行います。先ほどアクセスしたLaravelの初期画面の右上にある”Register”をクリックしてください。ユーザの登録画面が表示されます。Laravelのバージョンで違いはありません。ユーザの登録を行ってください。
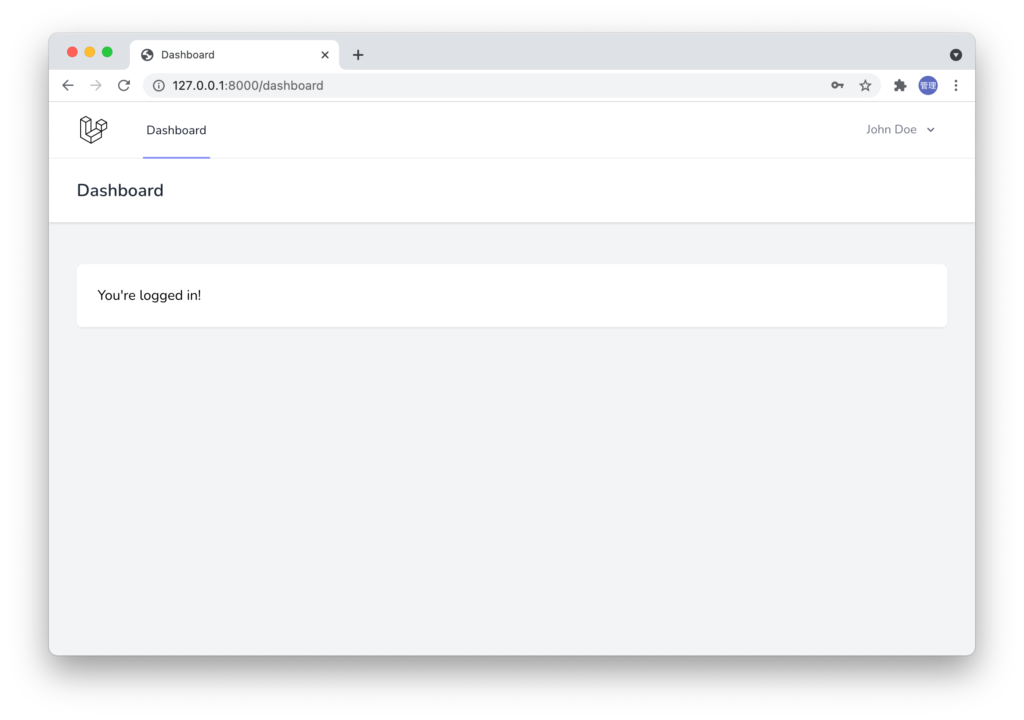
ユーザの登録が完了すると以下の画面が表示されます。
Breezeの設定理解(Laravel8)
Laravel11ではプロジェクト作成中にBreezeを選択しているのでこの処理は確認していません。
Breezeのインストール時にreactを指定するとどのような処理が行われるか確認するためにcomposerコマンドでlaravel/breezeパッケージをインストールした際に作成されるinstallCommand.phpファイルを確認します。 InstallCommand.phpファイルは、vendor¥laravel¥breeze¥src¥Consoleフォルダに保存されています。
InstallCommand.phpファイルを確認するとphp artisan breeze:installの引数にvue、reactを指定するか何もしていしないかで実行される処理が異なることがわかります。何も指定しない場合にはalpine.jsがインストールされることがわかります。
public function handle()
{
    if ($this->option('inertia') || $this->argument('stack') === 'vue') {
        return $this->installInertiaVueStack();
    }

    if ($this->argument('stack') === 'react') {
        return $this->installInertiaReactStack();
    }

        // NPM Packages...
        $this->updateNodePackages(function ($packages) {
            return [
                '@tailwindcss/forms' => '^0.2.1',
                'alpinejs' => '^2.7.3',
                'autoprefixer' => '^10.1.0',
                'postcss' => '^8.2.1',
                'postcss-import' => '^12.0.1',
                'tailwindcss' => '^2.0.2',
            ] + $packages;
        });
//略
reactの場合はinstallInertiaReactStack()が実行されるので関数の中身を確認してみましょう。
protected function installInertiaReactStack()
{
    // Install Inertia...
    $this->requireComposerPackages('inertiajs/inertia-laravel:^0.3.5', 'laravel/sanctum:^2.6', 'tightenco/ziggy:^1.0');

    // NPM Packages...
    $this->updateNodePackages(function ($packages) {
        return [
            '@headlessui/react' => '^1.2.0',
            '@inertiajs/inertia' => '^0.9.0',
            '@inertiajs/inertia-react' => '^0.6.0',
            '@inertiajs/progress' => '^0.2.4',
            '@tailwindcss/forms' => '^0.3.2',
            'autoprefixer' => '^10.2.4',
            'postcss' => '^8.2.13',
            'postcss-import' => '^14.0.1',
            'tailwindcss' => '^2.1.2',
            'react' => '^17.0.2',
            'react-dom' => '^17.0.2',
            '@babel/preset-react' => '^7.13.13',
        ] + $packages;
    });

    // Controllers...
    (new Filesystem)->ensureDirectoryExists(app_path('Http/Controllers/Auth'));
    (new Filesystem)->copyDirectory(__DIR__.'/../../stubs/inertia-common/app/Http/Controllers/Auth', app_path('Http/Controllers/Auth'));

    // Requests...
    (new Filesystem)->ensureDirectoryExists(app_path('Http/Requests/Auth'));
    (new Filesystem)->copyDirectory(__DIR__.'/../../stubs/default/App/Http/Requests/Auth', app_path('Http/Requests/Auth'));

    // Middleware...
    $this->installMiddlewareAfter('SubstituteBindings::class', '\App\Http\Middleware\HandleInertiaRequests::class');

    copy(__DIR__.'/../../stubs/inertia-common/app/Http/Middleware/HandleInertiaRequests.php', app_path('Http/Middleware/HandleInertiaRequests.php'));

    // Views...
    copy(__DIR__.'/../../stubs/inertia-common/resources/views/app.blade.php', resource_path('views/app.blade.php'));

    // Components + Pages...
    (new Filesystem)->ensureDirectoryExists(resource_path('js/Components'));
    (new Filesystem)->ensureDirectoryExists(resource_path('js/Layouts'));
    (new Filesystem)->ensureDirectoryExists(resource_path('js/Pages'));

    (new Filesystem)->copyDirectory(__DIR__.'/../../stubs/inertia-react/resources/js/Components', resource_path('js/Components'));
    (new Filesystem)->copyDirectory(__DIR__.'/../../stubs/inertia-react/resources/js/Layouts', resource_path('js/Layouts'));
    (new Filesystem)->copyDirectory(__DIR__.'/../../stubs/inertia-react/resources/js/Pages', resource_path('js/Pages'));

    // Tests...
    (new Filesystem)->copyDirectory(__DIR__.'/../../stubs/default/tests/Feature', base_path('tests/Feature'));

    // Routes...
    copy(__DIR__.'/../../stubs/inertia-common/routes/web.php', base_path('routes/web.php'));
    copy(__DIR__.'/../../stubs/inertia-common/routes/auth.php', base_path('routes/auth.php'));

    // "Dashboard" Route...
    $this->replaceInFile('/home', '/dashboard', resource_path('js/Pages/Welcome.js'));
    $this->replaceInFile('Home', 'Dashboard', resource_path('js/Pages/Welcome.js'));
    $this->replaceInFile('/home', '/dashboard', app_path('Providers/RouteServiceProvider.php'));

    // Tailwind / Webpack...
    copy(__DIR__.'/../../stubs/inertia-common/tailwind.config.js', base_path('tailwind.config.js'));
    copy(__DIR__.'/../../stubs/inertia-common/webpack.mix.js', base_path('webpack.mix.js'));
    copy(__DIR__.'/../../stubs/inertia-common/webpack.config.js', base_path('webpack.config.js'));
    copy(__DIR__.'/../../stubs/inertia-common/jsconfig.json', base_path('jsconfig.json'));
    copy(__DIR__.'/../../stubs/inertia-common/resources/css/app.css', resource_path('css/app.css'));
    copy(__DIR__.'/../../stubs/inertia-react/resources/js/app.js', resource_path('js/app.js'));

    $this->replaceInFile('.vue()', '.react()', base_path('webpack.mix.js'));
    $this->replaceInFile('.vue', '.js', base_path('tailwind.config.js'));

    $this->info('Breeze scaffolding installed successfully.');
    $this->comment('Please execute the "npm install && npm run dev" command to build your assets.');
}
updateNodePackages関数でpackage.jsonファイルの更新が行われていますがreactがインストールされていることが確認できます。それ以下のコードではFileSystemクラスのensureDirectoryExistsメソッドで指定したフォルダが存在するかチェックし、存在しない場合は作成、作成後はcopyDirectoryであらかじめstubsフォルダに保存されている情報をコピーしています。
package.jsonファイルを確認すると設定通りの内容が記述されていることがわかります。npm installを実行した際にここに記述されているJavaScriptのライブラリがインストールされることになります。inertiajs, react, tailwindcss, postcssで構成されていることがわかります。
{
//略
    "devDependencies": {
        "@babel/preset-react": "^7.13.13",
        "@headlessui/react": "^1.2.0",
        "@inertiajs/inertia": "^0.9.0",
        "@inertiajs/inertia-react": "^0.6.0",
        "@inertiajs/progress": "^0.2.4",
        "@tailwindcss/forms": "^0.3.2",
        "autoprefixer": "^10.2.4",
        "axios": "^0.21",
        "laravel-mix": "^6.0.6",
        "lodash": "^4.17.19",
        "postcss": "^8.2.13",
        "postcss-import": "^14.0.1",
        "react": "^17.0.2",
        "react-dom": "^17.0.2",
        "tailwindcss": "^2.1.2"
    }
}
ログイン処理
Laravel、IneriaとReactの組み合わせの環境下でアプリケーションの構築方法の理解を深めるためにログイン処理がどのようなに行っているか確認していきます。ログイン処理の内容を参考に後ほどCRUDのコードを記述します。
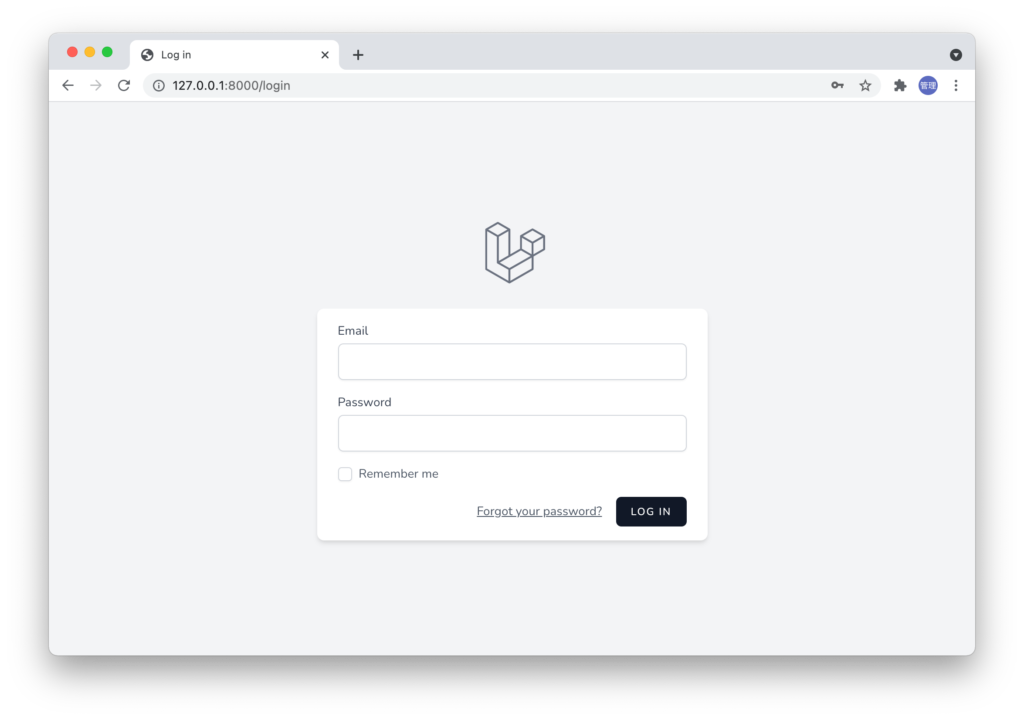
先程ユーザ登録した時にログインしているユーザを一度ログアウトしhttps://127.0.0.1:8000/loginにアクセスするとログイン画面が表示されます。
この画面が表示される流れを見ていきます。routesフォルダにあるルーティングファイルweb.phpファイルを確認すると最終行にauth.phpファイルが読み込まれていることが確認できます。これはLaravel Breezeをインストールしたことで追加されるルーティング情報です。
//略
Route::get('/', function () {
    return Inertia::render('Welcome', [
        'canLogin' => Route::has('login'),
        'canRegister' => Route::has('register'),
        'laravelVersion' => Application::VERSION,
        'phpVersion' => PHP_VERSION,
    ]);
});

Route::get('/dashboard', function () {
    return Inertia::render('Dashboard');
})->middleware(['auth', 'verified'])->name('dashboard');

require __DIR__.'/auth.php';
auth.phpファイルを確認すると/register, /login, /forgot-paswordなど認証に関するルーティングが追加されていることが確認できます。
<?php

use App\Http\Controllers\Auth\AuthenticatedSessionController;
use App\Http\Controllers\Auth\ConfirmablePasswordController;
use App\Http\Controllers\Auth\EmailVerificationNotificationController;
use App\Http\Controllers\Auth\EmailVerificationPromptController;
use App\Http\Controllers\Auth\NewPasswordController;
use App\Http\Controllers\Auth\PasswordResetLinkController;
use App\Http\Controllers\Auth\RegisteredUserController;
use App\Http\Controllers\Auth\VerifyEmailController;
use Illuminate\Support\Facades\Route;

Route::get('/register', [RegisteredUserController::class, 'create'])
                >middleware('guest')
                >name('register');

Route::post('/register', [RegisteredUserController::class, 'store'])
                >middleware('guest');

Route::get('/login', [AuthenticatedSessionController::class, 'create'])
                >middleware('guest')
                >name('login');
//略
//Laravel11の場合
Route::middleware('guest')->group(function () {
    Route::get('register', [RegisteredUserController::class, 'create'])
                ->name('register');
    Route::post('register', [RegisteredUserController::class, 'store']);

    Route::get('login', [AuthenticatedSessionController::class, 'create'])
                ->name('login');
auth.phpファイルの内容から/loginにアクセスを行うとAuthenticatedSessionControllerのcreateメソッドが実行されることがわかるのでAuthenticatedSessionController.phpファイルの中身を確認します。
public function create()
{
    return Inertia::render('Auth/Login', [
        'canResetPassword' => Route::has('password.request'),
        'status' => session('status'),
    ]);
}
Inertiaを利用しない場合はログイン画面の表示にBladeファイルが指定されることになりますが、Inertiaを利用している場合はInertiaクラスのrender関数にJavaScriptファイルを指定します。render関数の引数に設定されているAuth/Loginはフォルダ名とファイル名を表しており、このファイルはresoucecs¥js¥Pages¥Authフォルダに保存されているLogin.jsx(js)ファイルに対応します。render関数の第2引数に配列でcanRestPasswod, statusが設定されていますがLogin.jsファイル(Loginコンポーネント)にはpropsとしてこれらの変数を渡すことができます。
Loginコンポーネント
Login.jsx(js)ファイルは完全にReactのコードで記述されています。Login.jsx(js)ファイルの中ではログインの入力フォームの表示と入力後のPOSTリクエストまでの処理が記述されています。コード自体に難しい箇所はありませんが@inertiajs/reactパッケージからimportしているuseFromが気になる箇所かと思います。userFormはLaravelに含まれているヘルパー関数と同じようや役割を持っており、useFormを利用することでInertia+React環境下でフォーム処理が扱いやすくなっています。useFormは必須ではありませんが利用すると便利です。
Login.jsxファイルの先頭を見るとinput要素などもコンポーネント化されimportされていることがわかります。Laravel11のLogin.jsxファイルですがLaravel8もほとんど違いはありませんがimportするコンポーネントの名前等が変わっています。
import Checkbox from '@/Components/Checkbox';
import GuestLayout from '@/Layouts/GuestLayout';
import InputError from '@/Components/InputError';
import InputLabel from '@/Components/InputLabel';
import PrimaryButton from '@/Components/PrimaryButton';
import TextInput from '@/Components/TextInput';
import { Head, Link, useForm } from '@inertiajs/react';

export default function Login({ status, canResetPassword }) {
    const { data, setData, post, processing, errors, reset } = useForm({
        email: '',
        password: '',
        remember: false,
    });

    const submit = (e) => {
        e.preventDefault();

        post(route('login'), {
            onFinish: () => reset('password'),
        });
    };

    return (
        <GuestLayout>
            <Head title="Log in" />

            {status && <div className="mb-4 font-medium text-sm text-green-600">{status}</div>}

            <form onSubmit={submit}>
                <div>
                    <InputLabel htmlFor="email" value="Email" />

                    <TextInput
                        id="email"
                        type="email"
                        name="email"
                        value={data.email}
                        className="mt-1 block w-full"
                        autoComplete="username"
                        isFocused={true}
                        onChange={(e) => setData('email', e.target.value)}
                    />

                    <InputError message={errors.email} className="mt-2" />
                </div>

                <div className="mt-4">
                    <InputLabel htmlFor="password" value="Password" />

                    <TextInput
                        id="password"
                        type="password"
                        name="password"
                        value={data.password}
                        className="mt-1 block w-full"
                        autoComplete="current-password"
                        onChange={(e) => setData('password', e.target.value)}
                    />

                    <InputError message={errors.password} className="mt-2" />
                </div>

                <div className="block mt-4">
                    <label className="flex items-center">
                        <Checkbox
                            name="remember"
                            checked={data.remember}
                            onChange={(e) => setData('remember', e.target.checked)}
                        />
                        <span className="ms-2 text-sm text-gray-600">Remember me</span>
                    </label>
                </div>

                <div className="flex items-center justify-end mt-4">
                    {canResetPassword && (
                        <Link
                            href={route('password.request')}
                            className="underline text-sm text-gray-600 hover:text-gray-900 rounded-md focus:outline-none focus:ring-2 focus:ring-offset-2 focus:ring-indigo-500"
                        >
                            Forgot your password?
                        </Link>
                    )}

                    <PrimaryButton className="ms-4" disabled={processing}>
                        Log in
                    </PrimaryButton>
                </div>
            </form>
        </GuestLayout>
    );
}
useFormについて
Inertia+React環境でどのようにPOSTを送信するのか、エラーはどのように戻されるのか等フォーム処理に関して不明なことがあるかと思いますのがuseFormを利用することで簡単に行えるようになります。useFormを活用するために利用方法を理解する必要があるのでLogin.jsxファイルを見ながら説明していきます。
Login.jsxファイルの中でuseFormに関する以下のコードを確認することができます。
const { data, setData, post, processing, errors, reset } = useForm({
    email: "",
    password: "",
    remember: false,
});
useFormの引数にはログインフォームのinput要素に入力した値を保存する変数の初期値をオブジェクトで指定することができます。ログインフォームには2つのinput要素と1つのチェックボックスが存在するため3つの変数の初期値を定義しています。
設定した変数はdataを通して取得することができます。dataの中にemail, password, remerberの値が保存されているためemailのInputコンポーネントを見るとvalueの値にdata.emailが指定されています。
<TextInput
    id="email"
    type="email"
    name="email"
    value={data.email}
    className="mt-1 block w-full"
    autoComplete="username"
    isFocused={true}
    onChange={(e) => setData('email', e.target.value)}
/>
TextInputコンポーネントではpropsのhandleChangeが設定されています。Inputコンポーネントの中身を確認するとonChangeイベントが設定されているので文字を入力する度にsetData関数が実行され入力した値が更新されます。
setDataによって更新されたdataはsubmit関数のpost関数によって/loginに送信されます。post関数の処理はuseFormの中で実行されるためPOSTリクエストは送信先を設定するだけで完了です。処理が完了するとパスワードがリセットされます。
const submit = (e) => {
    e.preventDefault();

    post(route('login'), {
        onFinish: () => reset('password'),
    });
};
useForm関数から戻されるprocessingはリクエスト処理を処理中かどうか確認するために利用することができます。デフォルトの値はfalseで、POSTリクエスト送信後からPOST処理が完了するまでprocessingの値はtrueとなります。processingの値をbutton要素のdesabled属性で利用します。processingをpropsでButtonコンポーネントに渡すことでButtonコンポーネントにあるbutton要素のdisabled属性の値を設定しています。processingがtrueの場合は処理中なのでbuttonがクリックできないようにdisabled属性の値とtrueにしています。
errorsにはPOSTリクエストのバリデーションに失敗した場合のエラー情報が保存されます。InputErrorコンポーネントにpropsのmessageでそれぞれの値を渡ししてエラーをブラウザ上に表示できるように設定されています。
POSTリクエストの処理
POSTリクエストは/loginに送信され、AuthenticatedSessionController.phpファイルのstoreメソッドが実行されます。storeメソッドの中では認証の処理が行われ問題がなければdashboardにリダイレクトされます。
public function store(LoginRequest $request): RedirectResponse
{
    $request->authenticate();

    $request->session()->regenerate();

    return redirect()->intended(route('dashboard', absolute: false));
}
CRUDの準備
Breezeに含まれているログイン処理を確認することで入力フォームのデータの扱い方やPOSTリクエストの送信方法、コントローラー内での処理方法をある程度理解することができました。ここからはログイン処理を参考にCreate, Read, Update, Delete処理をLaravel+Inertia+React環境でどのように記述していくかを確認していきます。
Blogモデルの作成
動作確認を行うために利用するBlogモデルはtitle, contentの2つの列を持つシンプルなブログを想定しています。php artisan make:modelコマンドにオプション-aをつけて実行することでモデル、ファクトリー、マイグレーション、コントロラーファイルを一括で作成します。ファクトリーファイルはダミーデータを登録する際に利用します。
% php artisan make:model Blog -a

   INFO  Model [app/Models/Blog.php] created successfully.

   INFO  Factory [database/factories/BlogFactory.php] created successfully.

   INFO  Migration [database/migrations/2024_08_06_065522_create_blogs_table.php] created successfully.

   INFO  Seeder [database/seeders/BlogSeeder.php] created successfully.

   INFO  Request [app/Http/Requests/StoreBlogRequest.php] created successfully.

   INFO  Request [app/Http/Requests/UpdateBlogRequest.php] created successfully.

   INFO  Controller [app/Http/Controllers/BlogController.php] created successfully.

   INFO  Policy [app/Policies/BlogPolicy.php] created successfully.
テーブルの作成
テーブルにはtitleとcontet列のみ追加します。titleはブログのタイトルなのでデータタイプをstring, contentはブログの内容を保存するのでデータタイプをtextに設定します。
public function up()
{
    Schema::create('blogs', function (Blueprint $table) {
        $table->id();
        $table->string('title');
        $table->text('content');
        $table->timestamps();
    });
}
php artisan migrateコマンドでテーブルの作成を行います。
% php artisan migrate

   INFO  Running migrations.

  2024_08_06_065522_create_blogs_table ............ 4.57ms DONE
Blogテーブルへのデータ登録ができるようにBlog.phpファイルに追加した列の情報を追加します。
class Blog extends Model
{
    use HasFactory;

    protected $fillable = [
        'title',
        'content'
    ];
}
ルーティングの追加
/blogsにアクセスするとブラウザ上にブログ一覧が表示されるようにルーティングファイルweb.phpにルーティングを追加します。
use App\Http\Controllers\BlogController;
//
Route::get('/blogs', [BlogController::class, 'index'])
    ->name('blog.index')
    ->middleware('auth');
/blogsにアクセスするとBlogControllerのindexメソッドが実行されます。nameメソッドでルーティングに名前を付けています。リンク設定時に付与した名前を利用することで/blogsのURLが変わってもリンク設定側での変更が不必要になります。設定方法については後ほど実際にリンクを設定時に確認します。middlewareでauthを設定することでアクセス制限を行っています。ログインが完了していないユーザには/blogsにアクセスすることはできません。
middlewareの行を削除することでログインが完了していないユーザでもアクセスすることが可能になります。
use App\Http\Controllers\BlogController;
//
Route::get('/blogs', [BlogController::class, 'index'])
    ->name('blog.index');
リンクの設定
ログイン後には/dashboardにリダイレクトすることを確認したのでダッシュボードページから/blogsにアクセスできるようにリンクの設定を行います。
/dashboardにアクセスした場合に表示される内容はどのように記述されているのかはweb.phpファイルのルーティングを使って確認することができます。web.phpに記述されているルーティングからDashboardがrenderされていることがわかります。これはresouces¥js¥Pagesフォルダの下にあるDashboard.jsxファイルに対応します。
Route::get('/dashboard', function () {
    return Inertia::render('Dashboard');
})->middleware(['auth', 'verified'])->name('dashboard');
Dashboard.jsxファイルを開くとAuthenticatedLayoutコンポーネントによってラップされていることがわかります。AuthenticatedLayoutファイルの内容については本文書では説明しませんがログインしたユーザに表示されるページのレイアウトファイルとして利用されます。ヘッダーやフッターなどの情報がこのファイルに含まれています。
import AuthenticatedLayout from '@/Layouts/AuthenticatedLayout';
import { Head } from '@inertiajs/react';

export default function Dashboard({ auth }) {
    return (
        <AuthenticatedLayout
            user={auth.user}
            header={<h2 className="font-semibold text-xl text-gray-800 leading-tight">Dashboard</h2>}
        >
            <Head title="Dashboard" />

            <div className="py-12">
                <div className="max-w-7xl mx-auto sm:px-6 lg:px-8">
                    <div className="bg-white overflow-hidden shadow-sm sm:rounded-lg">
                        <div className="p-6 text-gray-900">You're logged in!</div>
                    </div>
                </div>
            </div>
        </AuthenticatedLayout>
    );
}
Authenticated.jsファイルを開いてNavLinkタブを見つけてください。これがダッシュボードの上部に表示されているDashboadへのリンクです。NavLinkを参考にweb.phpファイルのnameメソッドで指定したblog.indexを使ってNavLinkを追加します。
<div className="hidden space-x-8 sm:-my-px sm:ml-10 sm:flex">
    <NavLink
        href={route("dashboard")}
        active={route().current("dashboard")}
    >
        Dashboard
    </NavLink>
    <NavLink
        href={route("blog.index")}
        active={route().current("blog.index")}
    >


                                    Dashboard


    </NavLink>
</div>
設定後”npm run dev”コマンドを実行してViteの起動を行います。”npm run dev”コマンドを実行しないと更新した内容が画面に反映されません。デフォルトではプロジェクト作成中に実行されたビルドの内容が表示されています。
 % npm run dev

> dev
> vite


  VITE v5.3.5  ready in 330 ms

  ➜  Local:   http://localhost:5173/
  ➜  Network: use --host to expose
  ➜  press h + enter to show help

  LARAVEL v11.19.0  plugin v1.0.5
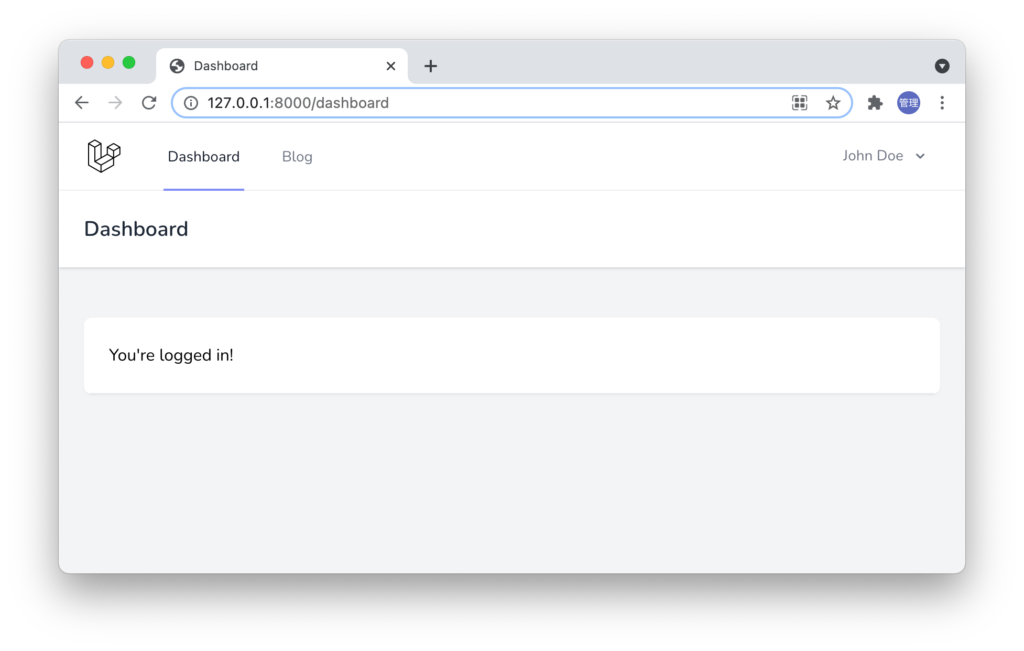
NavLinkを追加すると上部のDashboardの横に設定したBlogが表示されます。更新したにも関わらずブラウザ上の表示が変わらない場合はnpm run watchコマンドを実行してください。jsファイルを更新した時はリビルドが必要となるため忘れずに実行してください。
ここでBlogのリンクをクリックすると画面上に何も変化はありません。これはBlogControllerのindexメソッドに何もコードが記述されていないためです。
Indexページの作成
BlogControllerのindexメソッドが実行されるとrender関数を使ってBlog/Indexの内容が表示されるように下記のコードを追加します。
//略
use Inertia\Inertia;

class BlogController extends Controller
{

    public function index()
    {
        return Inertia::render('Blog/Index');
    }
//略
指定したBlog/Indexに対応するIndex.jsxファイルは未作成なので¥resources¥js¥Pagesの下にBlogフォルダを作成し、その下にIndex.jsxファイルを作成します。Index.jsxファイルはDashBoard.jsxを参考に下記のように記述します。
import AuthenticatedLayout from "@/Layouts/AuthenticatedLayout";
import { Head } from "@inertiajs/react";

export default function Index({ auth }) {
    return (
        <AuthenticatedLayout
            user={auth.user}
            header={
                <h2 className="font-semibold text-xl text-gray-800 leading-tight">
                    Blog
                </h2>
            }
        >
            <Head title="Blog Index" />

            <div className="py-12">
                <div className="max-w-7xl mx-auto sm:px-6 lg:px-8">
                    <div className="bg-white overflow-hidden shadow-sm sm:rounded-lg">
                        <div className="p-6 text-gray-900">Blog Index</div>
                    </div>
                </div>
            </div>
        </AuthenticatedLayout>
    );
}
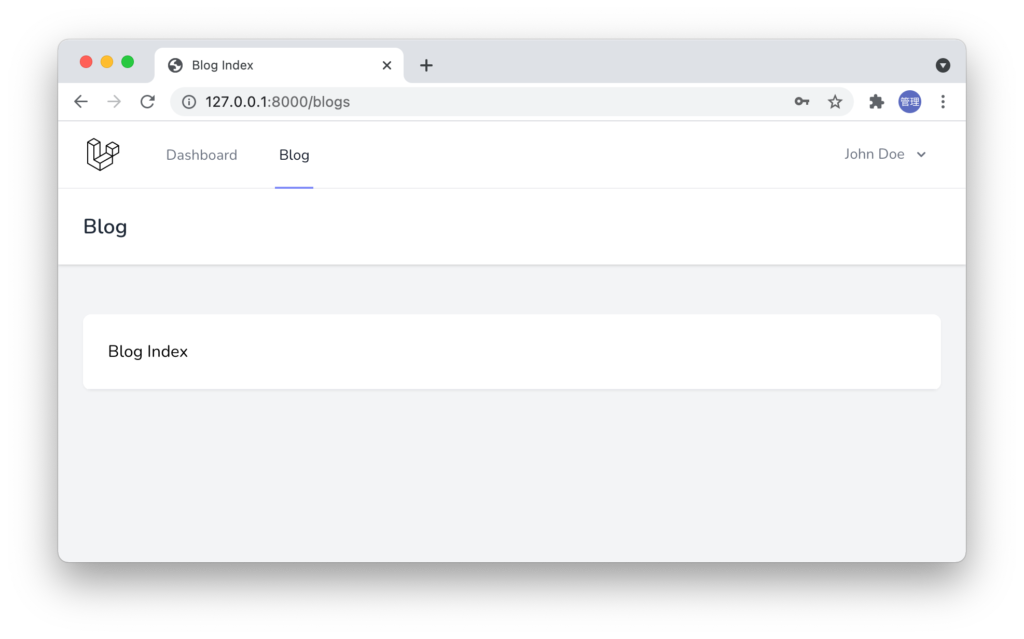
再度blogのリンクをクリックすると設定した内容が表示されます。
ダミーデータの挿入
/blogsにアクセスするとブログ一覧が表示されるようにblogテーブルにダミーデータの登録を行います。ダミーデータを挿入するためのSeeding機能に必要なFactoryファイルはモデル作成時に一緒に作成しているのでdatabase¥factoriesフォルダの中にBlogFactory.phpファイルが作成されているはずです。BlogFactory.phpファイルを開いてdefinition関数にダミーデータの定義を行います。
public function definition(): array
{
    return [
        'title' => $this->faker->sentence,
        'content' => $this->faker->text,
    ];
}
定義が完了したらdatabase¥seedersフォルダにあるDatabaseSeeder.phpファイルに下記の設定を行います。Seedingを実行すると10件のダミーデータがBlogfactory.phpファイルで定義した内容によって作成されます。
public function run(): void
{
    \App\Models\Blog::factory(10)->create();
}
設定が完了したらphp artisan db:seedコマンドでダミーデータの挿入を行います。
 % php artisan db:seed

   INFO  Seeding database.
Blogデータの一覧表示
blogテーブルに保存したデータはBlogController.phpファイルのindexメソッドの中で取得してpropsとしてBlog/Indexに渡します。
public function index()
{
    return Inertia::render('Blog/Index',['blogs' => Blog::all()]);
}
propsで受け取ったblogsはmap関数を利用して展開しテーブル要素として表示させます。
import AuthenticatedLayout from "@/Layouts/AuthenticatedLayout";
import { Head } from "@inertiajs/react";

export default function Index({ auth, blogs }) {
    return (
        <AuthenticatedLayout
            user={auth.user}
            header={
                <h2 className="font-semibold text-xl text-gray-800 leading-tight">
                    Blog
                </h2>
            }
        >
            <Head title="Blog Index" />

            <div className="py-12">
                <div className="max-w-7xl mx-auto sm:px-6 lg:px-8">
                    <div className="p-6 bg-white border-b border-gray-200">
                        <table>
                            <thead>
                                <tr>
                                    <th>タイトル</th>
                                    <th>コンテンツ</th>
                                </tr>
                            </thead>
                            <tbody>
                                {blogs.map((blog) => {
                                    return (
                                        <tr key={blog.id}>
                                            <td className="border px-4 py-2">
                                                {blog.title}
                                            </td>
                                            <td className="border px-4 py-2">
                                                {blog.content}
                                            </td>
                                        </tr>
                                    );
                                })}
                            </tbody>
                        </table>
                    </div>
                </div>
            </div>
        </AuthenticatedLayout>
    );
}
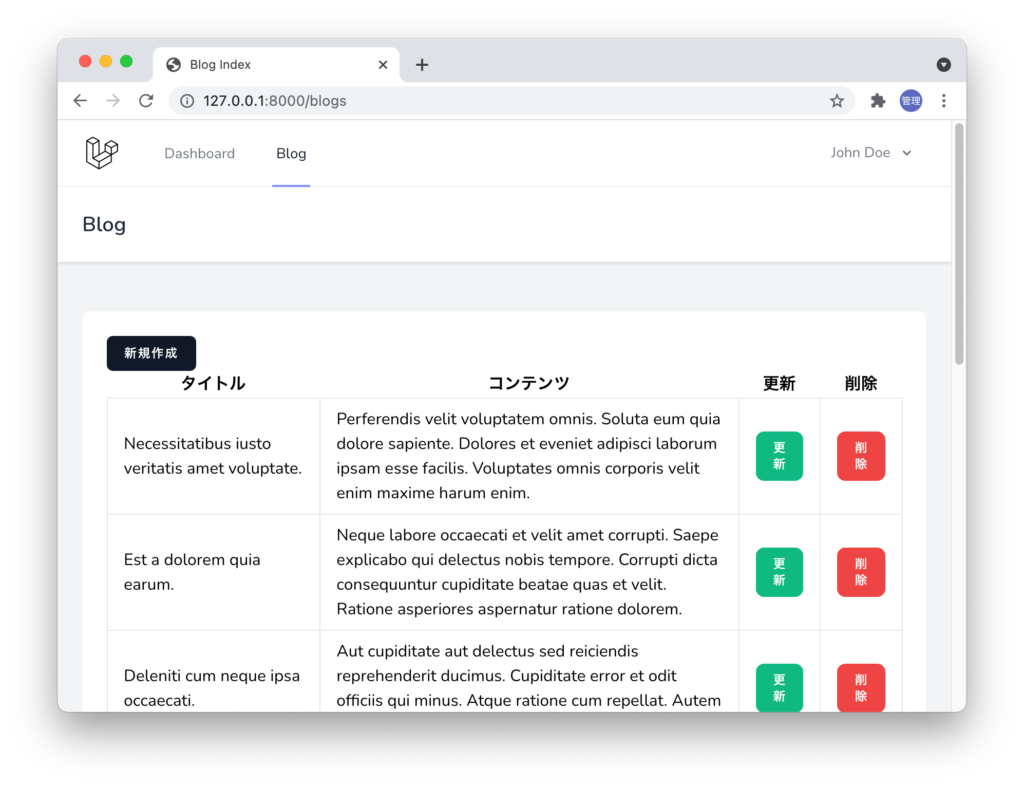
ブラウザで確認するとBlogデータの一覧が表示されることが確認できます。
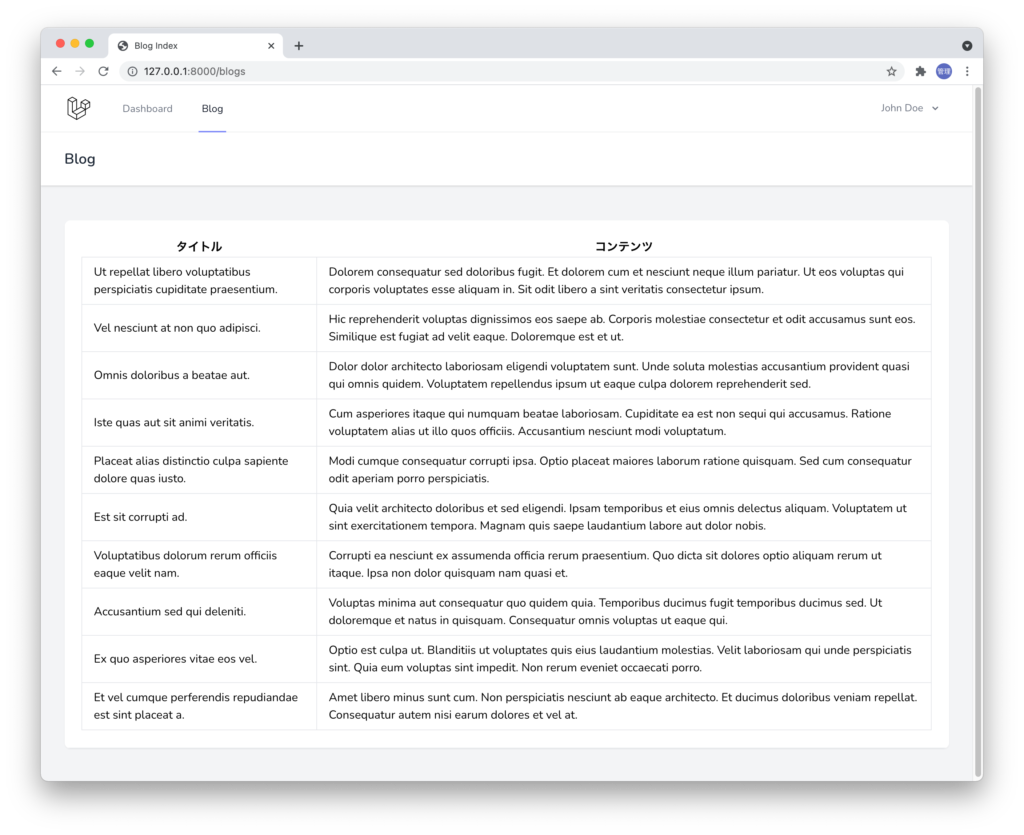
IneratiaとReactを利用してブラウザ上にデータを表示させる方法を理解することができました。
CRUDの処理
データの作成
一覧表示したデータはLaravelのSeeding機能を利用して一括で作成しましたがここから入力フォームを利用してデータの作成ができるようにコードを追加していきます。
ルーティングの追加
入力フォームのページを表示するためにはルーティングを追加する必要があります。ルーティングファイルweb.phpを開いて/blogsで設定していたルーティングをgetメソッドだけではなくpost, delete, put, updateメソッドでも利用できるようにgetからreroucesに変更を行い、createメソッドを追加します。
Route::resource('/blogs', BlogController::class)
    ->middleware(['auth']);
php artisan route:listコマンドを利用するとルーティングに設定された名前を確認することができます。AuthenticatedLayout.jsxファイルで設定したblog.indexをblogs.indexに変更します。
% php artisan route:list

  GET|HEAD        / ......................................................................................
  GET|HEAD        blogs .................. blogs.index › BlogController@index
  POST            blogs ...................... blogs.store › BlogController@store
  GET|HEAD        blogs/create ....... blogs.create › BlogController@create
  GET|HEAD        blogs/{blog} ....... blogs.show › BlogController@show
  PUT|PATCH       blogs/{blog} ...... blogs.update › BlogController@update
  DELETE          blogs/{blog} ......... blogs.destroy › BlogController@destroy
//略
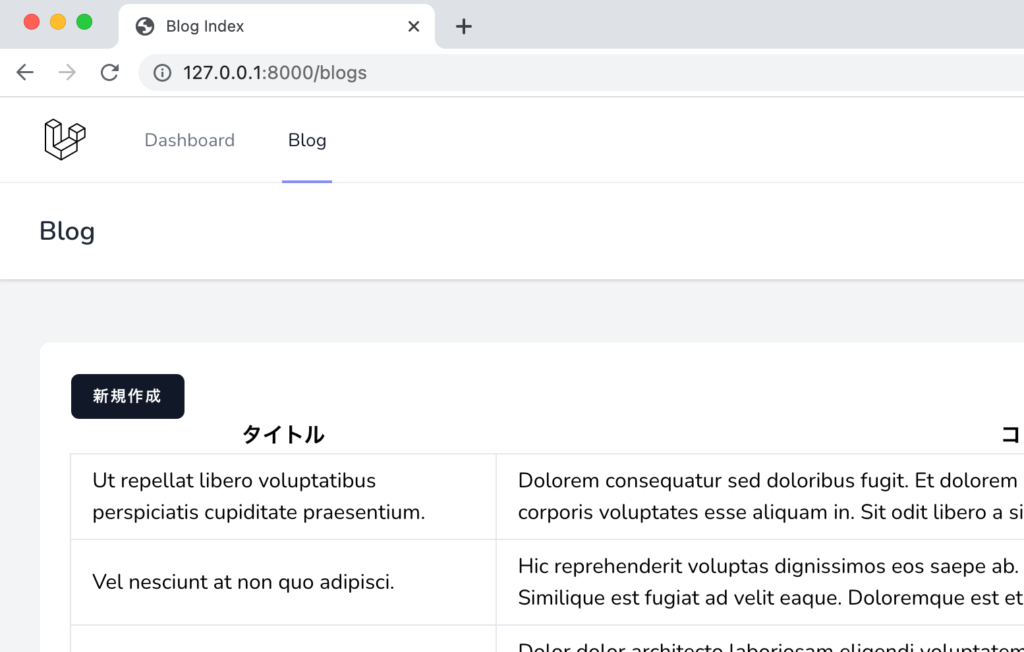
新規作成ボタンを追加
Blog/Index.jsファイルに新規作成ボタンを追加し、ボタンをクリックすると入力フォームのページに移動するようにリンクを設定します。リンク先はルーティングファイルに追加したBlogControlllerのcreateメソッドです(/blogs/create)。
新規作成ボタンはログイン画面で利用していたPrimaryButtonコンポーネントを再利用します。リンクについても@inertiajs/reactのLinkを利用します。ボタンはtable要素の上に追加します。利用するコンポーネントは忘れずにimportしておきます。
import PrimaryButton from "@/Components/PrimaryButton";
import AuthenticatedLayout from "@/Layouts/AuthenticatedLayout";
import { Head, Link } from "@inertiajs/react";

//略

<Head title="Blog Index" />

<div className="py-12">
    <div className="max-w-7xl mx-auto sm:px-6 lg:px-8">
        <div className="p-6 bg-white border-b border-gray-200">
            <div>
                <Link href={route("blogs.create")}>
                    <PrimaryButton type="button">
                        新規作成
                    </PrimaryButton>
                </Link>
            </div>
            <table>
                <thead>
//略
設定が完了するとBlog/Indexのデータ一覧のテーブルの上に新規作成ボタンが表示されます。新規作成ボタンをクリックすることはできますがクリックしても行き先であるBlogController.phpファイルにcreateメソッドの中身が記述されていないため何も変化はありません。
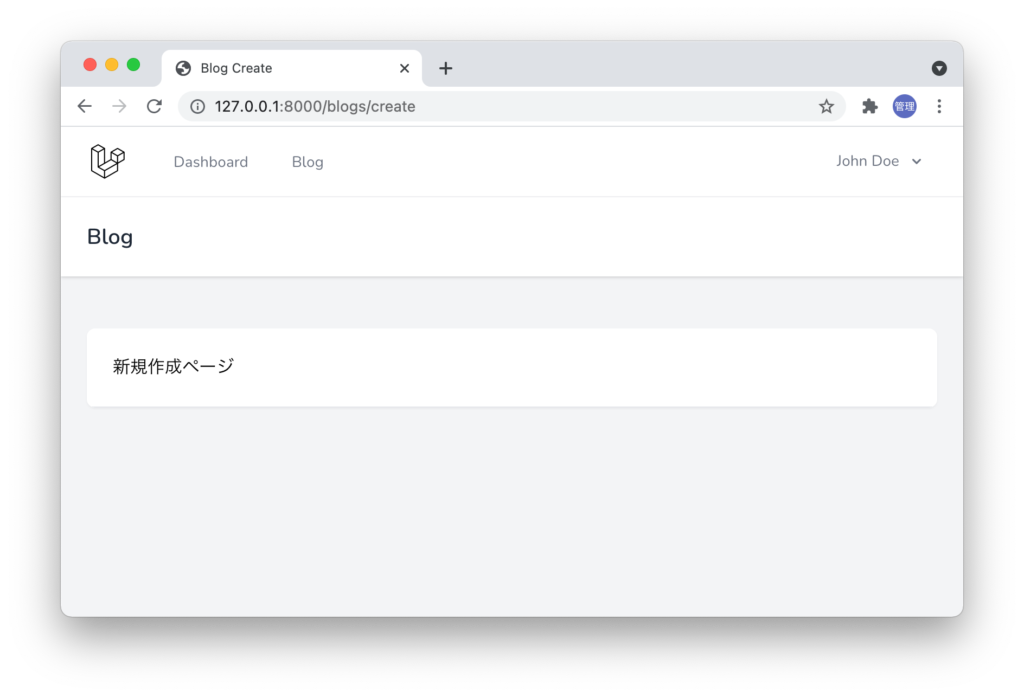
createページの作成
BlogController.phpファイルを開いてcreateメソッドを追加します。createメソッドが実行されるとrender関数で指定しているBlog/Createの中身が表示されます。
public function create()
{
    return Inertia::render('Blog/Create');
}
renderメソッドで指定したBlog/Createに対応するCreate.jsxファイルをIndex.jsxファイルと同様にresouces¥js¥Pages¥Blogの下に作成します。Index.jsxファイルを元にCreate.jsxファイルを作成します。
import AuthenticatedLayout from "@/Layouts/AuthenticatedLayout";
import { Head } from "@inertiajs/react";

export default function Create({ auth, blogs }) {
    return (
        <AuthenticatedLayout
            user={auth.user}
            header={
                <h2 className="font-semibold text-xl text-gray-800 leading-tight">
                    Blog
                </h2>
            }
        >
            <Head title="Blog Index" />

            <div className="py-12">
                <div className="max-w-7xl mx-auto sm:px-6 lg:px-8">
                    <div className="bg-white overflow-hidden shadow-sm sm:rounded-lg">
                        <div className="p-6 bg-white border-b border-gray-200">
                            新規作成ページ
                        </div>
                    </div>
                </div>
            </div>
        </AuthenticatedLayout>
    );
}
作成後に新規作成ボタンをクリックすると下記のページが表示されます。
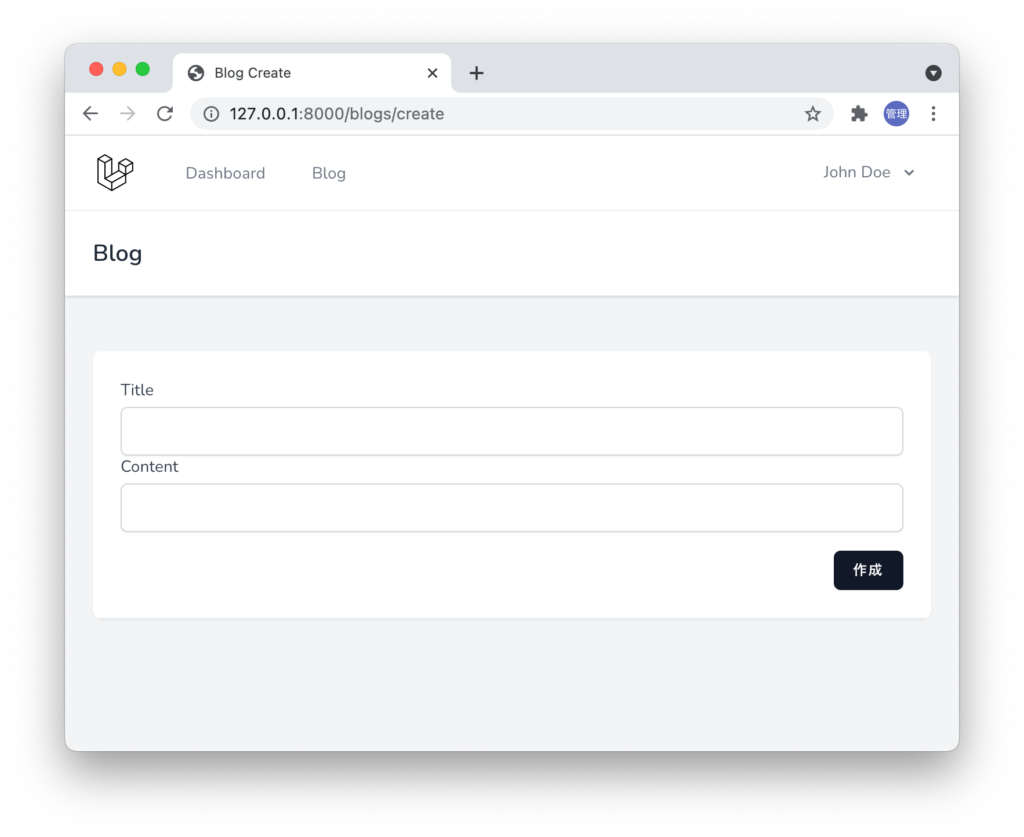
入力フォームの追加
作成したCreate.jsファイルに入力フォームを追加します。Login.jsファイルで入力フォームの作り方を確認していたのでそこで使われていたコンポーネントを利用しながら入力フォームを作成します。Login.jsxファイルを元に作成していきます。
import InputError from "@/Components/InputError";
import InputLabel from "@/Components/InputLabel";
import PrimaryButton from "@/Components/PrimaryButton";
import TextInput from "@/Components/TextInput";
import AuthenticatedLayout from "@/Layouts/AuthenticatedLayout";
import { Head, useForm } from "@inertiajs/react";

export default function Create({ auth, blogs }) {
    const { data, setData, post, processing, errors } = useForm({
        title: "",
        content: "",
    });

    const submit = (e) => {
        e.preventDefault();

        post(route("blogs.store"));
    };

    return (
        <AuthenticatedLayout
            user={auth.user}
            header={
                <h2 className="font-semibold text-xl text-gray-800 leading-tight">
                    Blog
                </h2>
            }
        >
            <Head title="Blog Create" />

            <div className="py-12">
                <div className="max-w-7xl mx-auto sm:px-6 lg:px-8">
                    <div className="bg-white overflow-hidden shadow-sm sm:rounded-lg">
                        <div className="p-6 bg-white border-b border-gray-200">
                            <form onSubmit={submit}>
                                <div>
                                    <InputLabel htmlFor="title" value="Title" />

                                    <TextInput
                                        type="text"
                                        name="title"
                                        value={data.title}
                                        className="mt-1 block w-full"
                                        autoComplete="title"
                                        isFocused={true}
                                        onChange={(e) =>
                                            setData("title", e.target.value)
                                        }
                                    />
                                    <InputError
                                        message={errors.title}
                                        className="mt-2"
                                    />
                                </div>
                                <div>
                                    <InputLabel
                                        htmlFor="content"
                                        value="Content"
                                    />

                                    <TextInput
                                        type="text"
                                        name="content"
                                        value={data.content}
                                        autoComplete="content"
                                        className="mt-1 block w-full"
                                        onChange={(e) =>
                                            setData("content", e.target.value)
                                        }
                                    />
                                    <InputError
                                        message={errors.content}
                                        className="mt-2"
                                    />
                                </div>
                                <div className="flex items-center justify-end mt-4">
                                    <PrimaryButton
                                        className="ml-4"
                                        disabled={processing}
                                    >
                                        作成
                                    </PrimaryButton>
                                </div>
                            </form>
                        </div>
                    </div>
                </div>
            </div>
        </AuthenticatedLayout>
    );
}

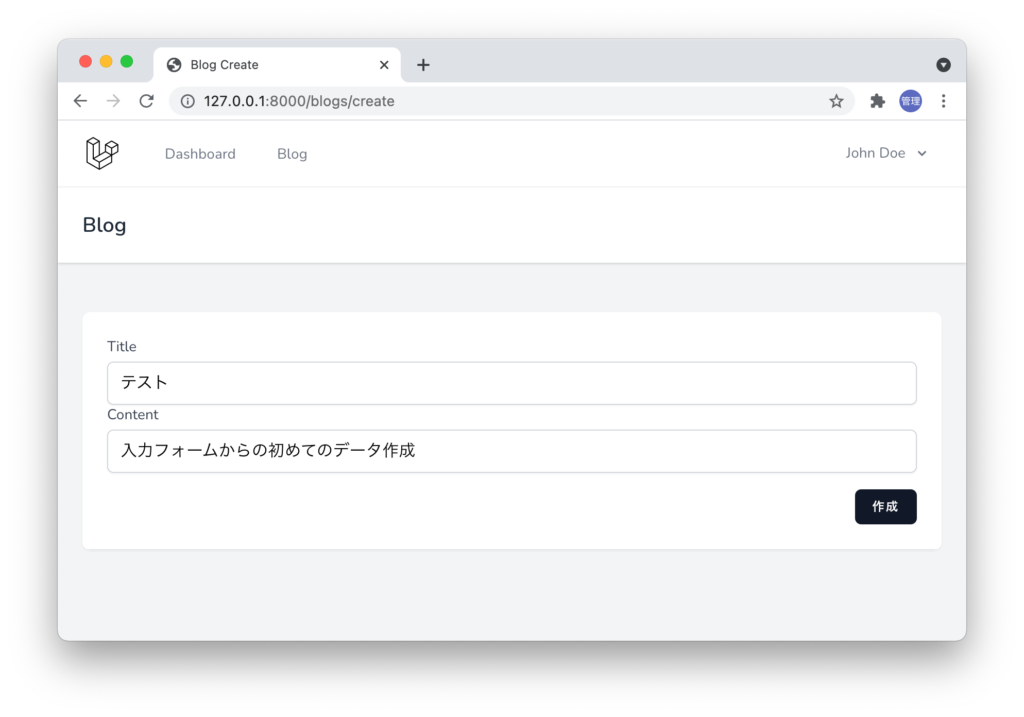
ブラウザで確認すると入力フォームが表示されます。
作成したCreate.jsxファイルの中身を確認していきます。
Login.jsxと同様に@inertiajs/reactのuseFormを利用しています。blogデータを作成するために必要となるデータはtitle, contentなのでuseFormの引数にtitleとcontentを持つオブジェクトを設定しています。初期値はどちらもブランクにしています。
const { data, setData, post, processing, errors } = useForm({
    title: "",
    content: "",
});
input要素にはTextInputコンポーネントを利用しています。useFormのdataにはtitleとcontentの値が入っているのでdata.titleでtitleの値にアクセスを行えるためvalueの値として設定しています。propsのisFocusedをtureに設定するとページを開いた時にこの要素に自動でフォーカスが当てられます。
<TextInput
    type="text"
    name="title"
    value={data.title}
    className="mt-1 block w-full"
    autoComplete="title"
    isFocused={true}
    onChange={(e) =>
        setData("title", e.target.value)
    }
/>
onSubmitイベントが設定されているのでボタンをクリックするとsubmit関数が実行されます。
<form onSubmit={submit}>
submitを実行すると通常はページのリロードが行わます。ページのリロードを避けるためpreventDefaultを設定しています。useFormのpostにPOSTリクエストを送信する場所を指定します。useFormを利用しているためpost関数を使うことでtitle, contentを含むデータがPOSTリクエストと一緒に送信されます。送信先のblog.storeはこの後に作成します。
const submit = (e) => {
    e.preventDefault();

    post(route("blogs.store"));
};
作成ボタンにはButtonコンポーネントを利用しています。Buttonコンポーネントのtype属性の値のデフォルト値はsubmitなのでボタンをクリックするとonSubmitイベントが発火されます。useFromのprocessingを利用することでPOSTリクエストの処理中はボタンがクリックできないように無効化しています。無効化により誤って複数回クリックするといったことが起こらないようになっています。
<PrimaryButton
    className="ml-4"
    disabled={processing}
>
    作成
</PrimaryButton>
useFormのerrorsとInputErrorコンポーネントを使いバリデーションエラーが発生した場合はエラーが表示されるようになっています。
<InputError
    message={errors.content}
    className="mt-2"
/>
データの作成処理
submit関数で指定したposts.storeに処理を追加するためにBlogController.phpファイルにstoreメソッドを追加します。
public function store(StoreBlogRequest $request)
{
    $request->validate([
        'title' => ['required'],
        'content' => ['required']
    ]);

    Blog::create($request->all());

    return redirect()->route('blogs.index');
}
StoreBlogRequestが設定されているのでRequests/StoreBlogRequest.phpファイルを開いてauthorize関数の戻り値をtrueに変更しておきます。falseのままだとリクエストを実行すると403Forbiddenのエラーが戻されます。
namespace App\Http\Requests;

use Illuminate\Foundation\Http\FormRequest;

class StoreBlogRequest extends FormRequest
{
    /**
     * Determine if the user is authorized to make this request.
     */
    public function authorize(): bool
    {
        return true;
    }

//略」
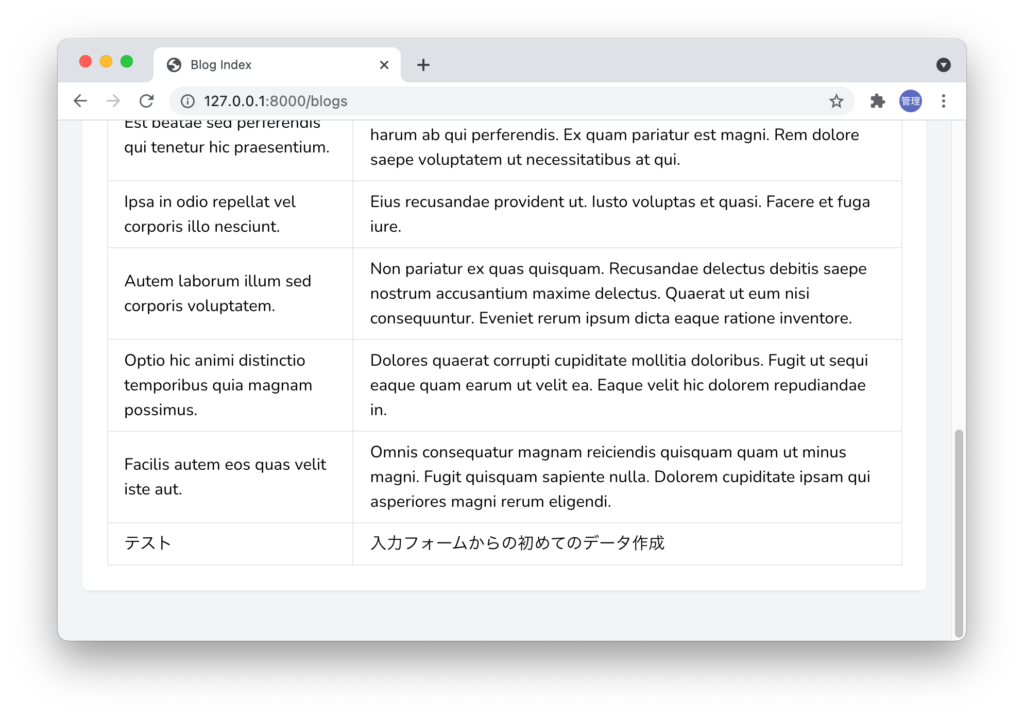
validateを使って送信されてきたデータのバリデーションを行います。どちらもrequiredに設定しているのでどちらも入力が必須となります。バリデーションをパスするとblogデータを作成し、データが一覧表示されるページのblog.indexにリダイレクトさせます。
作成ボタンをクリックするとリダイレクトが行われ最後の行に追加したデータが表示されることが確認できます。
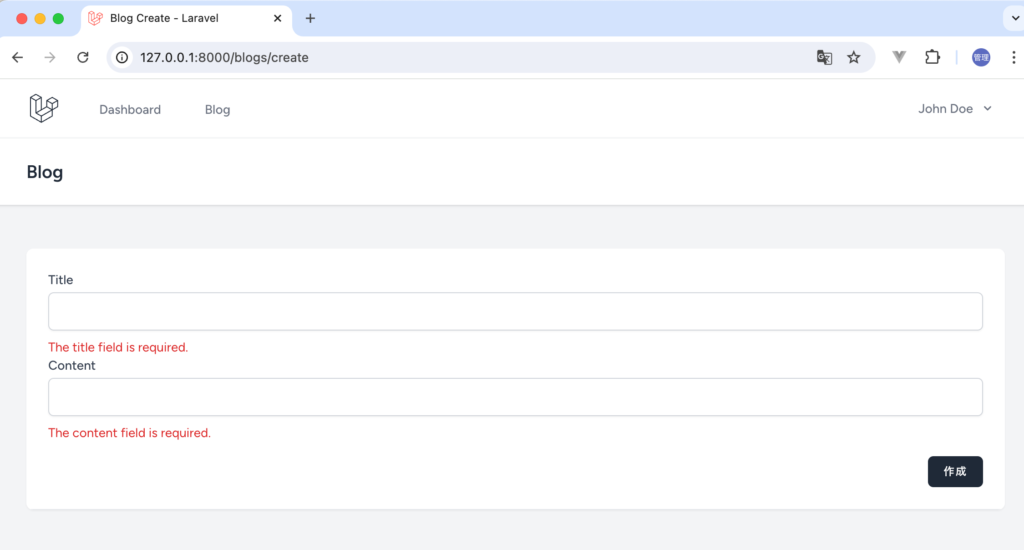
もしinput要素に何も入力せず作成ボタンをクリックした場合はバリデーションエラーが表示されます。
データ削除
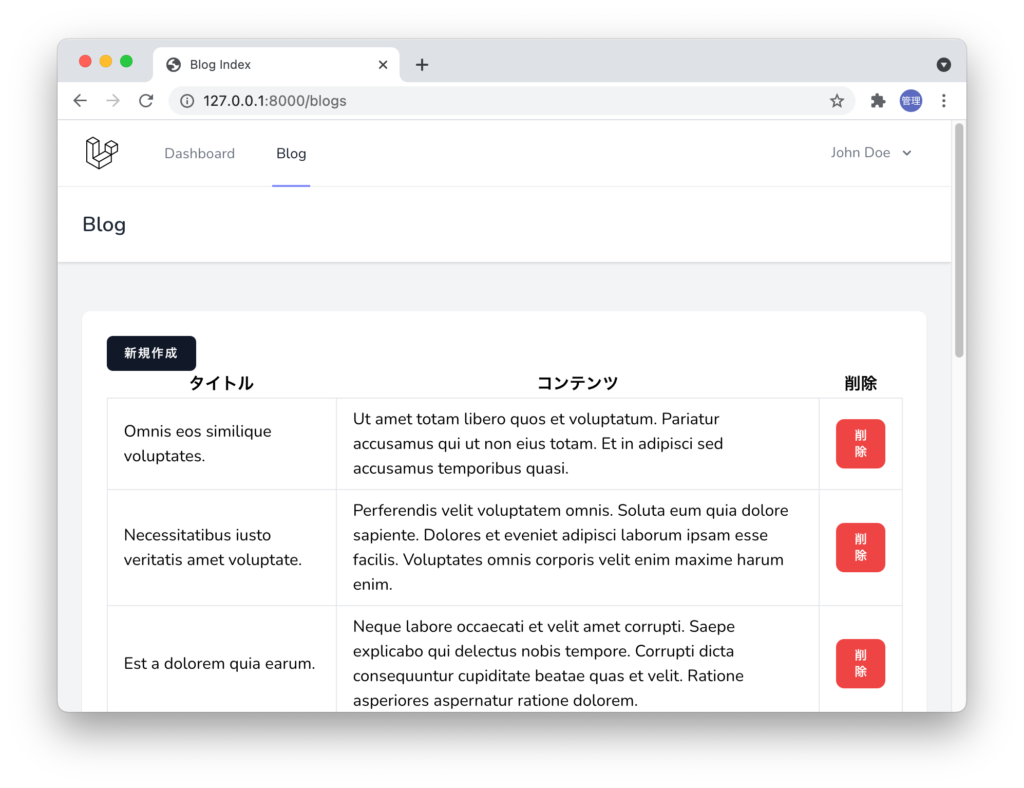
データ作成の機能を追加することができたので次は削除機能を追加します。Blog/Index.jsファイルのデータ一覧のテーブルに削除列と削除ボタンを追加します。ここではButtonコンポーネントは利用していません。
<table>
    <thead>
        <tr>
            <th>タイトル</th>
            <th>コンテンツ</th>
            <th>削除</th>
        </tr>
    </thead>
    <tbody>
        {blogs.map((blog) => {
            return (
                <tr key={blog.id}>
                    <td className="border px-4 py-2">
                        {blog.title}
                    </td>
                    <td className="border px-4 py-2">
                        {blog.content}
                    </td>
                    <td className="border px-4 py-2">
                        <button
                            className="px-4 py-2 bg-red-500 text-white rounded-lg text-xs font-semibold"
                            onClick={() =>
                                handleDelete(blog.id)
                            }
                        >
                            削除
                        </button>
                    </td>
                </tr>
            );
        })}
    </tbody>
</table>
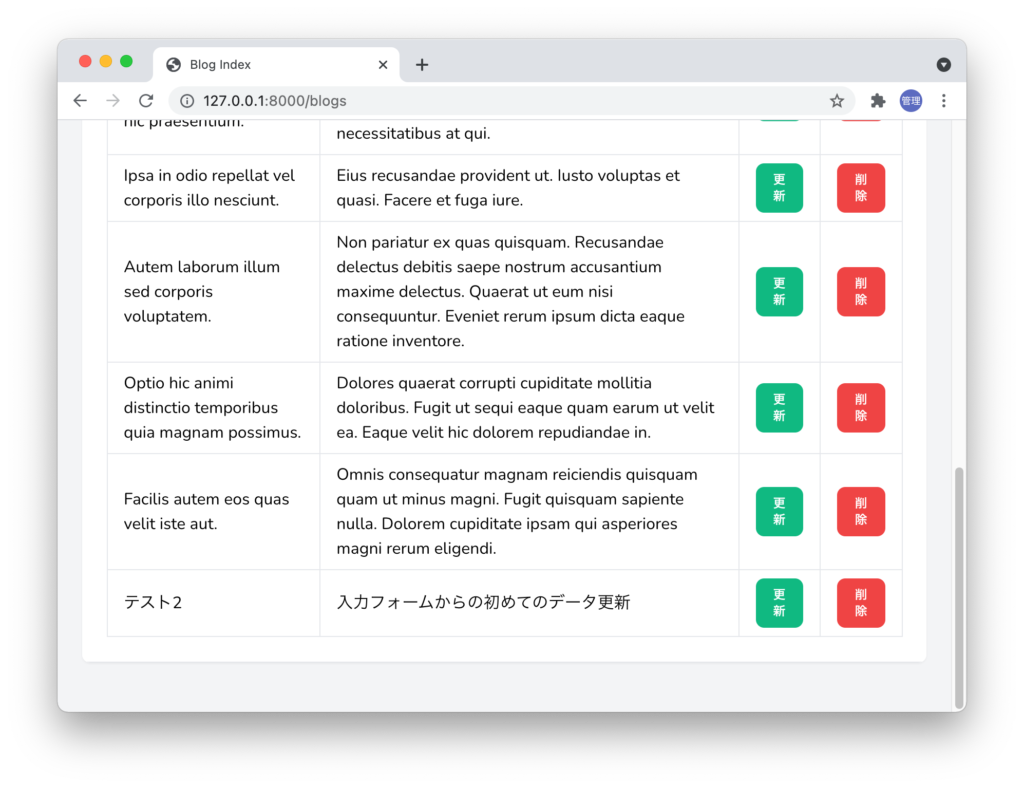
ブラウザで確認すると削除ボタンが表示されます。
削除ボタンにonClickイベントを設定しhandleDelete関数を設定します。引数にはどのデータを削除するのか識別するためにidを設定します。
<button
    className="px-4 py-2 bg-red-500 text-white rounded-lg text-xs font-semibold"
    onClick={() =>
        handleDelete(blog.id)
    }
>
    削除
</button>
handleDele関数の追加を行います。データを削除を行うためにDELETEリクエストを送信する必要があります。POSTリクエストでuseFormのpost関数を利用したようにDELETEリクエスト場合はuseFormのdestory関数を利用することができます。destory関数の第一引数にはroute関数を使ってリクエストの送信先であるblogs.destoryと削除するデータのidを設定しています。第2引数は必須ではありませんがpreserveScrollのtrueを設定することでデータ削除後にリダイレクトされてまた同じページにリダイレクトされた時にスクロール位置を削除ボタンを押した場所に戻してくれます。もし設定していない場合はページのトップから表示されることになります。
import PrimaryButton from "@/Components/PrimaryButton";
import AuthenticatedLayout from "@/Layouts/AuthenticatedLayout";
import { Head, Link, useForm } from "@inertiajs/react";

export default function Index({ auth, blogs }) {
    const { delete: destory } = useForm();
    const handleDelete = (id) => {
        destory(route("blogs.destroy", id), {
            preserveScroll: true,
        });
    };
//略
削除のリクエスト先であるblogs.destroyの設定を行うためBlogController.phpファイルのdestroy関数にコードを追加します。destroyメソッドの中ではblogデータを削除してblog.indexにリダイレクトしています。
public function destroy(Blog $blog)
{
    $blog->delete();

    return redirect()->route('blog.index');

}
設定完了後ブラウザ上から削除ボタンをクリックするとクリックした行のデータが削除されます。削除処理の実装は完了です。
データの更新処理
データの更新処理を行うためBlog/Index.jsファイルのテーブル要素に新たに更新ボタンを追加します。
import PrimaryButton from "@/Components/PrimaryButton";
import AuthenticatedLayout from "@/Layouts/AuthenticatedLayout";
import { Head, Link, useForm } from "@inertiajs/react";

export default function Index({ auth, blogs }) {
    const { delete: destory } = useForm();
    const handleDelete = (id) => {
        destory(route("blogs.destroy", id), {
            preserveScroll: true,
        });
    };
    return (
        <AuthenticatedLayout
            user={auth.user}
            header={
                <h2 className="font-semibold text-xl text-gray-800 leading-tight">
                    Blog
                </h2>
            }
        >
            <Head title="Blog Index" />

            <div className="py-12">
                <div className="max-w-7xl mx-auto sm:px-6 lg:px-8">
                    <div className="p-6 bg-white border-b border-gray-200">
                        <div>
                            <Link href={route("blogs.create")}>
                                <PrimaryButton type="button">
                                    新規作成
                                </PrimaryButton>
                            </Link>
                        </div>
                        <table>
                            <thead>
                                <tr>
                                    <th>タイトル</th>
                                    <th>コンテンツ</th>
                                    <th>更新</th>
                                    <th>削除</th>
                                </tr>
                            </thead>
                            <tbody>
                                {blogs.map((blog) => {
                                    return (
                                        <tr key={blog.id}>
                                            <td className="border px-4 py-2">
                                                {blog.title}
                                            </td>
                                            <td className="border px-4 py-2">
                                                {blog.content}
                                            </td>
                                            <td className="border px-4 py-2">
                                                <button className="px-4 py-2 bg-green-500 text-white rounded-lg text-xs font-semibold">
                                                    更新
                                                </button>
                                            </td>
                                            <td className="border px-4 py-2">
                                                <button
                                                    className="px-4 py-2 bg-red-500 text-white rounded-lg text-xs font-semibold"
                                                    onClick={() =>
                                                        handleDelete(blog.id)
                                                    }
                                                >
                                                    削除
                                                </button>
                                            </td>
                                        </tr>
                                    );
                                })}
                            </tbody>
                        </table>
                    </div>
                </div>
            </div>
        </AuthenticatedLayout>
    );
}
ブラウザで確認すると削除ボタンの横に更新ボタンが表示されます。
更新ボタンをクリックするとblogデータを更新するための入力フォームが表示できるように更新ボタンにLinkコンポーネントを利用してリンクを設定します。
<td className="border px-4 py-2">
    <Link
        href={route(
            "blogs.edit",
            blog.id
        )}
    >
        <button className="px-4 py-2 bg-green-500 text-white rounded-lg text-xs font-semibold">
            更新
        </button>
    </Link>
</td>
BlogController.phpファイルのedit関数にコードを追加します。render関数で指定したBlog/Editにpropsでblogデータを渡しています。
public function edit(Blog $blog)
{
    return Inertia::render('Blog/Edit',['blog' => $blog]);
}
Blog/Editに対応するファイルEdit.jsをresouces¥js¥Pages¥Blogの下に作成します。Create.jsファイルを元に作成します。 中身はCreate.jsとほとんど変わりませんがtitleとcontentの初期値はpropsで渡されるblogの値を利用しています。Create.jsの場合はsubmit関数の中でuseFormのpost関数を利用していましたが今度は更新なのでpost関数ではなくpatch関数を利用しています。
import InputError from "@/Components/InputError";
import InputLabel from "@/Components/InputLabel";
import PrimaryButton from "@/Components/PrimaryButton";
import TextInput from "@/Components/TextInput";
import AuthenticatedLayout from "@/Layouts/AuthenticatedLayout";
import { Head, useForm } from "@inertiajs/react";

export default function Edit({ auth, blog }) {
    const { data, setData, patch, processing, errors } = useForm({
        title: blog.title,
        content: blog.content,
    });

    const submit = (e) => {
        e.preventDefault();

        patch(route("blogs.update", blog.id));
    };

    return (
        <AuthenticatedLayout
            user={auth.user}
            header={
                <h2 className="font-semibold text-xl text-gray-800 leading-tight">
                    Blog
                </h2>
            }
        >
            <Head title="Blog Edit" />

            <div className="py-12">
                <div className="max-w-7xl mx-auto sm:px-6 lg:px-8">
                    <div className="bg-white overflow-hidden shadow-sm sm:rounded-lg">
                        <div className="p-6 bg-white border-b border-gray-200">
                            <form onSubmit={submit}>
                                <div>
                                    <InputLabel htmlFor="title" value="Title" />

                                    <TextInput
                                        type="text"
                                        name="title"
                                        value={data.title}
                                        className="mt-1 block w-full"
                                        autoComplete="title"
                                        isFocused={true}
                                        onChange={(e) =>
                                            setData("title", e.target.value)
                                        }
                                    />
                                    <InputError
                                        message={errors.title}
                                        className="mt-2"
                                    />
                                </div>
                                <div>
                                    <InputLabel
                                        htmlFor="content"
                                        value="Content"
                                    />

                                    <TextInput
                                        type="text"
                                        name="content"
                                        value={data.content}
                                        autoComplete="content"
                                        className="mt-1 block w-full"
                                        onChange={(e) =>
                                            setData("content", e.target.value)
                                        }
                                    />
                                    <InputError
                                        message={errors.content}
                                        className="mt-2"
                                    />
                                </div>
                                <div className="flex items-center justify-end mt-4">
                                    <PrimaryButton
                                        className="ml-4"
                                        disabled={processing}
                                    >
                                        更新
                                    </PrimaryButton>
                                </div>
                            </form>
                        </div>
                    </div>
                </div>
            </div>
        </AuthenticatedLayout>
    );
}
patchリクエストの送信先であるblogs.updateを設定するためにBlogController.phpファイルにupdate関数を追加します。送信されてきたデータのバリデーションを行い、バリデーションにパスしたらデータを更新し、blogs.indexにリダイレクトしています。
public function update(UpdateBlogRequest $request, Blog $blog)
{
    $request->validate([
        'title' => ['required'],
        'content' => ['required']
    ]);

    $blog->update($request->all());

    return redirect()->route('blogs.index');
}
UpdateBlogRequest.phpファイルのauthorize関数の戻り値をfalseからtrueに変更します。
namespace App\Http\Requests;

use Illuminate\Foundation\Http\FormRequest;

class UpdateBlogRequest extends FormRequest
{
    /**
     * Determine if the user is authorized to make this request.
     */
    public function authorize(): bool
    {
        return true;
    }
//略
BlogController.phpファイルのupdate関数にコードを追加後、データ一覧ページから先程作成したデータの更新ボタンをクリックしてください。
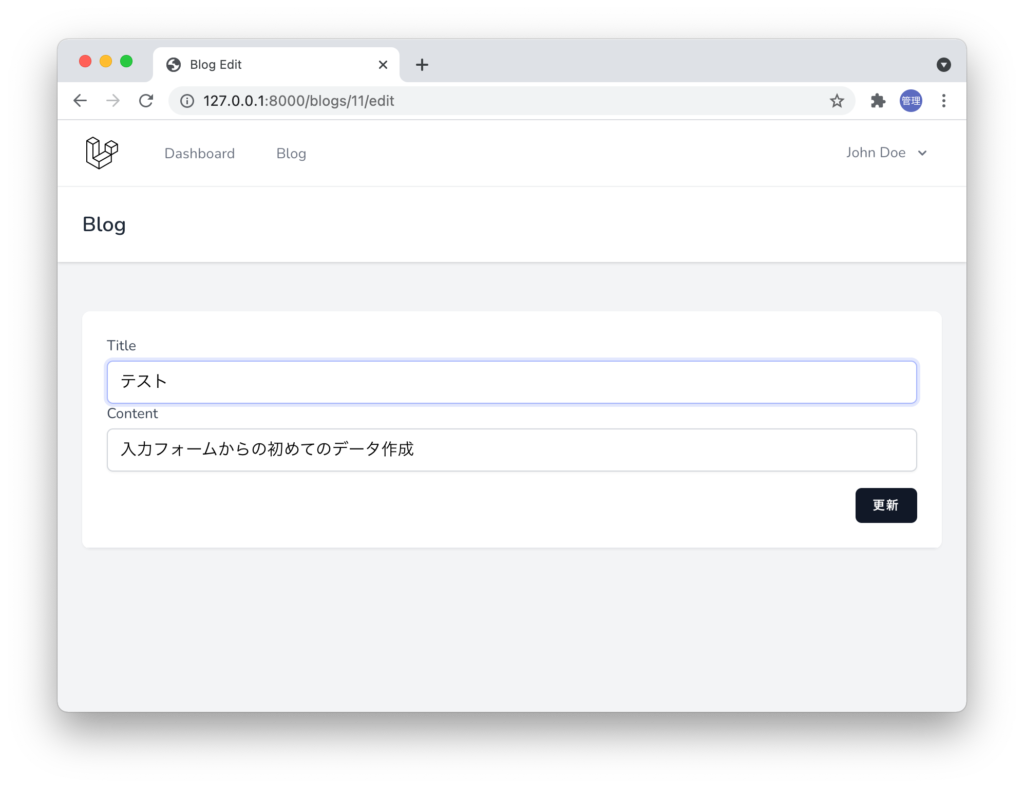
TitleまたはContetの内容を変更して更新ボタンをクリックしてください。
ここではTitleとContetのどちらも更新したのでリダイレクト後にデータ一覧ページで更新されたデータを確認することができます。
これでアプリケーションを構築する際のCRUDをLaravel+ Inertia + React環境で行えるようになりました。Inertia + Reactでどのようにコードを記述すればいいのか基本的な理解は深まったと思うのでぜひより大規模なアプリケーションの作成にチャレンジしてみてください。