Laravel Jetstream入門 Livewire編

Laravel8/Laravel9/Laravel10ではJetstreamをインストールする際にLivewireかInertiaを選択する必要があります。Livewireを選択し、インストール完了後に何をしていいのかわからないまたLivewireはLaravelのどこでどのように利用されているのか知りたいという人も多いかと思います。Laravelの中でLivewireがどのように利用されているかを理解するためにはLivewireの他に比較的新しい2つの技術を知っておく必要があります。そのため初めてLaravelを使う人だけではなくLaravelの初級者にとっても少しハードルが高いかもしれません。
- Blade Components
- AlpineJS
上記2つ技術とLivewireを加えた3つの技術を学ぶ余裕もそんな気分でもないと諦める人も多いかもしれませんが目まぐるしく変化するプログラミングの世界ではその気持ちのせいで時代に取り残されてしまいます。フロントエンドではVue.jsやReactを利用したInertiaを利用するのでLivewireは必要ないというのではなくぜひLivewire, Blade Components, Alpine.jsにチャレンジしてみてください。新しいものにチャレンジした結果、何かが得られるかもしれません。

Livewireってどこで利用されているの?
LaraveのJetStreamはユーザ認証機能だけではなくユーザのプロファイル管理機能も備えています。登録ユーザは自分自身のユーザ名、Emailアドレスやパスワードだけではなくプロファイル画像の設定/更新も行うことができます。それらのユーザのプロファイル設定画面がLivewireを利用して構築されています。
JetStreamをインストール時LivewireではなくInertiaを選択することができます。Inertiaを選択した場合はInertiaを利用してユーザのプロファイル管理画面が構築されています。

そのためJetstreamを利用した場合、ユーザのプロファイル画面がどのように作成されているのか、プロファイル画面を更新しデフォルトのデザインを変更するためにはLivewireかIneriaを理解しておく必要があります。
下記画面ユーザログイン後にアクセスできるプロファイル画面の一部です。
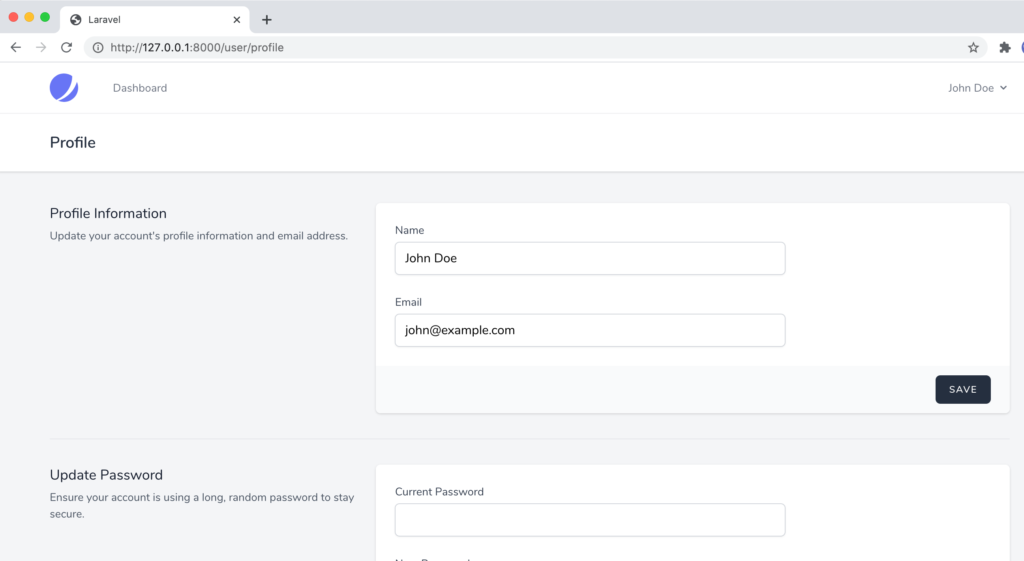
NameとEmailなどユーザ自身が変更を行うことができ、変更をするための処理や表示処理はすべてLivewireが使われています。LivewireはPHPを使って記述します。PHPを使ったアプリケケーションを構築した場合、ページをリロードすることなく動的にページの内容を更新するためにはJavaScriptが必要となります。しかしLivewireを利用することでJavaScriptを使うことなくPHPのみでJavaScriptのような動的なページを作成することができます。Profile画面でnameを変更して”Saveボタン”をクリックするとページのリロードは行われませんが名前の変更は反映されます。
Livewireのインストール
Livewireは単独のパッケージなのでLivewireのみインストールすることができます。Livewireを単独でインストールしてLivewireの動作確認を行いたい人は下記を参考にしてください。
プロジェクト作成時にLaravelと同時にJestream+Livewireをインストールしたい場合は–jetオプションをつけてプロジェクトの作成を行います。
% laravel new laravel_jetstream --jet
上記のコマンドを実行した場合はstackにinertiaかlivewireのどちらを選択するか聞かれるのでlivewireを選択してください。teamsを利用するかも聞かれます。teamsはデフォルトでは”no”に設定されています。
Laravelプロジェクト作成後にJetstreamをインストールする場合は、composerコマンドでJetstreamをインストールしてからphp artisanコマンドでlivewireのインストールを行います。
% composer require laravel/jetstream
% php artisan jetstream:install livewire
Livewireを体感してみよう
Laravel10とJetstreamをインストール後にデータベースの設定等を各自で行いユーザの登録ができる状態にしてください。本文書ではSQLiteを利用しています。
ユーザ登録または登録したユーザでのログインが完了するとDashboard画面が表示されます。右上のユーザ名をクリックするとドロップダウンメニューが表示されるのでProfileを選択してください。
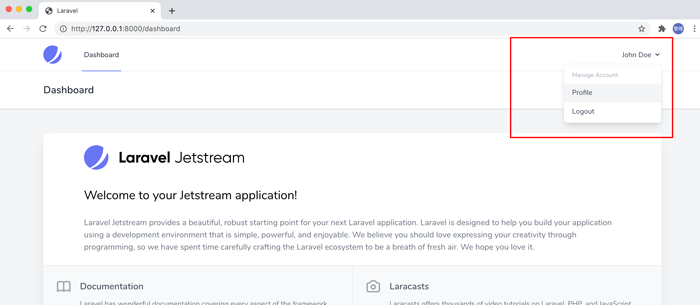

ユーザ名やメールアドレスのプロファイル情報が表示されるだけではなく画面上でプロファイル情報の更新を行うことができます。

Livewireを体感するためにNameを変更し、”SAVE”ボタンをクリックしてください。
”SAVE”ボタンを押すとページをリロードすることなくNameが更新され、ボタンの左側に”Saved.”と文字列が表示されゆっくりと決めます。また右上の名前が入力した値(John Doeからカタカナのジョンドー)に変更されます。
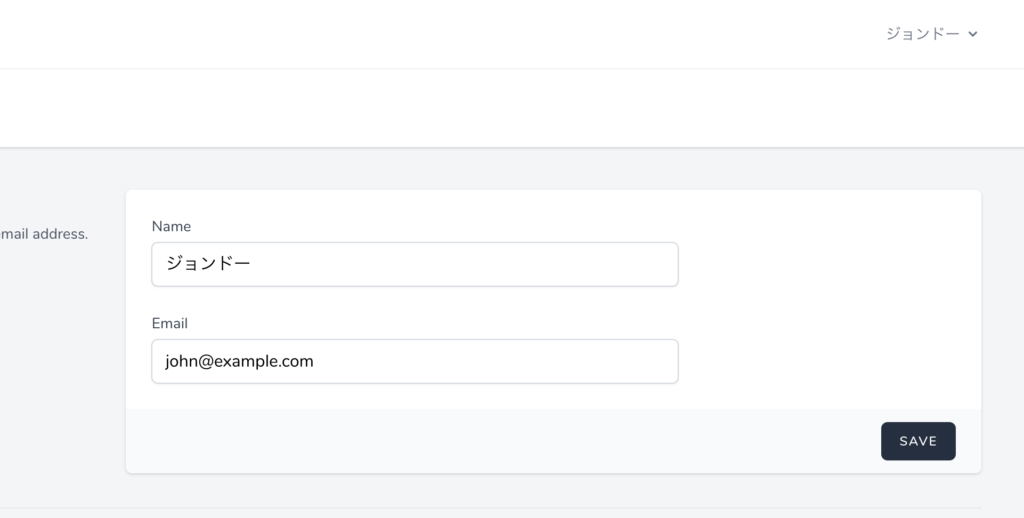

VuejsやReactなどのJavaScriptを利用してユーザインターフェイスを作成している人にとってこのような動作は驚くことではありませんがこの機能の大半はPHPを利用して行われています。
PHPの知識しかないためJavaScriptのような動きのあるページを作成できなかったPHP開発者もLivewireのおかげでJavaScriptで作ったような動きのあるページを作成することが可能となります。つまりフロントエンドもバックエンドもPHPで作成することができるのです。
PHPを使ってどのようにして動的なページが作成できるのかコードの確認を行っていきます。
プロファイル画面
Livewireを使ってどのようにコードを記述しているかはJetstreamインストール後にアクセスできるページを確認する必要があります。本文書ではプロファイル画面を確認していきます。
先ほどLivewireを体感するためにアクセスしたプロファイル画面のURLは/user/profileです。
実行されるファイルの確認方法
/user/profileにアクセスした際に実行される処理を確認する方法を本文書では2つ紹介します。
1つめの方法は、はphp artisan route:listコマンドです。実行すると画像が小さいのでわかりにくいですが、ルーティングに関する情報を確認することができます。

下記はLaravel8を利用した場合です。Laravel9では表示されるUIが変更になりましたが同じようにコントローラー名とメソッド名を確認することができます。Domain, Method, URI, Name, Action, Middleware列を持つテーブルが表示されます。表示されたURL列でuser/profileを見つけてください。見つけたらその行のAction列に表示されるコントローラー名とメソッド名を確認してください。
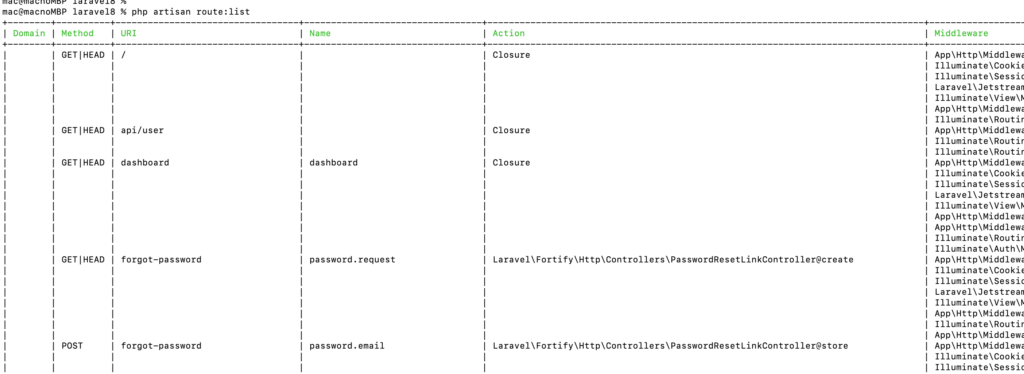
表示されている内容から/user/profileにアクセスした際に実行される処理はLaravel\Jetstream › UserProfileController@showであることが確認できます。
もう一つの確認方法はvendor¥laravel¥jetstrem¥routes¥livewire.phpファイルを利用します。livewire.phpファイルの中で/user/profileのルーティングが登録処理が記述されておりHTTPのGETメソッドでUserProfileControllerのshowメソッドが実行されることがわかります。
use Illuminate\Support\Facades\Route;
//略
use Laravel\Jetstream\Jetstream;

Route::group(['middleware' => config('jetstream.middleware', ['web'])], function () {
    if (Jetstream::hasTermsAndPrivacyPolicyFeature()) {
        Route::get('/terms-of-service', [TermsOfServiceController::class, 'show'])->name('terms.show');
        Route::get('/privacy-policy', [PrivacyPolicyController::class, 'show'])->name('policy.show');
    }

    $authMiddleware = config('jetstream.guard')
        ? 'auth:'.config('jetstream.guard')
        : 'auth';

    $authSessionMiddleware = config('jetstream.auth_session', false)
        ? config('jetstream.auth_session')
        : null;

    Route::group(['middleware' => array_values(array_filter([$authMiddleware, $authSessionMiddleware]))], function () {
        // User & Profile...
        Route::get('/user/profile', [UserProfileController::class, 'show'])->name('profile.show');
//略
異なる2つの方法を利用して/user/profileにアクセスするとUserProfileControllerのshowメソッドが実行されることがわかったのでUserProfileController.phpファイルを調べてきます。
ファイルはvendor/laravel/jetstream/src/Http/Controllers/Livewireの下に保存されています。
UserProfileControllerの確認
UserProfileController.phpを見るとshowメソッドではビューファイルのprofile.showが設定されています。
class UserProfileController extends Controller
{
    /**
     * Show the user profile screen.
     *
     * @param  \Illuminate\Http\Request  $request
     * @return \Illuminate\View\View
     */
    public function show(Request $request)
    {
        return view('profile.show', [
            'request' => $request,
            'user' => $request->user(),
        ]);
    }
}

/user/profileにアクセスするとprofile.show、つまりresources¥views¥profile¥show.blade.phpファイルの内容が表示されることになります。
次にshow.blade.phpファイルを開きます。
show.blade.phpファイルの先頭にある<x-app-layout>, <x-slot>, <x-jet-section-border />というタグを見て”x-”って何?と疑問を持った人はLivewireの前にBladeのComponentsを理解しておく必要があります。
<x-app-layout>
    <x-slot name="header">
        <h2 class="font-semibold text-xl text-gray-800 leading-tight">
            {{ __('Profile') }}
        </h2>
    </x-slot>

    <div>
        <div class="max-w-7xl mx-auto py-10 sm:px-6 lg:px-8">
            @if (Laravel\Fortify\Features::canUpdateProfileInformation())
                @livewire('profile.update-profile-information-form')

                <x-section-border />
            @endif

            @if (Laravel\Fortify\Features::enabled(Laravel\Fortify\Features::updatePasswords()))
                <div class="mt-10 sm:mt-0">
                    @livewire('profile.update-password-form')
                </div>

                <x-section-border />
            @endif
//略
Blade Componentsについて
x-を持つタグはBlade Componentsであることを表しており、x-app-layoutというタグはapp¥View¥Componentsディレクトリの下にあるAppLayout.phpファイルに対応します。x-app-layoutタグがAppLayout.phpに対応するということを理解するためにはBlade Componentsの2つのルールを知っておく必要があります。
- Blade Componentsのタグはクラスファイル名のケバブケースで先頭にx-がつきます。コンポーネントの名前がAppLayoutなのでタグはx-app-layoutになります。
- Blade ComponentsファイルはApp¥View¥Componentsに保存することでLaravelにより自動で認識されます。
この2つのルールによりx-app-layoutのコンポーネントファイルがapp¥View¥Components¥AppLayout.phpに対応することがわかります。
AppLayout.phpファイル
AppLayout.phpファイルを見るとrenderメソッドのviewでlayouts.appが設定されています。
このことにより、x-layout-appタグの中身がresources¥views¥layouts¥app.blade.phpファイルであることがわかります。app.blade.phpファイルを確認することでx-app-layoutタグを使って何を表示しているのかを理解することができます。
class AppLayout extends Component
{
    /**
     * Get the view / contents that represents the component.
     */
    public function render(): View
    {
        return view('layouts.app');
    }
}
livewireの設定
app.blade.phpファイルの中身はmeta情報を含んだヘッダーが含まれています。ヘッダー情報の記述に慣れている人も多いと思いますががapp.blade.phpファイルの中で何点か見慣れないタグの存在に気づくかと多います。見慣れないタグの中で重要なタグを確認していきましょう。
【Laravel10の場合】
<!DOCTYPE html>
<html lang="{{ str_replace('_', '-', app()->getLocale()) }}">
    <head>
        <meta charset="utf-8">
        <meta name="viewport" content="width=device-width, initial-scale=1">
        <meta name="csrf-token" content="{{ csrf_token() }}">

        <title>{{ config('app.name', 'Laravel') }}</title>

        <!-- Fonts -->
        <link rel="preconnect" href="https://fonts.bunny.net">
        <link href="https://fonts.bunny.net/css?family=figtree:400,500,600&display=swap" rel="stylesheet" />

        <!-- Scripts -->
        @vite(['resources/css/app.css', 'resources/js/app.js'])  //ここに注意

        <!-- Styles -->
        @livewireStyles  //ここに注意
    </head>
    <body class="font-sans antialiased">
        <x-banner />

        <div class="min-h-screen bg-gray-100">
            @livewire('navigation-menu')

            <!-- Page Heading -->
            @if (isset($header))
                <header class="bg-white shadow">
                    <div class="max-w-7xl mx-auto py-6 px-4 sm:px-6 lg:px-8">
                        {{ $header }}
                    </div>
                </header>
            @endif

            <!-- Page Content -->
            <main>
                {{ $slot }}  //ここに注意
            </main>
        </div>

        @stack('modals')

        @livewireScripts  //ここに注意
    </body>
</html>
【Laravel9の場合】
<!DOCTYPE html>
<html lang="{{ str_replace('_', '-', app()->getLocale()) }}">
    <head>
        <meta charset="utf-8">
        <meta name="viewport" content="width=device-width, initial-scale=1">
        <meta name="csrf-token" content="{{ csrf_token() }}">

        <title>{{ config('app.name', 'Laravel') }}</title>

        <!-- Fonts -->
        <link rel="stylesheet" href="https://fonts.bunny.net/css2?family=Nunito:wght@400;600;700&display=swap">

        <!-- Scripts -->
        @vite(['resources/css/app.css', 'resources/js/app.js']) //ここに注意

        <!-- Styles -->
        @livewireStyles //ここに注意
    </head>
    <body class="font-sans antialiased">
        <x-jet-banner />

        <div class="min-h-screen bg-gray-100">
            @livewire('navigation-menu')

            <!-- Page Heading -->
            @if (isset($header))
                <header class="bg-white shadow">
                    <div class="max-w-7xl mx-auto py-6 px-4 sm:px-6 lg:px-8">
                        {{ $header }} //ここに注意
                    </div>
                </header>
            @endif

            <!-- Page Content -->
            <main>
                {{ $slot }} //ここに注意
            </main>
        </div>

        @stack('modals')

        @livewireScripts //ここに注意
    </body>
</html>
【Laravel8の場合】
<!DOCTYPE html>
<html lang="{{ str_replace('_', '-', app()->getLocale()) }}">
    <head>
        <meta charset="utf-8">
        <meta name="viewport" content="width=device-width, initial-scale=1">
        <meta name="csrf-token" content="{{ csrf_token() }}">

        <title>{{ config('app.name', 'Laravel') }}</title>

        <!-- Fonts -->
        <link rel="stylesheet" href="https://fonts.googleapis.com/css2?family=Nunito:wght@400;600;700&display=swap">

        <!-- Styles -->
        <link rel="stylesheet" href="{{ asset('css/app.css') }}">

        @livewireStyles //ここに注意

        <!-- Scripts -->
        <script src="https://cdn.jsdelivr.net/gh/alpinejs/alpine@v2.7.0/dist/alpine.js" defer></script>
    </head>
    <body class="font-sans antialiased">
        <div class="min-h-screen bg-gray-100">
            @livewire('navigation-dropdown')

            <!-- Page Heading -->
            <header class="bg-white shadow">
                <div class="max-w-7xl mx-auto py-6 px-4 sm:px-6 lg:px-8">
                    {{ $header }} //ここに注意
                </div>
            </header>

            <!-- Page Content -->
            <main>
                {{ $slot }}  //ここに注意
            </main>
        </div>

        @stack('modals')

        @livewireScripts //ここに注意
    </body>
</html>
@liviwireで始まる2つのタグがあります。livewireをBladeファイルで利用するためには@livewireStylesをheadタグに入れ、@livewireScriptsをbodyタグに入れる必要があります。
またマスタッシュで囲まれた{{ $slot }}があります。{{ $slot }}の部分にshow.blade.phpファイルの<x-app-layout>の内部のコンテンツが挿入されます。

{{ $slot }}以外に{{ $header }}というものがものもあります。デフォルトでは$slotの中に<x-app-layout>タグのコンテンツが挿入されます。{{ $header }}には<x-app-layout>の内部のタグで<x-slot name=”header”>のx-slotタグで囲まれたコンテンツを表示させることができます。これは名前付きSlotと呼ばれます。
{{ $slot }}と{{ $header }}にどのようなものが挿入されるのかが理解できたのでshow.blade.phpファイルを再度確認します。
<x-app-layout>のコンテンツがapp.blade.phpの{{ $slot }}の部分に入り、<x-slot name=”header”>で囲まれたコンテンツは{{ $header }}に入ります。つまり{{ $header }}にはh2タグで囲まれた{{ __(‘Profile’) }}が入ります。
<x-app-layout>
    <x-slot name="header">
        <h2 class="font-semibold text-xl text-gray-800 leading-tight">
            {{ __('Profile') }}
        </h2>
    </x-slot>

    <div>
        <div class="max-w-7xl mx-auto py-10 sm:px-6 lg:px-8">
            @if (Laravel\Fortify\Features::canUpdateProfileInformation())
                @livewire('profile.update-profile-information-form')

                <x-section-border />
            @endif

            @if (Laravel\Fortify\Features::enabled(Laravel\Fortify\Features::updatePasswords()))
                <div class="mt-10 sm:mt-0">
                    @livewire('profile.update-password-form')
                </div>

                <x-section-border />
            @endif
//略
日本語化の確認
これはLivewireに直接関係のある箇所ではありませんが、{{ __(‘Profile’) }}については英語に対応する変換ファイルを用意することで表示を他の言語(日本語)に変更することができます。
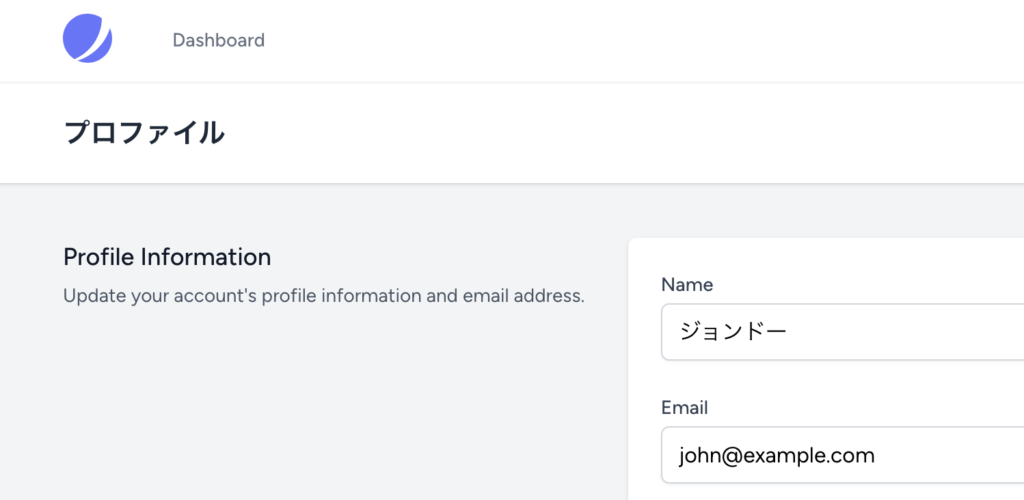
言語の変更方法は簡単でconfig/app.phpファイルを開いてlocaleをenからjaに変更します。次にresourcesの下にlangディレクトリを作成してその下にja.jsonファイルを作成しProfileに対応する日本語を記述すると通常はProfileと表示される部分がプロファイルと日本語表示になります。その他にもJetstreamで作成されたページには{{ __(‘XXXX’) }}と記述されている箇所が複数あるので必要であれば対応する日本語をja.jsonファイルに設定してください。
{
  "Profile": "プロファイル"
}
Profileの文字列がプロファイルに変更されることが確認できます。
Featureによる分岐
さらにshow.blade.phpを読み進めていくとif文での分岐があります。Jetstreamには複数の機能が含まれており、その機能を利用するかどうか設定を行うことができます。
Laravel¥Fortify¥Features::enabledのif文はJetStreamで利用する機能によってその機能に関連する設定画面を表示するか非表示にするかの設定を行うための分岐です。
@if (Laravel\Fortify\Features::canUpdateProfileInformation())
機能を利用するかしないかはjetstreamとfortifyの設定ファイルであるconfig¥fortify.phpかconfig¥jetstream.phpで行うことができます。どちらのファイルでも行をコメントアウトすることで機能を無効にすることができます。

fortify.phpではデフォルトでは登録したユーザのemailの確認を行う機能emailVerification以外は有効になっています。
'features' => [
    Features::registration(),
    Features::resetPasswords(),
    // Features::emailVerification(),
    Features::updateProfileInformation(),
    Features::updatePasswords(),
    Features::twoFactorAuthentication([
        'confirm' => true,
        'confirmPassword' => true,
        // 'window' => 0,
    ]),
],
ユーザ登録画面から自由にユーザ登録を行わせたくない場合はFeatures::registration()をコメントアウトするとユーザ登録機能が無効になります。
jetstream.phpではaccountDeletion以外の機能は無効になっています。
'features' => [
    // Features::termsAndPrivacyPolicy(),
    // Features::profilePhotos(),
    // Features::api(),
    // Features::teams(['invitations' => true]),
    Features::accountDeletion(),
],
if文の分岐でチェックが行われているcanUpdateProfileInformationはデフォルトでは有効になっているので下記の処理@livewireディレクティブが実行されます。@livewireディレクティブの引数には’profile.update-profile-information-form’が指定されています。
@livewire('profile.update-profile-information-form')
処理を行うコンポーネントファイルの確認
Livewireでは表示(ビュー)と処理(クラス)に関するファイルが別々に分かれています。
@livewireで指定されているprofile.update-profile-information-formはLivewireに関する設定ですがこの指定がどのファイルに対応するのかがわからないので調べる必要があります。
サービスプロバイダーファイルのvendor¥laravel¥jetstream¥src¥JetStreamServiceProvider.phpファイルを確認することでprofile.update-profile-information-formに対応するクラスファイルがわかります。
JetStreamServiceProvider.phpファイルのbootメソッドの中ではLivewire::componentでコンポーネントの登録が行われています。先ほど@livewireディレクティブの引数に指定されていたprofile.update-profile-information-formに対応するのはUpdateProfileInformationFormクラスであることがのファイルから確認することができます。
public function boot()
{
//略
        if (config('jetstream.stack') === 'livewire' && class_exists(Livewire::class)) {
            Livewire::component('navigation-menu', NavigationMenu::class);
            Livewire::component('profile.update-profile-information-form', UpdateProfileInformationForm::class);
            Livewire::component('profile.update-password-form', UpdatePasswordForm::class);
            Livewire::component('profile.two-factor-authentication-form', TwoFactorAuthenticationForm::class);
            Livewire::component('profile.logout-other-browser-sessions-form', LogoutOtherBrowserSessionsForm::class);
            Livewire::component('profile.delete-user-form', DeleteUserForm::class);

            if (Features::hasApiFeatures()) {
                Livewire::component('api.api-token-manager', ApiTokenManager::class);
            }

            if (Features::hasTeamFeatures()) {
                Livewire::component('teams.create-team-form', CreateTeamForm::class);
                Livewire::component('teams.update-team-name-form', UpdateTeamNameForm::class);
                Livewire::component('teams.team-member-manager', TeamMemberManager::class);
                Livewire::component('teams.delete-team-form', DeleteTeamForm::class);
            }
        }
//略
UpdateProfileInformationForm.phpクラスファイルはvendor¥laravel¥jetstream¥src¥Http¥Livewireの下に保存されています。
UpdateProfileInformationFormの確認
UpdateProfileInformationForm.phpファイルの中にはrender関数があり表示されるビューファイルを確認することができます。
//略
public function render()
{
    return view('profile.update-profile-information-form');
}
このことからビューファイルはresources¥views¥profileディレクトリの下にあるupdate-profile-information-form.blade.phpファイルであることがわかります。
ユーザのプロファイルに関連するLivewireの表示(ビュー)と処理(クラス)の2つのファイルを特定することができました。
この2つのファイルを利用してLivewireを利用したプロファイルページの更新方法を確認していきます。
Livewireでプロファイル画面の更新
update-profile-information-form.blade.phpファイルの内容はブラウザ上の赤線の部分に対応します。
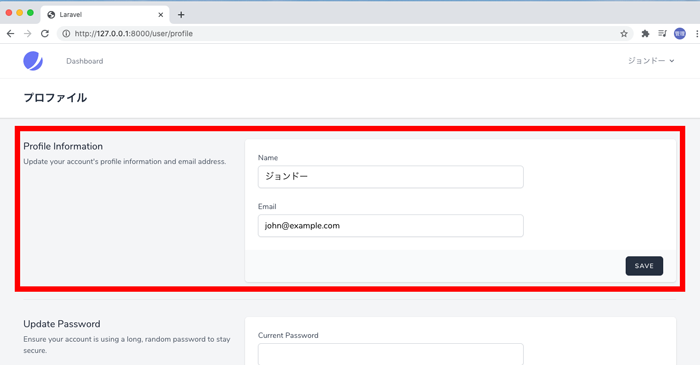
プロファイル画像の設定についてはconfig/jetstream.phpファイルで無効になっているのでデフォルトでは利用することができません。コードを見やすくするためにプロファイル画像の設定に関するコードをupdate-profile-information-form.blade.phpから削除します。
削除するとNameとEmailに関するinput要素とボタンのあるシンプルな形であることがわかります。
<x-form-section submit="updateProfileInformation">
    <x-slot name="title">
        {{ __('Profile Information') }}
    </x-slot>

    <x-slot name="description">
        {{ __('Update your account\'s profile information and email address.') }}
    </x-slot>

    <x-slot name="form">
        <!-- Name -->
        <div class="col-span-6 sm:col-span-4">
            <x-label for="name" value="{{ __('Name') }}" />
            <x-input id="name" type="text" class="mt-1 block w-full" wire:model="state.name" required autocomplete="name" />
            <x-input-error for="name" class="mt-2" />
        </div>

        <!-- Email -->
        <div class="col-span-6 sm:col-span-4">
            <x-label for="email" value="{{ __('Email') }}" />
            <x-input id="email" type="email" class="mt-1 block w-full" wire:model="state.email" required autocomplete="username" />
            <x-input-error for="email" class="mt-2" />

            @if (Laravel\Fortify\Features::enabled(Laravel\Fortify\Features::emailVerification()) && ! $this->user->hasVerifiedEmail())
                <p class="text-sm mt-2">
                    {{ __('Your email address is unverified.') }}

                    <button type="button" class="underline text-sm text-gray-600 hover:text-gray-900 rounded-md focus:outline-none focus:ring-2 focus:ring-offset-2 focus:ring-indigo-500" wire:click.prevent="sendEmailVerification">
                        {{ __('Click here to re-send the verification email.') }}
                    </button>
                </p>

                @if ($this->verificationLinkSent)
                    <p class="mt-2 font-medium text-sm text-green-600">
                        {{ __('A new verification link has been sent to your email address.') }}
                    </p>
                @endif
            @endif
        </div>
    </x-slot>

    <x-slot name="actions">
        <x-action-message class="me-3" on="saved">
            {{ __('Saved.') }}
        </x-action-message>

        <x-button wire:loading.attr="disabled" wire:target="photo">
            {{ __('Save') }}
        </x-button>
    </x-slot>
</x-form-section>

blade componentファイル
【Laravel10の場合】
update-profile-information-form.blade.phpファイルを見ると先頭にはx-で始まるx-form-sectionタグが記述されています。このタグはviews¥components¥form-section.blade.phpファイルに対応します。
【Laravel8の場合】
update-profile-information-form.blade.phpファイルを見ると先頭にはx-で始まるx-jet-form-sectionタグが記述されています。このタグがどのファイルに対応するのかを知っておく必要があります。
先ほどliverwireのコンポーネントを確認したJetStreamServiceProvider.phpファイルを開きます。configureCompoinentsメソッドでx-jet-form-sectionに対応するコンポーネントファイルがわかります。
protected function configureComponents()
{
    $this->callAfterResolving(BladeCompiler::class, function () {
        $this->registerComponent('action-message');
        //略
        $this->registerComponent('form-section');
        //略
        $this->registerComponent('welcome');
    });
}

protected function registerComponent(string $component)
{
    Blade::component('jetstream::components.'.$component, 'jet-'.$component);
}
対応するコンポーネントファイルはvendor¥laravel¥jetsream¥resource¥views¥components以下に保存されています。
上記のファイルは下記のコマンドを実行することでresources¥views¥vendor¥jetstreamディレクトリに作成され更新を行うことができます。
 % php artisan vendor:publish --tag=jetstream-views
Copied Directory [/vendor/laravel/jetstream/resources/views] To [/resources/views/vendor/jetstream]
resources¥views¥vendor¥jetstreamに保存されるファイルを変更すると変更内容が反映されます。試しにform-section.blade.phpファイルを更新してブラウザ上に反映されるか確認を行ってください。
表示される文字列の変更
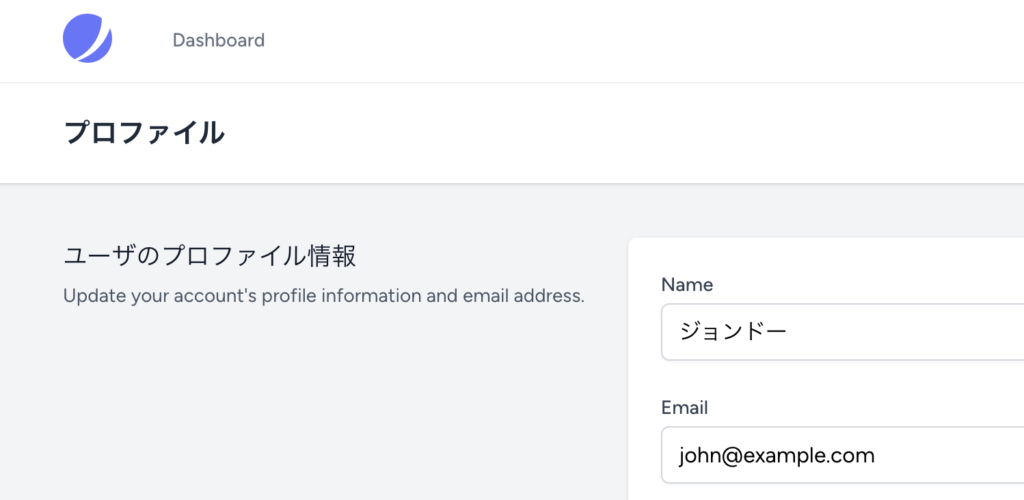
{{ _(XXX) }}で記述されている部分はja.jsonを利用して日本語に変換できることを説明しました。日本語後への変換ではなくもし表示する内容を変更したい場合は<x-slot name=”title”></title>の中身を変更するとProfile Informationから別の文字列に変更することができます。
<x-slot name="title">
    ユーザのプロファイル情報
//{{ __('Profile Information') }}
</x-slot>
変数の設定
LivewireのクラスファイルであるUpdateProfileInformationForm.phpでは$stateという変数が配列で宣言されています。この変数にどのような値が設定されているか確認し、update-profile-information-form.blade.phpファイル側で表示させてみましょう。
public $state = [];
LivewireにはライフサイクルフックというものがありLivewireの初期化中に指定した処理を行うことができます。UpdateProfileInformationForm.phpファイルでは初期化中にライフサイクルフックmountを利用してユーザ情報を$stateの中に入れています。
public function mount()
{
    $user = Auth::user();

    $this->state = array_merge([
        'email' => $user->email,
    ], $user->withoutRelations()->toArray());
}

//Laravel8の場合
public function mount()
{
    $this->state = Auth::user()->withoutRelations()->toArray();
}
$this->stateの中にユーザ情報が保存されるので確認するためにUpdateProfileInformationForm.phpファイルでdd関数を利用します。
public function mount()
{
    $user = Auth::user();

    $this->state = array_merge([
        'email' => $user->email,
    ], $user->withoutRelations()->toArray());

      dd($this->state);
}
ブラウザからLaravelにアクセスすると$stateの内容を確認することができます。
array:10 [▼ // vendor/laravel/jetstream/src/Http/Livewire/UpdateProfileInformationForm.php:48
  "email" => "john@example.com"
  "id" => 1
  "name" => "ジョンドー"
  "email_verified_at" => null
  "current_team_id" => null
  "profile_photo_path" => null
  "created_at" => "2024-01-16T02:31:26.000000Z"
  "updated_at" => "2024-01-16T02:32:07.000000Z"
  "two_factor_confirmed_at" => null
  "profile_photo_url" => "https://ui-avatars.com/api/?name=%E3%82%B8&color=7F9CF5&background=EBF4FF"
]
UpdateProfileInformationForm.phpファイルで宣言した変数はupdate-profile-information-form.blade.phpファイル側で表示させることができます。$stateは配列なので$state[‘name’]でアクセスすることができます。nameのinput要素の上に追加します。
<!-- Name -->
<div class="col-span-6 sm:col-span-4">
    <div>{{ $state['name']}}</div>
    <x-label for="name" value="{{ __('Name') }}" />
    <x-input id="name" type="text" class="mt-1 block w-full" wire:model="state.name" required autocomplete="name" />
    <x-input-error for="name" class="mt-2" />
</div>
下記のようにUpdateProfileInformationForm.phpで設定した変数をビュー側で表示させることができました。このようにクラスファイル側に変数を設定することでビュー側に表示することができることがわかりました。
![$state['name']を表示](https://reffect.co.jp/wp-content/uploads/2020/10/laravel8-jet-livewire-6-1024x317.png)
データバインディング
データバインディングのデフォルトの動作についてはLivewireのバージョン2とバージョン3とでは異なります。
下記の内容はLivewireのバージョン2を利用して動作確認をした内容です。現在Laravelで利用するLivewireのバージョンは3なので下記のようにリアルタイムでinput要素に入力した値を$state[‘name’]に反映されるためにはwire:model.liveとwire:modelの後にliveを設定する必要があります。またwire:modelのバージョン3でのデフォルトはwire:model.deferです。
update-profile-information-form.blade.phpのinput要素を見るとwire:model.defer=”state.name”という記述があります。これはLivewireでデータバインディングという設定を行っており、state.nameに入った内容をinput要素に表示させるだけではなくinput要素に入力した値をstateのnameに反映させることができます。
<!-- Name -->
<div class="col-span-6 sm:col-span-4">
    <div>{{ $state['name']}}</div>
    <x-label for="name" value="{{ __('Name') }}" />
    <x-input id="name" type="text" class="mt-1 block w-full" wire:model="state.name" required autocomplete="name" />
    <x-input-error for="name" class="mt-2" />
</div>
データバインディングの動作を確認するためにinput要素に入力した値が{{ $staet[‘name’] }}に反映するか確認するためwire:mode.deferのdeferを削除してからinput要素に入力を行ってください。
ユーザのNameをジョンドーからケビンに変更するとリアルタイムで変更されます。データバインディングによりクラス側とビュー側の変数が同期していることがわかります。
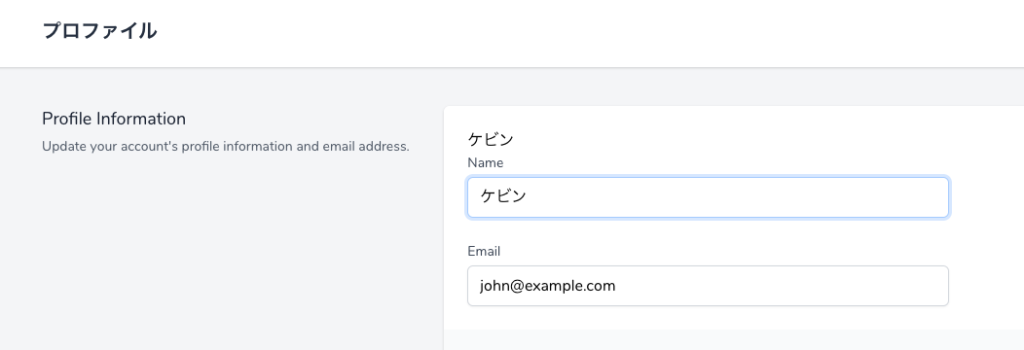

ブラウザのデベロッパーツールでネットワークタブを確認すると文字を一つと打つたびにネットワークにPostリクエストが送信されることが確認できます。 deferを削除した状態で確認しています。

submitイベントとpropsの理解
LivewireではHTMLと同様にsubmitイベントが存在します。form内に設定されているボタンをクリックするとそのクリックイベントを検知してsubmitイベントが実行されます。
update-profile-information-form.blade.phpファイルの先頭にx-form-sectionタグがありますが、submit属性にupdateProfileInformationが設定されています。
<x-form-section submit="updateProfileInformation">
Blade Componentsではpropsを使ってComponentに対し値を渡すことができます。submitという名前のpropsにupdateProfileInformationという文字列が渡され、form-section.blade.php内でsubmitの値を受け取ることができます。

form-section.blade.phpを確認すると先頭に@propsディレクティブでsubmitが設定されていることがわかります。
@props(['submit'])

<div {{ $attributes->merge(['class' => 'md:grid md:grid-cols-3 md:gap-6']) }}>
    <x-section-title>
        <x-slot name="title">{{ $title }}</x-slot>
        <x-slot name="description">{{ $description }}</x-slot>
    </x-section-title>

    <div class="mt-5 md:mt-0 md:col-span-2">
        <form wire:submit="{{ $submit }}">
            <div class="px-4 py-5 bg-white sm:p-6 shadow {{ isset($actions) ? 'sm:rounded-tl-md sm:rounded-tr-md' : 'sm:rounded-md' }}">
                <div class="grid grid-cols-6 gap-6">
                    {{ $form }}
                </div>
            </div>

            @if (isset($actions))
                <div class="flex items-center justify-end px-4 py-3 bg-gray-50 text-end sm:px-6 shadow sm:rounded-bl-md sm:rounded-br-md">
                    {{ $actions }}
                </div>
            @endif
        </form>
    </div>
</div>
form-section.blade.phpではformタグのwire:submitディレクティブに$submitが指定されています。
form-section.blade.phpには {{ $submit }}の他に{{ $title }}, {{ $description }}, {{ $form }} , {{ actions }}などの複数の名前付きSlotも設定されています。これは親であるupdate-profile-information-form.blade.phpファイル内の<x-slot name=”XXX”></x-slot>タグの内部のコンテンツが渡されます。
submitイベントで実行されるメソッド
form-section.blade.phpファイルのformタグにはlivewireのsubmitイベントが設定されており{{ $submit }}にはpropsで渡されたupdateProfileInformationが入ります。この結果、フォーム内のボタンをクリックするとlivewireのupdateProfileInformationメソッドが実行されることになります。
<form wire:submit="{{ $submit }}">
wire:submitで指定されているupdateProfileInformationはUpdateProfileInformationForm.phpクラスファイルにメソッドして登録されています。
public function updateProfileInformation(UpdatesUserProfileInformation $updater)
{
    $this->resetErrorBag();

    $updater->update(
        Auth::user(),
        $this->photo
            ? array_merge($this->state, ['photo' => $this->photo])
            : $this->state
    );

    if (isset($this->photo)) {
        return redirect()->route('profile.show');
    }

    $this->dispatch('saved');

    $this->dispatch('refresh-navigation-menu');
}
Dependency InjectionによりUpdatesUserProfileInformationがインスタンス化されて変数$updaterに入っています。$updaterの中身を確認する必要がありますが、UpdatesUserProfileInformationはインターフェイスなので実体のクラスではありません。UpdatesUserProfileInformationのupdateメソッドの中身を確認するためには実体のクラスがどれなのか見つける必要があります。
app¥Providers¥FortifyServiceProvider.phpファイルのbootメソッドを確認するとUpdateUserProfileInformation::classを見つけることができます。
public function boot(): void
{
    Fortify::createUsersUsing(CreateNewUser::class);
    Fortify::updateUserProfileInformationUsing(UpdateUserProfileInformation::class);
    Fortify::updateUserPasswordsUsing(UpdateUserPassword::class);
    Fortify::resetUserPasswordsUsing(ResetUserPassword::class);
//略
}
さらにvendor/laravel/fortify/src/Fortify.phpファイルのupdateUserProfileInformationUsingメソッドを確認するとsingletonでサービスコンテナに登録されているので、実体のファイルはApp\Actions\Fortify\UpdateUserProfileInformation.phpであることがわわかります。
public static function updateUserProfileInformationUsing(string $callback)
{
    return app()->singleton(UpdatesUserProfileInformation::class, $callback);
}
UpdateUserProfileInformation.phpにはupdateメソッドがあり、バリデーションと保存処理を行っていることがわかります。$user変数を受け取り$input要素に入った情報を利用して更新を行っています。このファイルを更新することでバリデーション方法を変更することもできます。
public function update(User $user, array $input): void
{
    Validator::make($input, [
        'name' => ['required', 'string', 'max:255'],
        'email' => ['required', 'email', 'max:255', Rule::unique('users')->ignore($user->id)],
        'photo' => ['nullable', 'mimes:jpg,jpeg,png', 'max:1024'],
    ])->validateWithBag('updateProfileInformation');

    if (isset($input['photo'])) {
        $user->updateProfilePhoto($input['photo']);
    }

    if ($input['email'] !== $user->email &&
        $user instanceof MustVerifyEmail) {
        $this->updateVerifiedUser($user, $input);
    } else {
        $user->forceFill([
            'name' => $input['name'],
            'email' => $input['email'],
        ])->save();
    }
}
もう一度UpdateProfileInformationForm.phpファイルに戻りupdateProfileInformationメソッドを確認します。プロファイル画像に関する処理を削除すると下記ようなコードに書き換えることができ、どのような処理が行われているのかが見やすくなります。

public function updateProfileInformation(UpdatesUserProfileInformation $updater)
{
    $this->resetErrorBag();

    $updater->update(Auth::user(),$this->state);

    $this->dispatch('saved');

    $this->dispatch('refresh-navigation-dropdown');
}
updateProfileInformationメソッドではバリデーションで表示されたエラーメッセージをリセットし、$updaterのupdateメソッドにinput要素に入力したnameとemailを持つ$stateを渡して更新を行っています。その後dispatchでイベントを発行しています。
イベントの発行
updateメソッド更新が正常に完了したら、dispatchメソッドでイベントが発行され引数にはsavedが入っています。イベントが発行されているということはイベントを受け取るリスナーが存在します。savedイベントに対応するリスナーを確認していきます。

リスナーの確認
update-profile-information-form.blade.phpの中身を確認すると先ほどのdispatchで指定していたsavedという文字列を見つけることができます。savedがありますがこれはリスナーの設定ではありません。
<x-slot name="actions">
    <x-action-message class="mr-3" on="saved">
        {{ __('Saved.') }}
    </x-action-message>

    <x-button wire:loading.attr="disabled" wire:target="photo">
        {{ __('Save') }}
    </x-button>
</x-slot>
on propsを持っているx-action-messageタグに対応するaction-message.blade.phpファイルを確認します。action-message.blade.phpファイルではpropsのonを通してsavedが渡されていることがわかります。
@props(['on'])

<div x-data="{ shown: false, timeout: null }"
    x-init="@this.on('{{ $on }}', () => { clearTimeout(timeout); shown = true; timeout = setTimeout(() => { shown = false }, 2000);  })"
    x-show.transition.opacity.out.duration.1500ms="shown"
    style="display: none;"
    {{ $attributes->merge(['class' => 'text-sm text-gray-600']) }}>
    {{ $slot ?? 'Saved.' }}
</div>
action-message.blade.phpファイルの中には新たにdivタグの中にx-data, x-init, x-show属性があります。これは一体なんなのでしょうか?”x-“が先頭についていますがタグではないのでBladeのComponentsではありません。
これはAlpine.jsのディレクティブです。

Alpine.jsについて
Alpine.jsはVue.jsに似た軽量のJavaScriptのフレームワークです。軽量ということもありLaravel8ではcdnを使ってApline.jsを使っていました。Laravel10で利用しているLivewireではAlpine.jsがLivewireのJavaScriptコードの中に含まれているのでcdnなどを利用してAlpine.jsを別に追加する必要はありません。
<script src="https://cdn.jsdelivr.net/gh/alpinejs/alpine@v2.7.0/dist/alpine.js" defer></script>
JetstreamではAlpine.jsの3つのディレクティブを利用しています。3つのディレクティブはx-data, x-show, x-initです。
- x-data・・・Apline.jsの中で扱う変数を定義します。
- x-show・・・true or falseを設定することができtrueの場合は要素を表示、falseの場合は要素が非表示になります。x-dataで宣言する変数と組み合わせることによりtoggleを実装することができます。
- x-init・・・Apline.jsのコンポーネントの初期化時に実行したい関数を設定することができます
実際のコードを見ながらそれぞれのディレクティブがどのように利用されているのかを確認していきます。
@props(['on'])

<div x-data="{ shown: false, timeout: null }"
    x-init="@this.on('{{ $on }}', () => { clearTimeout(timeout); shown = true; timeout = setTimeout(() => { shown = false }, 2000);  })"
    x-show.transition.opacity.out.duration.1500ms="shown"
    style="display: none;"
    {{ $attributes->merge(['class' => 'text-sm text-gray-600']) }}>
    {{ $slot ?? 'Saved.' }}
</div>
x-dataで2つの変数shown, timeoutを定義しており、shownの初期値はfalseで、timeoutはnullに設定されています。
x-showではtransition.opacity.out.duration.1500msが設定されており、transitionを利用して1500msかけてゆっくりと表示させる設定を行っています。transitionがいらない場合はtransition以下を削除することも可能で、要素の表示/非表示するかの設定はshownの値で決まります。
ここが重要でx-initの引数の中にLivewireのリスナーの設定が入っています。下記の部分がLivewireのリスナー設定の箇所です。
@this.on('{{ $on }}', () => { clearTimeout(timeout); shown = true; timeout = setTimeout(() => { shown = false }, 2000); })
上記だけを見てもLivewireのリスナーだと判断することが難しいと思うので、JavaScriptでのLivewireのリスナーの記述方法が公式ドキュメントに記載されているので比較してみましょう。
document.addEventListener('livewire:init', () => {
   Livewire.on('post-created', (event) => {
       //
    });
});
Livevireが@thisとなっている点は異なりますがあとの形は同じです。{{ $on }}にはpropsで受け取った文字列savedが入り、updateProfileInformationメソッドのdispatchイベントで発行したsavedを受け取ることができます。
savedのイベントを受け取ったら、shownを一度trueにして2000ms後に再度falseにしています。
これでsavedイベントによりどのような処理が行われているかがわかりました。
もう少しaction-message.blade.phpファイルを見ていくとdiv要素には$attributesの設定がありますが、これはBlade Componentsの設定でclassのtext-sm text-gray-600を追加しています。
{{ $attributes->merge(['class' => 'text-sm text-gray-600']) }}
div要素のコンテンツである{{ $slot->isEmpty() ? ‘Saved.’ : $slot }}は$slotの値<x-action-message>タグにコンテンツがあればそのコンテンツが表示され、なければSaved.が表示されます。
action-message.blade.phpのAlpine.js, Blade Components, Livewireの各設定を確認することができました。
action-message.blade.phpの内容がどのような動きになるかはユーザの名前を変更して確認してみましょう。
名前を変更し”SAVE”ボタンをクリックするとボタンの左側にSaved.という文字列が表示され、しばらくするとtransitionによりゆっくりと消えていきます。x-initの中で設定していたx-showのtranstionの設定と同じ動作になることがわかります。
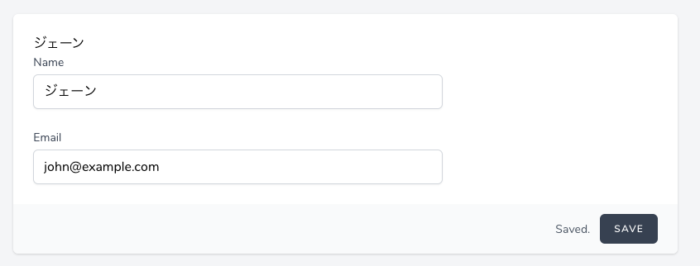
UpdateProfileInformationForm.phpファイルのupdateProfileInformationメソッドのdispatchイベントは理解することができました。最後のrefresh-navigation-menuイベントがどのような動作に関連しているのか確認していきましょう。
$this->dispatch('refresh-navigation-menu');
refresh-navigation-menuイベントを発行することでリスナーがそのイベントを受け取り右上の名前の変更を処理を行っています。
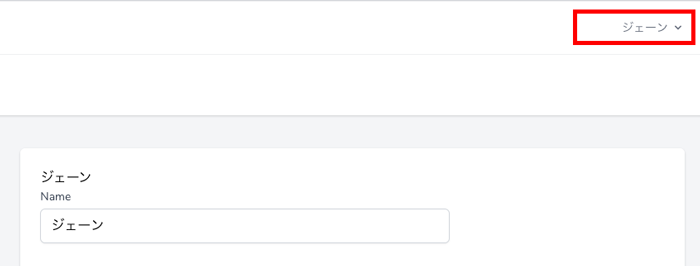
リスナーがどのファイルで設定されているか探す必要があります。
views¥layouts¥app.blade.phpファイルを確認するとnavigation-menuを見つけることができます。
@livewire('navigation-menu')
navigation-menuはvendor¥laravel¥jetstream¥src¥JetStreamServiceProvider.phpファイルのregisterで登録されていることがわかります。
//略
if (config('jetstream.stack') === 'livewire' && class_exists(Livewire::class)) {
    Livewire::component('navigation-menu', NavigationMenu::class);
//略
NavigationMenu.phpファイルではリスナーが登録されており、refresh-navigation-menuイベントをが設定されていることがわかります。通常はrefresh-navigation-menuキーの値にはメソッドを設定しますが、$refreshを設定するだけでコンポーネントがリフレッシュされ更新内容が反映されます。
namespace Laravel\Jetstream\Http\Livewire;

use Livewire\Component;

class NavigationMenu extends Component
{
    /**
     * The component's listeners.
     *
     * @var array
     */
    protected $listeners = [
        'refresh-navigation-menu' => '$refresh',
    ];

    /**
     * Render the component.
     *
     * @return \Illuminate\View\View
     */
    public function render()
    {
        return view('navigation-menu');
    }
}
$refreshはMagic Actionと言われ追加の処理を記述することなくコンポーネントの再描写が行われます。
ここまでの理解ができればJetstreamで構築されたデフォルト画面の更新をカスタマイズすることが可能です。
非常に長い文書となりますが、ようやくLaravelのJetStreamでLivewireを使いこなすためのスタートラインに立つことができました。
