入門者でも安心、Playwrightで驚くほど簡単にブラウザテストを行う
本文書ではブラウザを利用したテスト自動化ツールを利用した経験がない人、これから Playwright を使ってみたいという人を対象に Playwright の基本的な操作方法について説明を行っています。Vue と React のプロジェクトでの Playwright の利用方法についても後半に説明しています。
Playwrightとは
Playwright は WEB アプリケーションのテストを自動化するオープンソースのテストツールです。Playwright ではユーザが実際にブラウザを利用して WEB アプリケーションの操作を行う代わりにプログラムを通してブウラザ(Chromium、Firefox、WebKit)を動かすことで WEB アプリケーションのテストを行います。ツールを利用しない場合は機能を追加/更新する度に開発者がブラウザでページを開き動作確認を行う必要があります。Playwright ではフォームへの入力やボタンのクリック、ページの移動などプログラムを通して行うことができるためブラウザ上での操作をコード化することで繰り返し行う動作確認をテストとして自動化することができます。また Playwright では Chromium、Firefox、WebKit など主要なブラウザエンジンをサポートしているため 1 つのコードで複数のブラウザ上での動作確認テストを一括で行うことができます。
Playwrightのインストール
Playwright の動作確認を行うために Playwright のインストールを行います。任意の名前のフォルダ(playwrite-testing)を作成します。
% mkdir playwrite-testing
作成したフォルダで”npm init playwrite@latest”コマンドを実行します。インストール中にいくつか対話的に質問があるのでその質問に答える形でインストールを進めます。
インストール時に TypeScript と JavaScript の選択の質問がありますがここでは TypeScript を選択しています。テストフォルダの保存場所はデフォルトの tests、GitHub Actions の workflow の追加を聞かれますがデフォルトの”N”, テストに利用するブラウザを一緒にインストールするか聞かれるので”Y”を選択しています。
 % npm init playwright@latest
Need to install the following packages:
  create-playwright@1.17.130
Ok to proceed? (y) y
Getting started with writing end-to-end tests with Playwright:
Initializing project in '.'
✔ Do you want to use TypeScript or JavaScript? · TypeScript
✔ Where to put your end-to-end tests? · tests
✔ Add a GitHub Actions workflow? (y/N) · false
✔ Install Playwright browsers (can be done manually via 'npx playwright install')? (Y/n) · true
Initializing NPM project (npm init -y)…
Wrote to /Users/mac/Desktop/playwrite-testing/package.json:

{
  "name": "playwrite-testing",
  "version": "1.0.0",
  "description": "",
  "main": "index.js",
  "scripts": {
    "test": "echo \"Error: no test specified\" && exit 1"
  },
  "keywords": [],
  "author": "",
  "license": "ISC"
}


Installing Playwright Test (npm install --save-dev @playwright/test)…

added 4 packages, and audited 5 packages in 2s

found 0 vulnerabilities
Downloading browsers (npx playwright install)…
Writing playwright.config.ts.
Writing tests/example.spec.ts.
Writing tests-examples/demo-todo-app.spec.ts.
Writing package.json.
✔ Success! Created a Playwright Test project at /Users/mac/Desktop/playwrite-testing

Inside that directory, you can run several commands:

  npx playwright test
    Runs the end-to-end tests.

  npx playwright test --ui
    Starts the interactive UI mode.

  npx playwright test --project=chromium
    Runs the tests only on Desktop Chrome.

  npx playwright test example
    Runs the tests in a specific file.

  npx playwright test --debug
    Runs the tests in debug mode.

  npx playwright codegen
    Auto generate tests with Codegen.

We suggest that you begin by typing:

    npx playwright test

And check out the following files:
  - ./tests/example.spec.ts - Example end-to-end test
  - ./tests-examples/demo-todo-app.spec.ts - Demo Todo App end-to-end tests
  - ./playwright.config.ts - Playwright Test configuration

Visit https://playwright.dev/docs/intro for more information. ✨

Happy hacking! 🎭
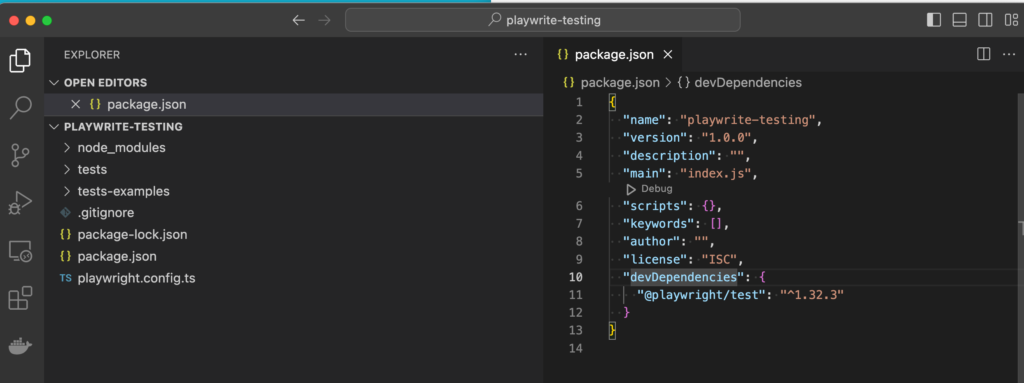
インストールと一緒に package.json ファイルの作成も自動で行なってくれます。
{
  "name": "playwrite-testing",
  "version": "1.0.0",
  "description": "",
  "main": "index.js",
  "scripts": {},
  "keywords": [],
  "author": "",
  "license": "ISC",
  "devDependencies": {
    "@playwright/test": "^1.39.0",
    "@types/node": "^20.8.9"
  }
インストール直後のフォルダ構成は下記の通りです。node_modules フォルダの他に tests、tests-examples フォルダが作成されサンプルのテストコードが保存されています。playwright.config.ts ファイルは Playwright の設定ファイルです。
はじめてのテスト
インストールを行うと tests フォルダにテストが記述されているので”npx playwright test”コマンドを実行するとすぐにテストを実行することができます。実際にコマンドを実行してみましょう。
 % npx playwright test

Running 6 tests using 4 workers
  6 passed (11.9s)

To open last HTML report run:

  npx playwright show-report
メッセージを確認すると 4 つの workers 利用して 6 つのテストが実行され、6 つのテストをパスしたことがわかります。コマンドを実行後にはプロジェクトフォルダ直下に playwright-report, test-results フォルダが新たに作成されます。test-results フォルダは空ですが playwright-report フォルダには index.html ファイルが作成されています。
6 つのテストがどのようなテストかメッセージだけではわからないのでテストコマンド実行後にメッセージに表示されている”npx playwright show-report”コマンドを実行します。
% npx playwright show-report

  Serving HTML report at http://localhost:9323. Press Ctrl+C to quit.
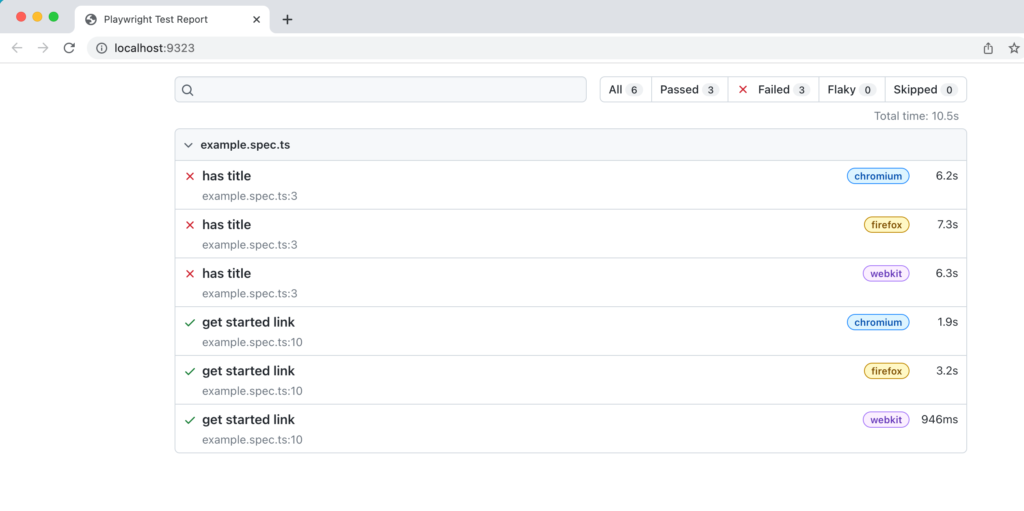
コマンドを実行すると localhost のポート 9323 で開発サーバが起動してそれに合わせてブラウザが自動起動して画面には実行したテストの内容が表示されます。レポートの内容から chromium, firefox, webkit の 3 つのブラウザを利用してテストを実施し、実行したテストファイルは example.spec.ts ファイルであることがわかります。
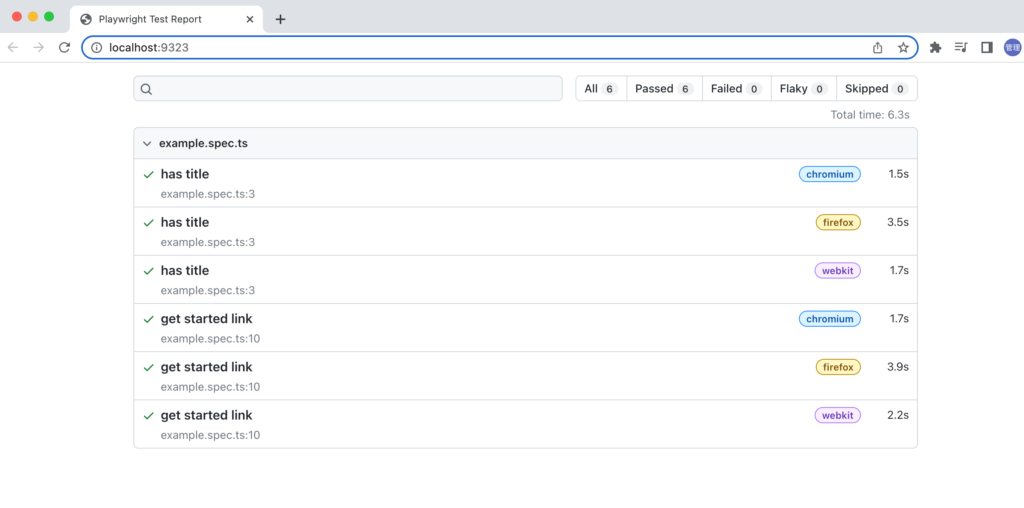
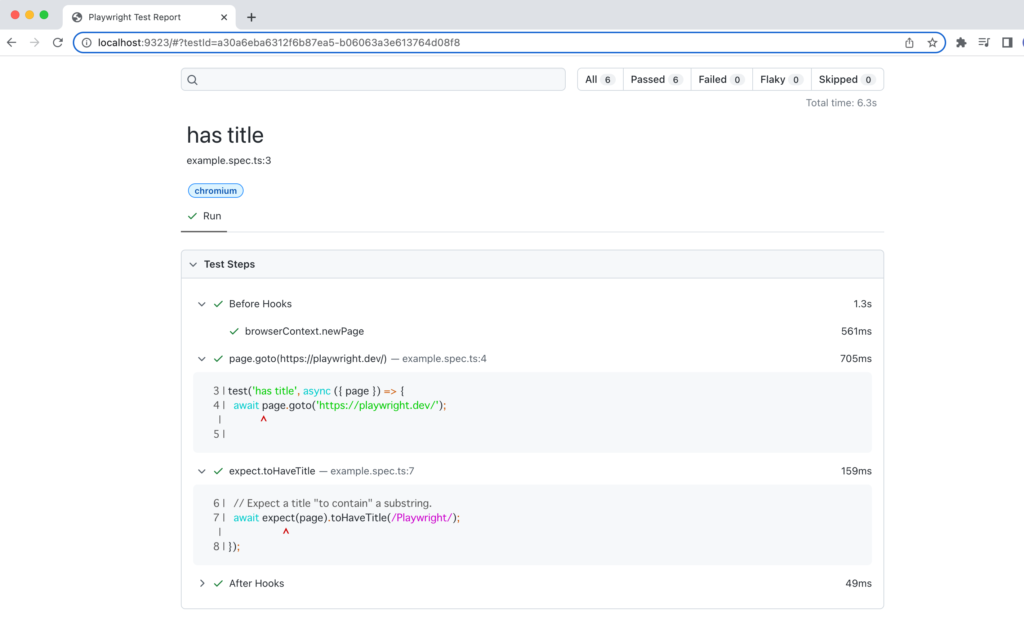
“has title”, “gert started link”というのは各テストにつけられたテスト名なのでテスト名をクリックするとテストの詳細情報を確認することができます。ステップ毎にテストの内容やコードが表示されます。
レポートの内容はテストを実行した時に作成された playwright-report フォルダの index.html ファイルに記述されているので”npx playwright show-report”コマンドを実行しなくても直接 index.html ファイルを開くてことでもレポートの内容を確認することができます。テストコマンドを実行した直近のテストのレポートが書き込まれています。
tests/example.spec.tsファイルの中身
実際にどのようなテストが実行されたのか確認するとためにtestsフォルダのexample.spec.tsファイルを確認します。
import { test, expect } from '@playwright/test';

test('has title', async ({ page }) => {
  await page.goto('https://playwright.dev/');

  // Expect a title "to contain" a substring.
  await expect(page).toHaveTitle(/Playwright/);
});

test('get started link', async ({ page }) => {
  await page.goto('https://playwright.dev/');

  // Click the get started link.
  await page.getByRole('link', { name: 'Get started' }).click();

  // Expects the URL to contain intro.
  await expect(page).toHaveURL(/.*intro/);
});
テストツールを利用したことがある人なら馴染みのあるexpect, test関数を利用していることがわかります。
test 関数と expect 関数を@playwright/test パッケージから import しており、test 関数の中にテストの内容を記述していきます。test 関数の第一引数にはテストの名前を設定し、第二引数にコールバック関数でテスト内容を記述します。第二引数のコールバック関数の引数では page オブジェクトを利用することができます。page オブジェクトのメソッドを通してページにアクセスしてコンテンツを取得することができます。expect 関数はテストのアサーションを行うために利用します。アサーションは期待される値と実際の値を比較してその結果によって成功か失敗かを判断することです。
page.goto(‘https://playwright.dev/‘)でgotoメソッドの引数にURL(https://playwright.dev/)を設定することで設定したURLにアクセスを行っています。その結果、pageオブジェクトにはアクセスしたページのコンテンツが保存されます。expect(page).toHaveTitle(/Playwright/)ではアクセスしたURLから戻されたコンテンツの中にtitleに”Playwright”という文字列が含まれているのか確認(アサーション)をしています。文字列が含まれている場合にテストは成功になります。
2 つ目のテストの内容も確認しておきましょう。テストの名前を”get started link”に設定しています。先ほどと同様に goto メソッドで”https://playwright.dev/”にアクセスしています。アクセス後、アクセスしたページのコンテンツの中に”Get started”という名前を持つリンクを getByRole メソッドで取得してクリックを実行しています。クリックを実行するとページの移動が行われるので toHaveURL メソッドで移動先の URL に”intro”の文字列が含まれている確認しています。
test('get started link', async ({ page }) => {
  await page.goto('https://playwright.dev/');

  // Click the get started link.
  await page.getByRole('link', { name: 'Get started' }).click();

  // Expects the URL to contain intro.
  await expect(page).toHaveURL(/.*intro/);
});
アクセスしているページのコンテンツを確認したい場合にはgotoメソッドでアクセス後に下記のようにconsole.logを利用して取得することができます。実行するとテストを実行したコンソールにHTML文が表示されるはずです。
console.log(await page.content());
test 関数の第二引数のコールバック関数の引数の page オブジェクトは Playwight の中で fixtures と呼ばれ、page 以外にも context, browser, browserName, request の fixtures が利用できます。browserName はテストで利用しているブラウザ名を表示するだけのものですが他のオブジェクトについては複数のメソッドやプロパティを持っているので詳細を知りたい場合にはドキュメントを確認する必要があります。page 以外に browserName を利用してテストで利用してブラウザ名を確認してみます。デフォルトではテストに 3 つのブラウザを利用しているのでコンソールには chromium, webkit, firefox が表示されるはずです。
test('has title', async ({ page, browserName }) => {
  console.log(browserName);
//chromium or webkit or firefox
test 関数の第二引数のコールバック関数では fixtures 以外にも Testinfo オブジェクトから現在実行しているテストの情報などを取得することができます。下記のように console.log で testInfo オブジェクトの中身を確認すると Playwright の設定情報などさまざまな情報が表示されます。
test('has title', async ({ page }, testInfo) => {
  console.log(testInfo);
testInfoにはメソッドやプロパティも用意されており例えばtestInfo.titleではテストの名前が表示されます。testinfoに含まれる情報はPlaywrightのドキュメントで確認することができます。
ブラウザを利用したテスト
“npx playwright test”コマンドを実行してテストを実行しましたがデフォルトでは headless でテストが行われます。headless はブラウザのウィンドウを開くことなしにテストが行われます。実際にブラウザのウィンドウを開いてテストを行いたい場合にはテストのコマンドに—headed のオプションをつけることで実行できます。
 % npx playwright test --headed

Running 6 tests using 4 workers
  6 passed (8.7s)

To open last HTML report run:

  npx playwright show-report
実行するとブラウザが起動してウィンドウが開いたり閉じたりを繰り返します。実際にアクセスしているページも一瞬ですが確認することができます。テストが完了すると開いたウィンドウは閉じた状態で完了します。
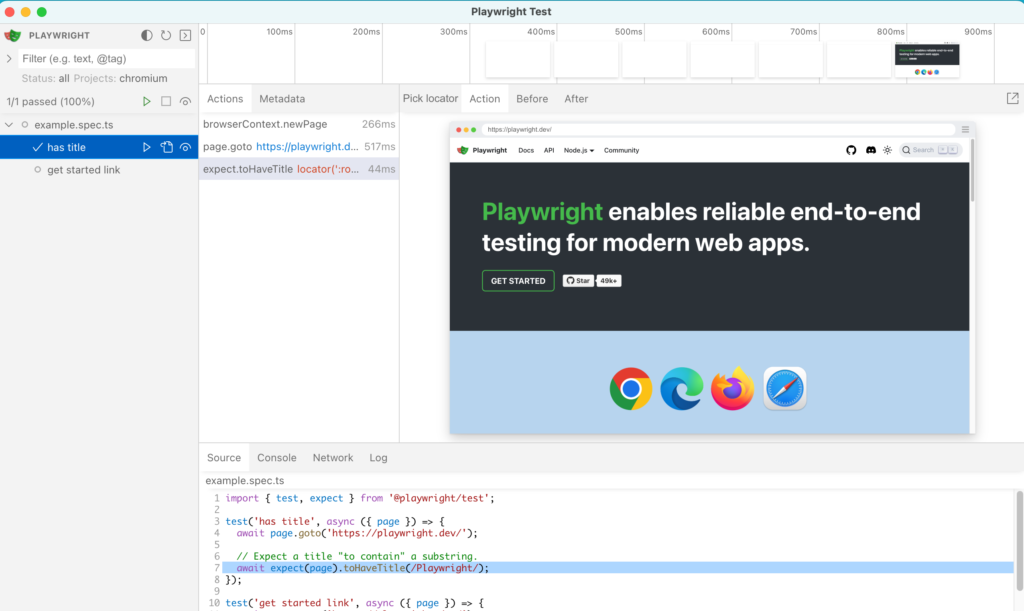
UI を利用してインタラクティブにテストを行いたい場合には—ui オプションをつけて実行します。
% npx playwright test --ui
コマンドを実行すると自動で以下の画面が表示されます。
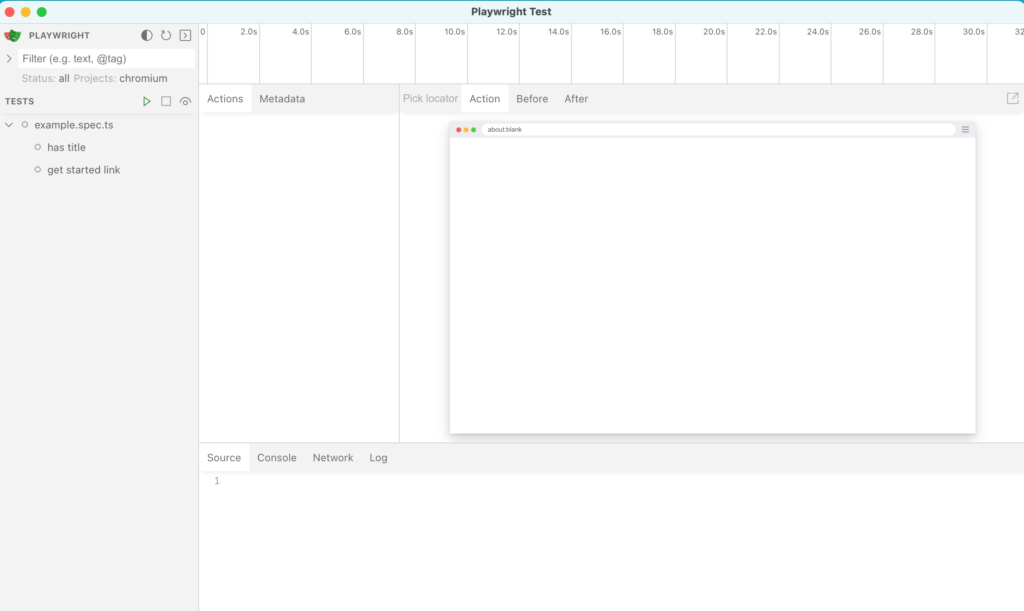
テストに記述したコードを実行したい場合にはサイドバーに表示されているテストの名前をクリックして三角の”再生ボタン”をクリックすると選択したテストが実行され右側の画面に表示され画面下には実行したコードが表示されます。
テストの失敗(エラー)
“npx playwright test”を実行するとテストに成功しますがテストに失敗した場合にはどのようなエラーが表示されるのか確認するために意図的にアサーションに失敗するように更新を行います。toHaveTitle の引数を Playwright から Playwright2 に変更しています。
test('has title', async ({ page }) => {
  await page.goto('https://playwright.dev/');

  // Expect a title "to contain" a substring.
  await expect(page).toHaveTitle(/Playwright2/);
});
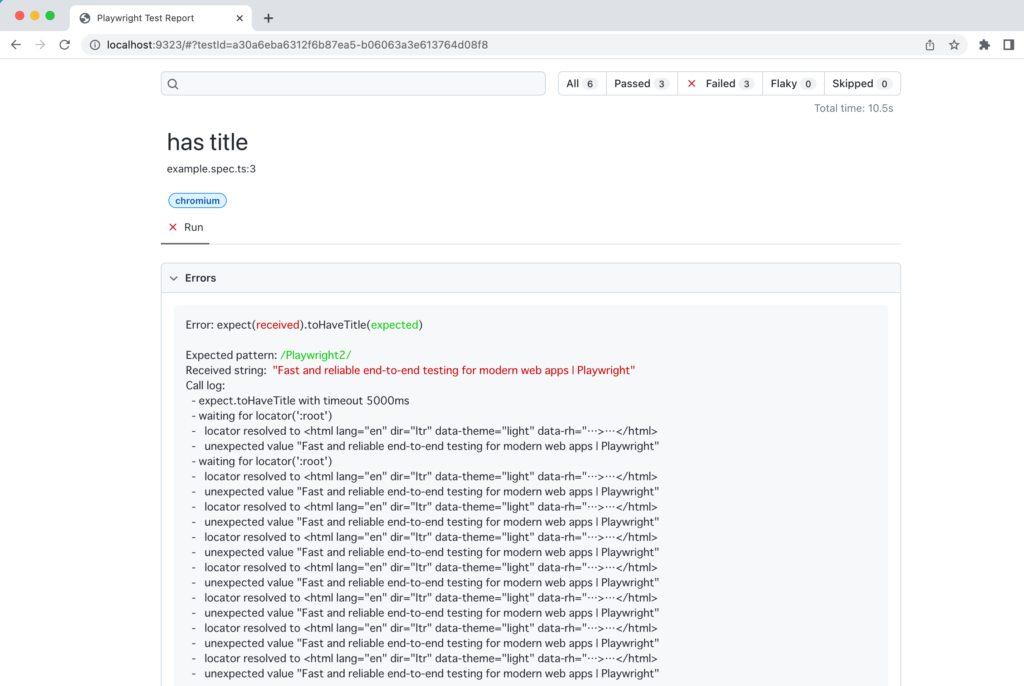
テストを実行するとどこのアサーションに失敗しているのかや期待した値と実際にブラウザから取得した値なども表示されエラーの原因を確認することができます。エラーが発生した場合にはメッセージと同時に自動で show-report が実行されブラウザに Test の Report が表示されます。
 % npx playwright test
 //略
    Error: expect(received).toHaveTitle(expected)

    Expected pattern: /Playwright2/
    Received string:  "Fast and reliable end-to-end testing for modern web apps | Playwright"
    Call log:
//略
  3 failed
    [chromium] › example.spec.ts:3:5 › has title ───────────────────────────────────────────────────
    [firefox] › example.spec.ts:3:5 › has title ────────────────────────────────────────────────────
    [webkit] › example.spec.ts:3:5 › has title ─────────────────────────────────────────────────────
  3 passed (10.5s)
   Serving HTML report at http://localhost:9323. Press Ctrl+C to quit.
Reportからもエラーを確認することができます。
エラーの中身を確認するためにエラーが発生しているテストをクリックします。ターミナルに表示されていたメッセージと同様に Expected pattern と Received string の値からエラーの原因を確認することができます。それ以外に expect timeout 5000ms と表示されておりタイムアウトが完了するまで何度もアサーションの処理が行われていることが確認できます。タイムアウトの値については Playwright の設定ファイルから調整することができます。
スクリーンショットの取得
ブラウザでアクセスしているページのスクリーンショットも簡単に取得することができます。gotoメソッドでページにアクセス後に”await page.screenshot({ path: ‘screenshot.png’ });”を追加します。
import { test, expect } from '@playwright/test';

test('has title', async ({ page }, testInfo) => {
  console.log(testInfo.title);
  await page.goto('https://playwright.dev/');
  await page.screenshot({ path: 'screenshot.png' });
  // Expect a title "to contain" a substring.
  await expect(page).toHaveTitle(/Playwright/);
});
テストを実行するとプロジェクトフォルダ直下にscreenshotメソッドのpathに指定したscreenshot.pngという名前でファイルが作成されます。
設定ファイルの確認
Playwightの設定はインストール後に自動作成されるplaywright.config.tsファイルで行うことができます。デフォルトではどのような設定が行われ、それぞれの設定が何を行っているか確認していきます。
import { defineConfig, devices } from '@playwright/test';

/**
 * Read environment variables from file.
 * https://github.com/motdotla/dotenv
 */
// require('dotenv').config();

/**
 * See https://playwright.dev/docs/test-configuration.
 */
export default defineConfig({
  testDir: './tests',
  /* Run tests in files in parallel */
  fullyParallel: true,
  /* Fail the build on CI if you accidentally left test.only in the source code. */
  forbidOnly: !!process.env.CI,
  /* Retry on CI only */
  retries: process.env.CI ? 2 : 0,
  /* Opt out of parallel tests on CI. */
  workers: process.env.CI ? 1 : undefined,
  /* Reporter to use. See https://playwright.dev/docs/test-reporters */
  reporter: 'html',
  /* Shared settings for all the projects below. See https://playwright.dev/docs/api/class-testoptions. */
  use: {
    /* Base URL to use in actions like `await page.goto('/')`. */
    // baseURL: 'http://127.0.0.1:3000',

    /* Collect trace when retrying the failed test. See https://playwright.dev/docs/trace-viewer */
    trace: 'on-first-retry',
  },

  /* Configure projects for major browsers */
  projects: [
    {
      name: 'chromium',
      use: { ...devices['Desktop Chrome'] },
    },

    {
      name: 'firefox',
      use: { ...devices['Desktop Firefox'] },
    },

    {
      name: 'webkit',
      use: { ...devices['Desktop Safari'] },
    },

    /* Test against mobile viewports. */
    // {
    //   name: 'Mobile Chrome',
    //   use: { ...devices['Pixel 5'] },
    // },
    // {
    //   name: 'Mobile Safari',
    //   use: { ...devices['iPhone 12'] },
    // },

    /* Test against branded browsers. */
    // {
    //   name: 'Microsoft Edge',
    //   use: { ...devices['Desktop Edge'], channel: 'msedge' },
    // },
    // {
    //   name: 'Google Chrome',
    //   use: { ..devices['Desktop Chrome'], channel: 'chrome' },
    // },
  ],

  /* Run your local dev server before starting the tests */
  // webServer: {
  //   command: 'npm run start',
  //   url: 'http://127.0.0.1:3000',
  //   reuseExistingServer: !process.env.CI,
  // },
});
testDir
testDir は Playwright をインストールした時に設定した tests フォルダです。このフォルダの中のファイルが”npx playwright test”コマンドを実行した時に実行されます。tests-examples フォルダにある demo-todo-app.spec.ts ファイルを tests フォルダに移動してテストコマンドを実行してみてください。先ほどのテストとは比較できないくらいたくさんのテストが実行され、テストの時間もかなりかかります。tests フォルダにテストファイルを保存することでテストファイルを認識してテストを実行してくれることがわかります。tests フォルダに移動した demo-todo-app.spec.ts ファイルを再度 test-examples フォルダに戻してください。
fullyParallel
fullyParallel はテストを並行に行うかどうかを決めるために設定します。
forbidOnly
forbidOnly は test.only を設定している場合には CI でエラーとなります。test 関数を test.only に変更すると only を設定したテストのみが実行されるようになります。
retries
retries はテストに何度リトライするかを設定します。デフォルトでは 0(CI では 2)なので一度だけテストを実行しますが複数の値を設定するとその数だけテストを行います。
workers
workers は数値を設定することで同時に起動する Worker Process の最大値を設定します。テスト実行時に起動している workers の数を確認することができます。
 % npx playwright test

Running 6 tests using 4 workers
workers の値を 1 に設定してテストを実行すると 1 Worker Process だけ起動してテストを行っていることが確認できます。
 % npx playwright test

Running 6 tests using 1 worker
reporter
reporter ではテストのレポートの方法や表示を変更することができます。デフォルトの html ではこれまでの動作確認通り、テストの結果が index.html ファイルに保存されブラウザから確認することができます。html の他には line, list, dot, json などがあり用途に応じて切り替えることができます。
html から list に変更してテストを実行すると以下のようにコンソールに Report が表示されます。
 % npx playwright test

Running 6 tests using 4 workers

  ✓  1 [firefox] › example.spec.ts:3:5 › has title (5.6s)
  ✓  2 [chromium] › example.spec.ts:11:5 › get started link (2.2s)
  ✓  3 [chromium] › example.spec.ts:3:5 › has title (1.7s)
  ✓  4 [firefox] › example.spec.ts:11:5 › get started link (6.3s)
has title
  ✓  5 [webkit] › example.spec.ts:3:5 › has title (2.3s)
has title
  ✓  6 [webkit] › example.spec.ts:11:5 › get started link (2.3s)
has title

  6 passed (8.9s)
trace
trace の値の”on-first-retry”では retries の設定で複数の retires を設定している場合にテストに失敗した場合にリトライの trace を取得します。trace の値には trace を取得する on, 取得しない off, リトライで失敗した時に取得する”on-first-retry”,失敗した場合に取得する”retain-on-failure”があります。
trace を設定するとどのような情報を取得することができるか確認するために”on”にして実行すると playwright-report フォルダに data、trace フォルダが作成され、test-results フォルダの下にもテスト分のフォルダが作成されます。
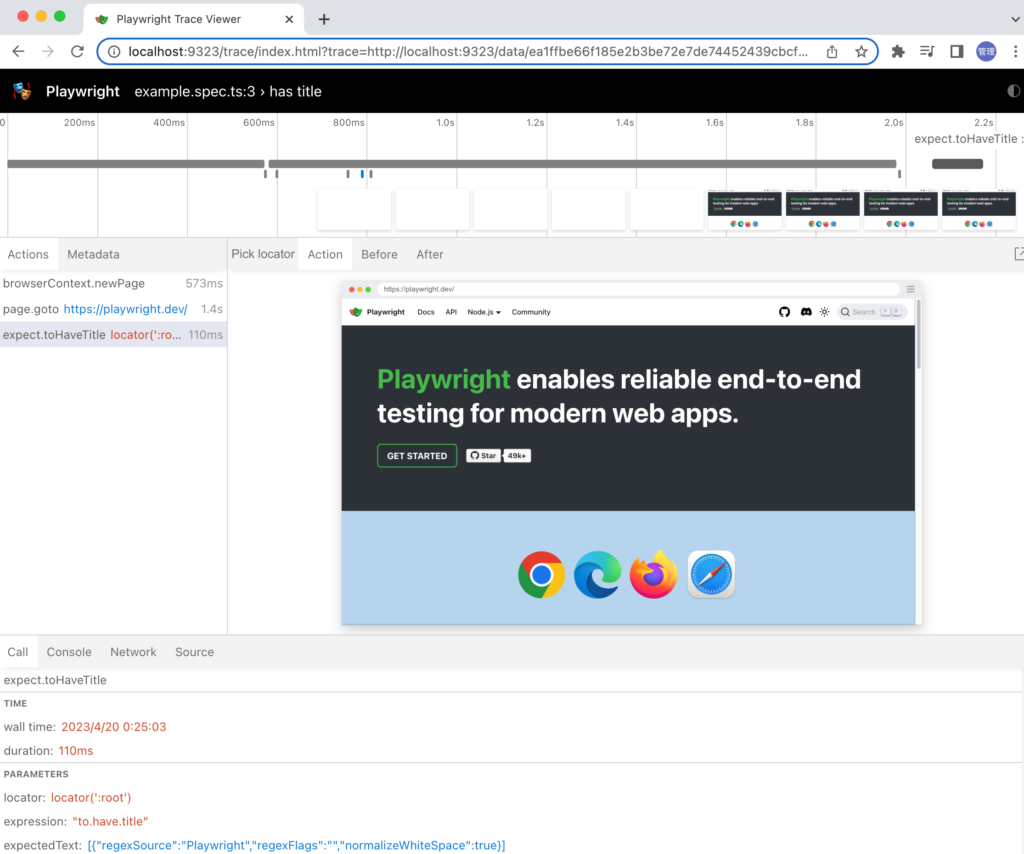
trace を取得後に Report を確認すると図の赤丸をつけたアイコンが表示されます。
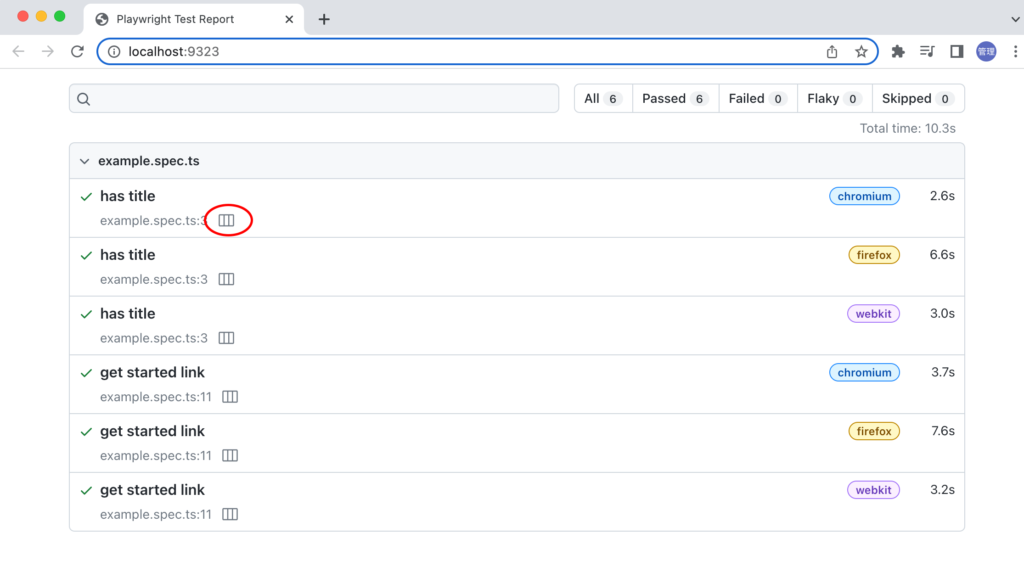
Trace Viewerで取得したtraceを確認することができます。
projects
projects ではテストを実施するブラウザを設定します。デフォルトで chromium, firefox, webkit の 3 つを利用してテストを実行しています。
chromium のみでテストを実行したい場合に残りの 2 つをコメントすることで chromium のみのテストを実行することができます。テストを実行すると chromium のみで実行されていることがわかります。
 % npx playwright test

Running 2 tests using 2 workers
[chromium] › example.spec.ts:3:5 › has title
has title
  2 passed (3.0s)

To open last HTML report run:

  npx playwright show-report
…devices[‘Desktop Chrome’]に設定している値を変更することでアクセスするブラウザやデバイスを変更することができます。各設定値によってどのような値が利用されるかについてはhttps://github.com/microsoft/playwright/blob/main/packages/playwright-core/src/server/deviceDescriptorsSource.jsonから確認することができます。
”Desktop Chrome”であれば下記のような設定が行われています。
  "Desktop Chrome": {
    "userAgent": "Mozilla/5.0 (Windows NT 10.0; Win64; x64) AppleWebKit/537.36 (KHTML, like Gecko) Chrome/113.0.5672.24 Safari/537.36",
    "screen": {
      "width": 1920,
      "height": 1080
    },
    "viewport": {
      "width": 1280,
      "height": 720
    },
    "deviceScaleFactor": 1,
    "isMobile": false,
    "hasTouch": false,
    "defaultBrowserType": "chromium"
  },
playwright.config.tsファイルの中に同じ”Desktop Chrome”でchannelが設定されているものとされないものがあります。channelをchromeを設定した場合には手元のOSにインストールされているChromeブラウザを利用してテストを行います。channelがない場合にはchromiumを利用してテストを行います。
  projects: [
    {
      name: 'chromium',
      use: { ...devices['Desktop Chrome'] },
    },
//略
    {
       name: 'Google Chrome',
       use: { ...devices['Desktop Chrome'], channel: 'chrome' },
     },
もしMac OSでmsedgeがインストールされていない状態で下記の設定を行いテストを実行するとmsedgeをインストールするメッセージが表示されます。
    {
      name: 'Microsoft Edge',
      use: { ...devices['Desktop Edge'], channel: 'msedge' },
    },
テスト実行時に表示されるメッセージは下記の通りです。
    Error: browserType.launch: Chromium distribution 'msedge' is not found at /Applications/Microsoft Edge.app/Contents/MacOS/Microsoft Edge
    Run "npx playwright install msedge"
msedgeのインストール
メッセージの指示通りmsedgeのインストールを行います。
% npx playwright install msedge
実行するとEdgeのインストールが行われ、アプリケーションにMicrosoft Edgeが追加されるのでmac OS上でEdgeブラウザを利用できるようになります。インストール後再度テストを実行するとインストールしたEdgeを利用してテストが行われます。
その他の設定
playwright.config.tsファイルではデフォルトで記述されていない設定項目がいくつもあります。その中からいくつかピックアップして動作確認を行います。
expect timeout
例えばエラーが発生した場合にexpect関数で5000msのタイムアウトが設定されていましたがこの値を設定したい場合には設定ファイルに以下を追加することでタイムアウトの時間を変更することができます。2000msのタイムアウトに変更しています。
//略
  expect: {
    timeout: 2000,
  },
//略
headless
デフォルトではテストはheadlessで行われ、オプションに–headedをつけることでブラウザのウィンドウが表示されることを確認しました。headlessの設定も設定ファイルで制御することができます。
useの中でheadlessプロパティをfalseに設定することでブラウザのウィンドウが表示されるようになります。
//略
use: {
  /* Base URL to use in actions like `await page.goto('/')`. */
  // baseURL: 'http://127.0.0.1:3000',

  /* Collect trace when retrying the failed test. See https://playwright.dev/docs/trace-viewer */
  // trace: 'on-first-retry',
  trace: 'on-first-retry',
  headless: false,
},
//略
VueでPlaywrightを利用
Vue で Playwright を利用した場合は npm init vue@latest コマンドを実行することで簡単に Playwright を利用することができます。npm init vue@latest コマンドを実行すると Vue で利用可能な機能の選択を行うことができます。End-to-End Testing Solution の選択項目の中に Playwright が含まれているので Playwright を選択するとプロジェクトの作成と同時に Playwright が一緒にインストールされ、サンプルテストもついているのでプロジェクト作成直後からテストを実行することができます。
 % npm init vue@latest

Vue.js - The Progressive JavaScript Framework

✔ Project name: … vue-playwright
✔ Add TypeScript? … No / Yes
✔ Add JSX Support? … No / Yes
✔ Add Vue Router for Single Page Application development? … No / Yes
✔ Add Pinia for state management? … No / Yes
✔ Add Vitest for Unit Testing? … No / Yes
✔ Add an End-to-End Testing Solution? › Playwright
✔ Add ESLint for code quality? … No / Yes
✔ Add Prettier for code formatting? … No / Yes

Scaffolding project in /Users/mac/Desktop/vue-playwright...

Done. Now run:

  cd vue-playwright
  npm install
  npm run format
  npm run dev
Playwright の機能を選択するとプロジェクトには Playwright に関する e2e フォルダと playwright.config.ts ファイルが作成されていることが確認できます。e2e フォルダは playwright.config.ts ファイルの testDir の設定で指定されているフォルダです。このフォルダにテストファイルを保存します。
playwright.config.ts ファイルの中身を確認するとここまでに動作確認した内容とほとんど設定内容が同じなのでどのような設定が行われているか理解することができます。
import type { PlaywrightTestConfig } from '@playwright/test'
import { devices } from '@playwright/test'

/**
 * Read environment variables from file.
 * https://github.com/motdotla/dotenv
 */
// require('dotenv').config();

/**
 * See https://playwright.dev/docs/test-configuration.
 */
const config: PlaywrightTestConfig = {
  testDir: './e2e',
  /* Maximum time one test can run for. */
  timeout: 30 * 1000,
  expect: {
    /**
     * Maximum time expect() should wait for the condition to be met.
     * For example in `await expect(locator).toHaveText();`
     */
    timeout: 5000
  },
  /* Fail the build on CI if you accidentally left test.only in the source code. */
  forbidOnly: !!process.env.CI,
  /* Retry on CI only */
  retries: process.env.CI ? 2 : 0,
  /* Opt out of parallel tests on CI. */
  workers: process.env.CI ? 1 : undefined,
  /* Reporter to use. See https://playwright.dev/docs/test-reporters */
  reporter: 'html',
  /* Shared settings for all the projects below. See https://playwright.dev/docs/api/class-testoptions. */
  use: {
    /* Maximum time each action such as `click()` can take. Defaults to 0 (no limit). */
    actionTimeout: 0,
    /* Base URL to use in actions like `await page.goto('/')`. */
    baseURL: 'http://localhost:5173',

    /* Collect trace when retrying the failed test. See https://playwright.dev/docs/trace-viewer */
    trace: 'on-first-retry',

    /* Only on CI systems run the tests headless */
    headless: !!process.env.CI
  },

  /* Configure projects for major browsers */
  projects: [
    {
      name: 'chromium',
      use: {
        ...devices['Desktop Chrome']
      }
    },
    {
      name: 'firefox',
      use: {
        ...devices['Desktop Firefox']
      }
    },
    {
      name: 'webkit',
      use: {
        ...devices['Desktop Safari']
      }
    }

    /* Test against mobile viewports. */
    // {
    //   name: 'Mobile Chrome',
    //   use: {
    //     ...devices['Pixel 5'],
    //   },
    // },
    // {
    //   name: 'Mobile Safari',
    //   use: {
    //     ...devices['iPhone 12'],
    //   },
    // },

    /* Test against branded browsers. */
    // {
    //   name: 'Microsoft Edge',
    //   use: {
    //     channel: 'msedge',
    //   },
    // },
    // {
    //   name: 'Google Chrome',
    //   use: {
    //     channel: 'chrome',
    //   },
    // },
  ],

  /* Folder for test artifacts such as screenshots, videos, traces, etc. */
  // outputDir: 'test-results/',

  /* Run your local dev server before starting the tests */
  webServer: {
    /**
     * Use the dev server by default for faster feedback loop.
     * Use the preview server on CI for more realistic testing.
    Playwright will re-use the local server if there is already a dev-server running.
     */
    command: process.env.CI ? 'vite preview --port 5173' : 'vite dev',
    port: 5173,
    reuseExistingServer: !process.env.CI
  }
}

export default config
Vue をインストールせず Playwright のみインストールした環境の設定との大きな違いとして webServer で開発サーバの起動の設定と use の中で baseURL の’http://localhost:5173’が設定されている点です。webServer の設定により、テスト実行時に開発サーバが起動していない場合は起動を行なってくれます。
テストのコマンドを確認するために package.json ファイルを開きます。インストールしたパッケージのバージョンを確認することができますが scripts プロパティに”playwrite test”を実行する test:e2e を確認することができます。
{
  "name": "vue-playwright",
  "version": "0.0.0",
  "private": true,
  "scripts": {
    "dev": "vite",
    "build": "run-p type-check build-only",
    "preview": "vite preview",
    "test:unit": "vitest",
    "test:e2e": "playwright test",
    "build-only": "vite build",
    "type-check": "vue-tsc --noEmit -p tsconfig.vitest.json --composite false",
    "lint": "eslint . --ext .vue,.js,.jsx,.cjs,.mjs,.ts,.tsx,.cts,.mts --fix --ignore-path .gitignore",
    "format": "prettier --write src/"
  },
  "dependencies": {
    "vue": "^3.2.47"
  },
  "devDependencies": {
    "@playwright/test": "^1.31.1",
    "@rushstack/eslint-patch": "^1.2.0",
    "@types/jsdom": "^21.1.0",
    "@types/node": "^18.14.2",
    "@vitejs/plugin-vue": "^4.0.0",
    "@vue/eslint-config-prettier": "^7.1.0",
    "@vue/eslint-config-typescript": "^11.0.2",
    "@vue/test-utils": "^2.3.0",
    "@vue/tsconfig": "^0.1.3",
    "eslint": "^8.34.0",
    "eslint-plugin-vue": "^9.9.0",
    "jsdom": "^21.1.0",
    "npm-run-all": "^4.1.5",
    "prettier": "^2.8.4",
    "typescript": "~4.8.4",
    "vite": "^4.1.4",
    "vitest": "^0.29.1",
    "vue-tsc": "^1.2.0"
  }
}
実際に”npm run test:e2e”コマンドを実行してテストを行います。
 % npm run test:e2e

> vue-playwright@0.0.0 test:e2e
> playwright test


Running 3 tests using 3 workers
  3 passed (5.4s)

To open last HTML report run:

  npx playwright show-report
3つのテストが実行され3つのテストにパスします。実行したテストはe2eフォルダに保存されているので確認します。ファイル名はvue.spec.tsです。
import { test, expect } from '@playwright/test';

// See here how to get started:
// https://playwright.dev/docs/intro
test('visits the app root url', async ({ page }) => {
  await page.goto('/');
  await expect(page.locator('div.greetings > h1')).toHaveText('You did it!');
})
goto メソッドの引数には”/“のみが指定されています。これは playwright.config.ts ファイルの baseURL で開発サーバの URL が指定されているためです。page オブジェクトの locator メソッドを利用して class 名が greetings の div 要素の子要素の h1 要素を取得してその要素の文字列に”You did it!”が含まれているかチェックを行っています。
“You did it!”がブラウザ上に表示されるのは App.vue から import した HelloWorld コンポーネントに props を介して”You did it!”が渡されていることで確認できます。
Vue プロジェクトでも簡単に Playwight が利用できることがわかりました。
ReactでPlaywrightを利用
ReactでPlaywrightをインストールするためにcreate-react-appコマンドでReactのプロジェクトを作成します。プロジェクト名はreact-playwrightを設定しています。
% npx create-react-app react-playwright --typescript
プロジェクト作成後に react-playwright フォルダに移動して Playwright のインストールを行います。Playwright では Experimental ですが Components Testing にも利用することができます。Components Testing については React だけではなく Vue や Svelte でも利用することができます。これまで通り End to End Testing を行うこともできるので本文書では End to End Testing で簡単な動作確認テストを行います。
Components Testing を利用する場合はインストールオプションに— —ct をつけて実行します。ct は Component Testing の略です。インストール時に React, vue, solid, svelte のどのフレームワークを利用するのか選択してブラウザのインストールを行うかどうか選択します。React を選択してブラウザのインストールは”Y”を選択します。
% npm init playwright@latest -- --ct
Getting started with writing end-to-end tests with Playwright:
Initializing project in '.'
✔ Which framework do you use? (experimental) · react
✔ Install Playwright browsers (can be done manually via 'npx playwright install')? (Y/n) · true
//略
Inside that directory, you can run several commands:

  npm run test-ct
    Runs the component tests.

  npm run test-ct -- --project=chromium
    Runs the tests only on Desktop Chrome.

  npm run test-ct App.test.ts
    Runs the tests in the specific file.

  npm run test-ct -- --debug
    Runs the tests in debug mode.

We suggest that you begin by typing:

  npm run test-ct

Visit https://playwright.dev/docs/intro for more information. ✨
プロジェクトが完了後はプロジェクトフォルダに移動して”npm install”コマンドを実行してください。
プロジェクトフォルダには playwright フォルダと playwright-ct.config.ts ファイルが作成されます。ファイルの中身を確認するとこれまでに利用してきた playwright.config.js ファイルと内容はほとんど同じですが、use で ctPort:3100 という設定があることが確認できます。testDir は”./“に設定されています。
import { defineConfig, devices } from '@playwright/experimental-ct-react';

/**
 * See https://playwright.dev/docs/test-configuration.
 */
export default defineConfig({
  testDir: './',
  /* The base directory, relative to the config file, for snapshot files created with toMatchSnapshot and toHaveScreenshot. */
  snapshotDir: './__snapshots__',
  /* Maximum time one test can run for. */
  timeout: 10 * 1000,
  /* Run tests in files in parallel */
  fullyParallel: true,
  /* Fail the build on CI if you accidentally left test.only in the source code. */
  forbidOnly: !!process.env.CI,
  /* Retry on CI only */
  retries: process.env.CI ? 2 : 0,
  /* Opt out of parallel tests on CI. */
  workers: process.env.CI ? 1 : undefined,
  /* Reporter to use. See https://playwright.dev/docs/test-reporters */
  reporter: 'html',
  /* Shared settings for all the projects below. See https://playwright.dev/docs/api/class-testoptions. */
  use: {
    /* Collect trace when retrying the failed test. See https://playwright.dev/docs/trace-viewer */
    trace: 'on-first-retry',

    /* Port to use for Playwright component endpoint. */
    ctPort: 3100,
  },

  /* Configure projects for major browsers */
  projects: [
    {
      name: 'chromium',
      use: { ...devices['Desktop Chrome'] },
    },
    {
      name: 'firefox',
      use: { ...devices['Desktop Firefox'] },
    },
    {
      name: 'webkit',
      use: { ...devices['Desktop Safari'] },
    },
  ],
});
playwright フォルダの中には index.html, index.tsx ファイルがあります。このファイルは Components Testing を行う際に利用するファイルです。
package.json ファイルを確認すると scripts に”playwright test -c playwright-ct.config.ts”が test-ct という名前で追加されていることが確認できます。playwright のパッケージは@playwright/test ではなく@playwright/experimental-ct-react であることがわかります。
テストを実行するために”npm run test-ct”コマンドを実行します。残念ながら ReferenceError によりテストを実施することはできません。
 % npm run test-ct

> react-playwright@0.1.0 test-ct
> playwright test -c playwright-ct.config.ts


ReferenceError: test is not defined
   at src/App.test.tsx:5

//略
テストファイルとして App.test.tsx ファイルが実行されているので中身を確認します。中身を見ると Playwright 用のファイルではなく create-react-app を実行するとデフォルトで作成される単体テスト用のファイルであることがわかります。
import React from 'react';
import { render, screen } from '@testing-library/react';
import App from './App';

test('renders learn react link', () => {
  render(<App />);
  const linkElement = screen.getByText(/learn react/i);
  expect(linkElement).toBeInTheDocument();
});
npm run test コマンドを実行すると App.test.tsx ファイルを利用した単体テストが実行できテストにパスできます。
新たにフォルダを作成して playwright-ct.config.ts ファイルの testDir で作成したフォルダを設定することもできますが Playwright でテストができるように App.test.tsx ファイルの内容を更新します。
import { test, expect } from '@playwright/test';

// See here how to get started:
// https://playwright.dev/docs/intro
test('visits the app root url', async ({ page }) => {
  await page.goto('http://localhost:3000/');
  await expect(page.locator('a')).toHaveText(/Learn React/);
});

テストを実行しますが実行前にnpm startコマンドで開発サーバの起動を行っておきます。起動していない場合にはエラーとなります。起動後にテストを実行すると成功します。
% npm run test-ct

> react-playwright@0.1.0 test-ct
> playwright test -c playwright-ct.config.ts


Running 3 tests using 3 workers
  3 passed (5.4s)
開発サーバがテスト実行時に起動していない場合に起動させるためにはplaywright-ct-config.tsファイルにwebServerの設定を行います。
  webServer: {
    command: 'yarn start',
    port: 3000,
    reuseExistingServer: !process.env.CI,
  },
page.goto(‘http://localhost:3000/’)の引数をpage.goto(‘/’)にするためにはplaywright-ct-config.tsのuseにbaseURLを追加します。
  use: {
//略
    /* Port to use for Playwright component endpoint. */
    ctPort: 3100,
    baseURL: 'http://localhost:3000',
  },
ReactでもPlaywrightを利用してEnd to End Testingを行える環境を構築することができました。
Component Testing
ドキュメントに記述してあるComponentのテストのコードを利用してAppコンポーネントのテストを行います。
import { test, expect } from '@playwright/experimental-ct-react';
import App from './App';

test('should work', async ({ mount }) => {
  const component = await mount(<App />);
  await expect(component).toContainText('Learn React');
});
import した App コンポーネントを mount fixtures を利用してマウントを行い、マウントしたコンポーネントの中に”Learn React”という文字列が含まれているかテストしています。
Component のテストでは npm start で起動する開発サーバを利用しないので playwright-ct-config.ts の webServers の設定を削除することができます。
テストはこれまで同様に npm run test-ct コマンドで行うことができます。