Laravel Polymorphicリレーション完全理解
MySQLやPostgres, Oracleなどのリレーショナルデータベースを利用してアプリケーションの構築を行うとシンプルなテーブル構成でもone to oneリレーションシップやone to manyリレーションシップを利用する機会があるのでそれらの機能/設定を理解できるている人は多いかと思います。しかし本文書で説明を行うpolymorphoicリレーションについては利用方法がわかならいまたは利用した経験がないという人が大半だと思います。Laravelのドキュメントに記載されている例を使って、one to oneのpolymorphic リレーションをできるだけたくさんの人に理解してもらえるように説明を行っていきます。

Polymorphicという難しい単語のため直感的に想像もできないことから何か難しいものではという思い込みがあり理解するための努力に躊躇してしまいそうですが1つのモデルを複数のモデルで共有するという単純な仕組みです。仕組みがわかってしまえばたったこれだけと感じるかもしれません。
目次
Polymorphicリレーションについて
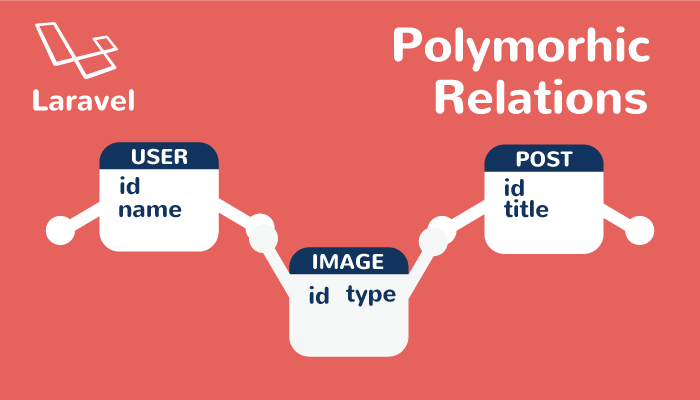
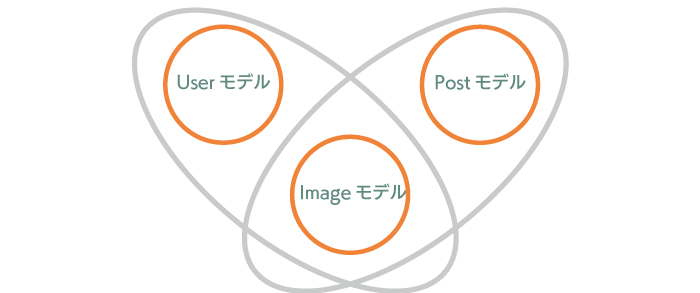
ブログのアプリケーションを構築する例を使って説明していきます。ブログアプリケーションにユーザ情報を保存するUserモデルと記事情報を保存するPostモデルを作成し、各ユーザにはプロファイル画像、各記事にはトップ画像を保存できるとします。
通常であれば、各モデルが持つ画像が1枚であれば、Userモデルにプロファイル画像の情報を保存する列、Postモデルにはトップ画像の情報を保存する列を作成することになります。複数の画像の情報を保存したい場合はUser用のUserImageモデル、Post用のPostImageモデルを別に作成し、one to oneやone to manyリレーションでUserモデルやPostモデルと結びつけます。
Polymorphicでは、画像の情報を保存するImageモデルを1つ追加し、UserとPostから同時にリレーションをもたせます。つまり、ImageモデルをUserモデルとPostモデルで共有します。この共有化を行うことがPolymorphicリレーションを持たせることを意味します。
Polymorphicのテーブル構造について
Laravelではpolymorphicを使用するためにimageable_idとimageable_typeという2つの列を追加し、この2つの列を使って共有化を実現します。画像情報を保存するのでimageableという名前を付けています。状況に合わせて名前は変更してください。imageable_typeには、App\User(App\Models\User)かApp\Post(App\Models\Post)のどちらかのモデル情報を保存し、imageable_idにはUserかPostのどちらかのidを保存します。
最終的にテーブルにデータを登録すると以下のような関連を持たせることができます。
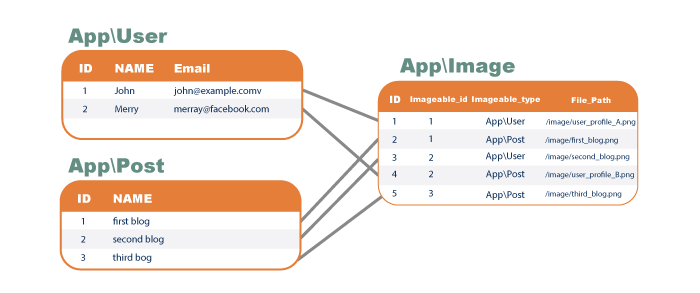
例えばUserテーブルのユーザidが2のユーザのプロファイル画像を登録したい場合は、imageable_typeにはApp\User、imageable_idに2を指定して保存を行います。保存した画像は、imageable_typeにApp\User、imageable_idに2を指定すれば取得することができます。
Polymorphicテーブルを作成
ここまでの説明でてきた2つの画像で2つのモデルで1つのモデルを共有するというpolymorphicのイメージはつかめてもらえたかと思います。ここからは上記の説明の例を元に実際にテーブルを作成して、動作確認を行っていきます。
Userテーブルの作成
usersテーブルのマイグレーションファイルはインストール時にLaravelで作成されますが、構造をシンプルにするためにnameとemailのみの列として作成します。
public function up()
{
Schema::create('users', function (Blueprint $table) {
    $table->bigIncrements('id');
    $table->string('name');
    $table->string('email')->unique();
    $table->timestamps();
});
}
Postテーブルの作成
Post.phpファイルはphp arisan make:modelコマンドで作成します。以下のコマンドでは、migrationファイルも同時に作成されます。
env_test $ php artisan make:model Post -m
postsテーブルにはシンプルにするためname列だけで作成します。
public function up()
{
Schema::create('posts', function (Blueprint $table) {
    $table->bigIncrements('id');
    $table->string('name');
    $table->timestamps();
});
}
Polymorphicテーブルの作成(Image)
つぎにPolymorphicで最も重要なImage.phpファイルを作成します。
env_test $ php artisan make:model Image -m
マイグレーションファイルにはファイルのパスを保存する列とPolymorphicで使用するimageable列には、stringやintegerといった通常の型ではなくmorphs使用して作成します。
public function up()
{
    Schema::create('images', function (Blueprint $table) {
        $table->bigIncrements('id');
        $table->string('file_path');
        $table->morphs('imageable');
        $table->timestamps();
    });
}
列の型をmorphsにすることによってどのような列が追加されるか確認を行います。使用するデータベースによってテーブル情報の確認方法は異なりますが、本環境はsqliteを使用しているので、sqliteで確認すると下記のようにimageable_typeとimageable_idが追加されていることがわかります。
sqlite> PRAGMA table_info('images');
0|id|integer|1||1
1|imageable_type|varchar|1||0
2|imageable_id|integer|1||0
3|file_path|varchar|1||0
4|created_at|datetime|0||0
5|updated_at|datetime|0||0
Modelファイルへの追加
UserモデルとImageモデル, PostモデルとImageモデルとの関係をModelファイルを使用して記述します。
User.phpにmorphOneメソッドを追加します。one to oneリレーションシップではhasOneメソッドとなりますが、PolymorphicではmorphOneになります。
public function image()
{
    return $this->morphOne('App\Image', 'imageable');
}
Post.phpにも同様にmorphOneメソッドを追加します。
public function image()
{
    return $this->morphOne('App\Image', 'imageable');
}
Imageモデルには、morphToメソッドを追加します。one to oneリレーションシップでのbelongsToメソッドに相当します。
public function imageable()
{
    return $this->morphTo();
}
データの作成
Postへのデータ登録
php artisan tinkerを使用して、Imageモデルへのデータの登録を行います。
- Postモデルを使用してpostsテーブルに1件データを作成します。作成したデータは$postに保存します。
- 次にImageモデルを使用して$imageを作成し、$imeageのfile_pathにimage/post_1.imgを設定します。
- Postモデルはimageメソッドを持っているのでimageメソッドを使用して$imageを保存しています。この処理により、$postと$imageが関連づけられます。
保存後のimageテーブルのimageable_typeには、App\Postが入っていることが確認できます。
$ php artisan tinker
Psy Shell v0.9.9 (PHP 7.1.23 — cli) by Justin Hileman
>>> $post = new App\Post();
=> App\Post {#2958}
>>> $post->name = 'first post'
=> "first post"
>>> $post->save();
=> true
>>> $image = new App\Image();
=> App\Image {#2964}
>>> $image->file_path = 'image/post_1.img'
=> "image/post_1.img"
>>> $post->image()->save($image);
=> App\Image {#2964
     file_path: "image/post_1.img",
     imageable_id: 1,
     imageable_type: "App\Post",
     updated_at: "2019-06-25 01:10:19",
     created_at: "2019-06-25 01:10:19",
     id: 1,
   }
データ登録後は、Postに関連する画像は下記のように取得することができます。
>>> App\Post::find(1)->image
=> App\Image {#2971
     id: "1",
     imageable_type: "App\Post",
     imageable_id: "1",
     file_path: "image/post_1.img",
     created_at: "2019-06-25 01:10:19",
     updated_at: "2019-06-25 01:10:19",
   }
>>> App\Post::find(1)->image->file_path
=> "image/post_1.img"
Userへのデータ登録
userへのデータ登録もpostと同様に行うことができます。
$ php artisan tinker
Psy Shell v0.9.9 (PHP 7.1.23 — cli) by Justin Hileman
>>> $user = new App\User()
=> App\User {#2957}
>>> $user->name = 'john'
=> "john"
>>> $user->email = 'john@example.com'
=> "john@example.com"
>>> $user->save()
=> true
>>> $image = new App\Image()
=> App\Image {#2961}
>>> $image->file_path = 'image/profile_A.png'
=> "image/profile_A.png"
>>> $user->image()->save($image)
=> App\Image {#2961
     file_path: "image/profile_A.png",
     imageable_id: 1,
     imageable_type: "App\User",
     updated_at: "2019-06-25 01:26:16",
     created_at: "2019-06-25 01:26:16",
     id: 2,
   }
先程はpostを使用してimageの情報を取得しましたが、今度はimageからuserもしくはpostの情報を取得します。
Imageのidが2にはUserの情報、Imageのidが1にはPostの情報が入っているので結果は下記のようになります。
>>> App\Image::find(2)->imageable
=> App\User {#2966
     id: "1",
     name: "john",
     email: "john@example.com",
     created_at: "2019-06-25 01:25:38",
     updated_at: "2019-06-25 01:25:38",
   }
>>> App\Image::find(1)->imageable
=> App\Post {#2951
     id: "1",
     name: "first post",
     created_at: "2019-06-25 01:06:13",
     updated_at: "2019-06-25 01:06:13",
   }
>>>
名前がpolymorphicと発音も意味もわからない難しいイメージのある単語なので名前の通り難しいそうという印象を受けてしまいそうですが、シンプルな例を使って動作確認を行うと難しいものではないとわかっていただけたのではないでしょうか。何度も繰り返していますが要は1つのモデルを2つのモデルで共有するための仕組みです。
Polymorphicのクエリー
Polymorphicリレーションに対してクエリーを実行したい場合はwhereHasMorphメソッドを利用して行うことができます。
Image::whereHasMorph('imageable', [User::class, Post::class], function ($query, $type) {
    if ($type === User::class) {
        //Userに関するquery
        // $query->
    }

    if ($type === Post::class) {
        //Postに関するquery
        // $query->
    }
})->where(..)->get();