Headless UIのTanStack Tableライブラリでテーブルの実装方法を学ぶ

アプリケーションを構築する際にPagination(ページネーション)やSorting(ソート)の機能を持ったテーブルを作成するためにライブラリを利用したいけどデザインは自分達で行いたいなと思った経験はないですか?そんな人達のために作られたライブラリが TanStack Tableです。TanStack TableはHeadless UI なのでテーブルを実装する際に必要となる機能部分とデザイン部分が分かれているので機能部分だけをTanStack Tableを利用しデザインは各自で行うことができます。また一つのフレームワークに特化したライブラリではないのであるフレームワークでの利用方法が理解できれば他のフレームワークでもその知識を活かすことができます。使いこなすためには TanStack Table が持つ API を理解する必要があります。一度動作確認で設定してしまえば結構簡単に感じるのですがドキュメントだけを見て初めて設定を行うと結構難しいというのが個人的な感想です。しかし本文書を読めば理解が早まるはずです。

Headless UIなのでShadcn UIなどのUIライブラリでも利用されています。

プロジェクトの作成
Vite を利用して動作確認を行うための TypeScript の React プロジェクトの作成を行います。
 % npm create vite@latest
✔ Project name: … vite-tanstack-table
✔ Select a framework: › React
✔ Select a variant: › TypeScript

Scaffolding project in /Users/mac/Desktop/vite-tanstack-table...

Done. Now run:

  cd vite-tanstack-table
  npm install
  npm run dev
プロジェクト作成後、npm installでJavaScriptのパッケージをインストールした後にTanStack Table のインストールを行います。
$ cd vite-tanstack-table
$ npm install
$ npm install @tanstack/react-table
インストールしたライブラリとバージョンを package.json ファイルで確認しておきます。
{
  "name": "vite-tanstack-table",
  "private": true,
  "version": "0.0.0",
  "type": "module",
  "scripts": {
    "dev": "vite",
    "build": "tsc && vite build",
    "lint": "eslint src --ext ts,tsx --report-unused-disable-directives --max-warnings 0",
    "preview": "vite preview"
  },
  "dependencies": {
    "@tanstack/react-table": "^8.9.3",
    "react": "^18.2.0",
    "react-dom": "^18.2.0"
  },
  "devDependencies": {
    "@types/react": "^18.2.14",
    "@types/react-dom": "^18.2.6",
    "@typescript-eslint/eslint-plugin": "^5.61.0",
    "@typescript-eslint/parser": "^5.61.0",
    "@vitejs/plugin-react": "^4.0.1",
    "eslint": "^8.44.0",
    "eslint-plugin-react-hooks": "^4.6.0",
    "eslint-plugin-react-refresh": "^0.4.1",
    "typescript": "^5.0.2",
    "vite": "^4.4.0"
  }
}
TanStack Table の設定
データの取得とリスト表示
テーブル作成に利用するデータは無料で利用できる JSONPlaceHolderのデータを利用します。“https://jsonplaceholder.typicode.com/posts”にアクセスすると100件分のPostデータを取得することができます。
App.tsx ファイルにデータ取得のコードを記述します。
import { useEffect, useState } from 'react';
type Post = {
userId: number;
id: number;
title: string;
body: string;
};
function App() {
const [posts, setPosts] = useState<Post[]>([]);
useEffect(() => {
const getPosts = async () => {
const response = await fetch(
'https://jsonplaceholder.typicode.com/posts'
);
const data = await response.json();
setPosts(data);
};
getPosts();
});
return (
<div style={{ margin: '2em' }}>
<h1>Posts</h1>
<ul>
{posts.map((post) => (
<li key={post.id}>{post.title}</li>
))}
</ul>
</div>
);
}
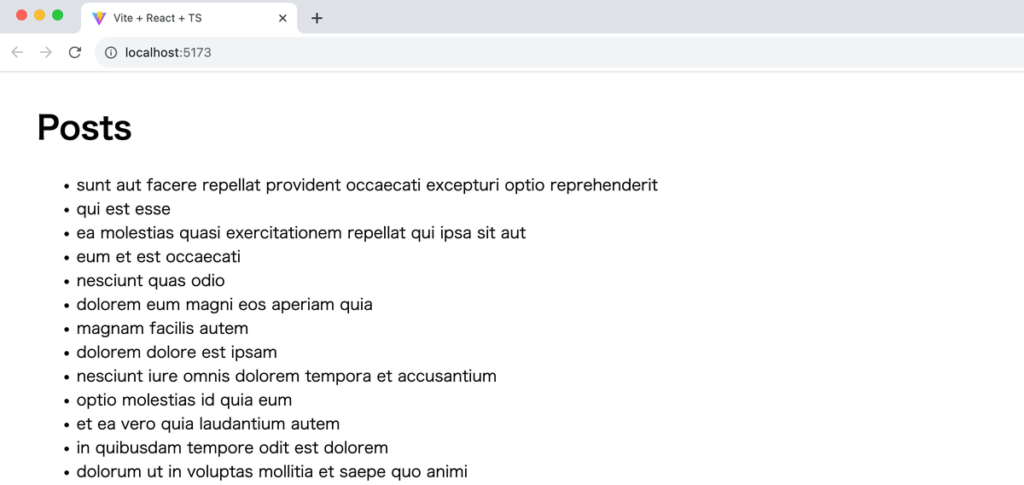
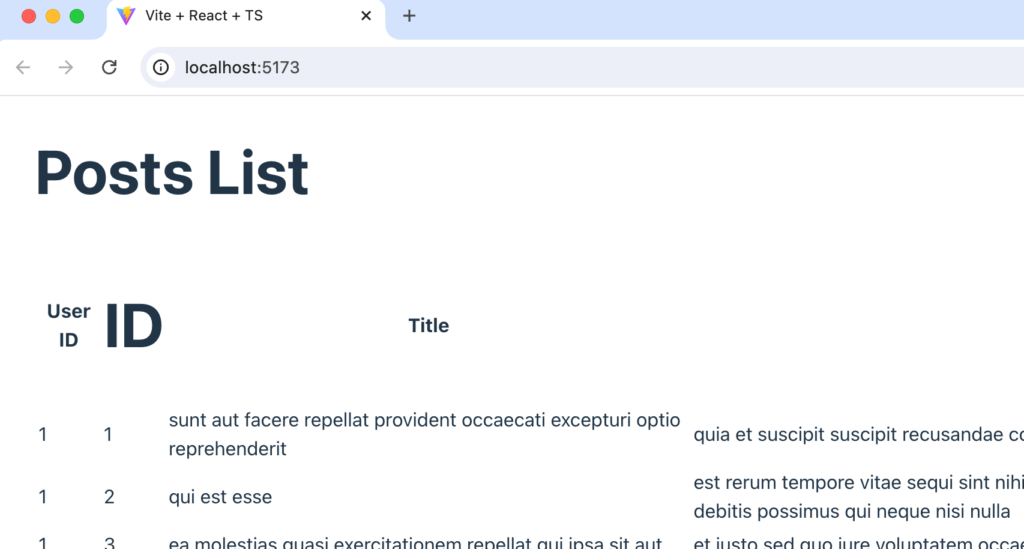
export default App;App.tsx ファイルを更新後、“npm run dev”コマンドで開発サーバを起動してブラウザでアクセスすると Post の一覧が表示されます。
初めての TanStack Table
JSONPlaceHolderがデータを取得してブラウザ上に表示することができたので取得したデータを利用して TanStack Tableでテーブルを作成します。
TanStack Tableでテーブルをブラウザ上に表示するコードをApp.tsxファイルに記述します。
import {
  flexRender,
  getCoreRowModel,
  useReactTable,
} from '@tanstack/react-table';
import { useEffect, useState } from 'react';

type Post = {
  userId: number;
  id: number;
  title: string;
  body: string;
};

function App() {
  const [posts, setPosts] = useState<Post[]>([]);

  useEffect(() => {
    const getPosts = async () => {
      const response = await fetch(
        'https://jsonplaceholder.typicode.com/posts'
      );
      const data = await response.json();
      setPosts(data);
    };

    getPosts();
  }, []);

  const columns = [
    {
      accessorKey: 'userId',
    },
    {
      accessorKey: 'id',
    },
    {
      accessorKey: 'title',
    },
    {
      accessorKey: 'body',
    },
  ];

  const table = useReactTable({
    data: posts,
    columns,
    getCoreRowModel: getCoreRowModel(),
  });

  return (
    <div style={{ margin: '2em' }}>
      <h1>Posts List</h1>
      <table>
        <thead>
          {table.getHeaderGroups().map((headerGroup) => (
            <tr key={headerGroup.id}>
              {headerGroup.headers.map((header) => (
                <th key={header.id}>
                  {flexRender(
                    header.column.columnDef.header,
                    header.getContext()
                  )}
                </th>
              ))}
            </tr>
          ))}
        </thead>
        <tbody>
          {table.getRowModel().rows.map((row) => (
            <tr key={row.id}>
              {row.getVisibleCells().map((cell) => (
                <td key={cell.id}>
                  {flexRender(cell.column.columnDef.cell, cell.getContext())}
                </td>
              ))}
            </tr>
          ))}
        </tbody>
      </table>
    </div>
  );
}

export default App;
コード内では@tanstack/react-tableからimportしたuseReactTable の引数にオプションを指定することで tableオブジェクトを作成します。table オブジェクトのプロパティにはテーブルに関する様々な関数が含まれており戻される関数を利用してテーブルの設定を行なっていきます。useReactTable のオプションに設定を追加することで機能の追加を行うことができます。
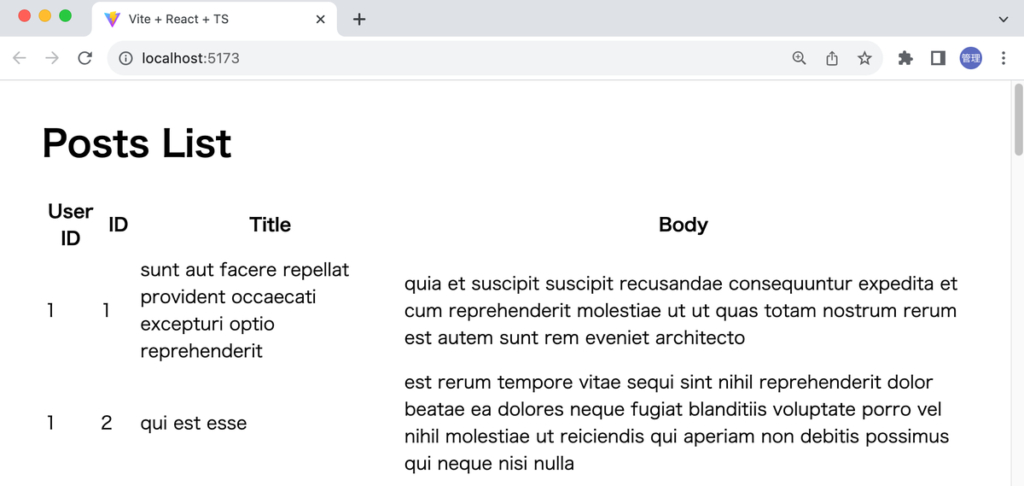
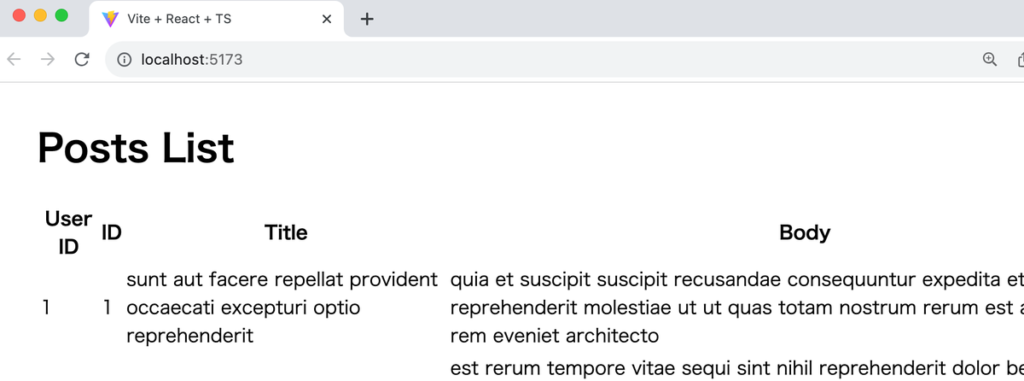
まずはコードの内容よりも実際にブラウザで動作することを確認すると下記のように表示されます。Headless UIと呼ばれる通り、テーブルは表示されていますがテーブルの罫線など何もスタイルは設定されていません。
コードの確認
TanStack Tableを利用してテーブルの作成を行うことができたので設定したコードの内容を確認していきます。
useReactTableの確認
useReactTableの引数で設定しているオプションのdata, columns, getCoreRowModel は必須なプロパティです。どれか一つでも設定を行わないとTypeScriptがエラーで教えてくれます。
dataプロパティ にはテーブルに表示したいPostデータを設定します。オブジェクトを要素に持つ配列です。columsプロパティには配列で accessorKey を持つオブジェクトを設定します。accessorKey は Post データが持つデータのプロパティの名前と一致する必要があり一意の値を設定する必要があります。同じ accssorKey を設定するとブラウザのコンソールに下記のエラーが表示されます。
react-dom.development.js:86 Warning: Encountered two children with the same key, `99_id`. Keys should be unique so that components maintain their identity across updates. Non-unique keys may cause children to be duplicated and/or omitted — the behavior is unsupported and could change in a future version.
JSX側の確認
JSX に記述されている table の getHeaderGroup メソッドはテーブルのヘッダー情報、getRowModel メソッドはテーブルの Row 情報(行)を戻します。
getHeaderGroup メソッドから戻される HeaderGroup の headers プロパティには header オブジェクトが配列で含まれています。headers を map 関数で展開したheader オブジェクトを FlexRender 関数を利用してヘッダーを表示しています。
getRowModel メソッドから戻されるオブジェクトにはプロパティとして配列 rows が含まれています。 配列の rows を map 関数で展開した row オブジェクトが持つ row.getVisibleCells メソッドで各行の cell を配列で取得しています。cell の配列を map 関数で展開した cell オブジェクトを FlexRender 関数を利用して行を表示しています。
ここまででuseReactTableから戻されたtableの持つメソッドを利用して Table を設定していくことを理解することができました。
取得データの活用
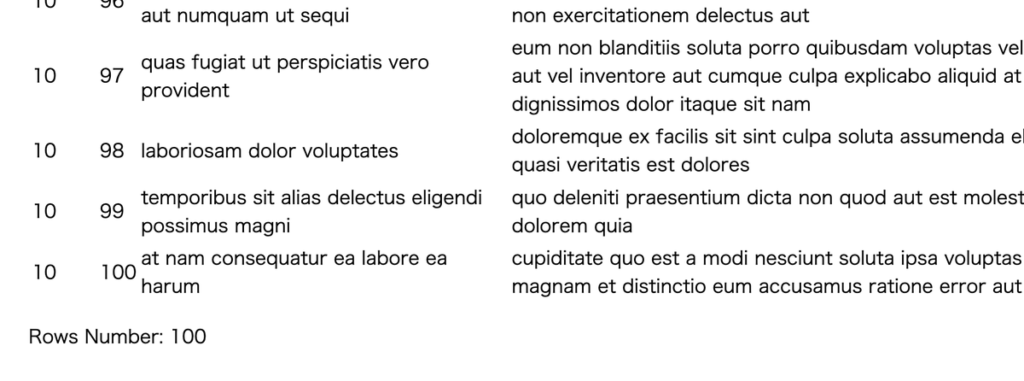
各メソッドから戻されるデータを理解することができればテーブルに関する情報を取得することができます。例えば getRowModel から取得する rows プロパティはすべての行情報を持った配列になっているので length を利用して行数を取得することもできます。テーブルタグの閉じタグの後に追加を行っています。
<p>Rows Number: {table.getRowModel().rows.length}</p>
getRowModel から取得する 配列の rows プロパティに slice メソッドを利用することで表示する行の数を指定することも可能です。
<tbody>
  {table
    .getRowModel()
    .rows.slice(0, 5)
    .map((row) => (
      <tr key={row.id}>
        {row.getVisibleCells().map((cell) => (
          <td key={cell.id}>
            {flexRender(cell.column.columnDef.cell, cell.getContext())}
          </td>
        ))}
      </tr>
    ))}
</tbody>
テーブルのセルのカスタマイズ
ヘッダー名の変更
columns の accssorKey で設定した値がそのままヘッダーとして表示されていましたが header プロパティを利用することで任意の名前に変更することができます。
const columns = [
  {
    accessorKey: 'userId',
    header: 'User ID',
  },
  {
    accessorKey: 'userId',
    header: 'ID',
  },
  {
    accessorKey: 'title',
    header: 'Title',
  },
  {
    accessorKey: 'body',
    header: 'Body',
  },
];
header プロパティを設定することで設定した値に列名が変わっていることが確認できます。
header の値は文字列ではなく関数を設定することもできます。さらに HTML 文を利用することもできます。
const columns = [
  {
    accessorKey: 'userId',
    header: () => 'User ID',
  },
  {
    accessorKey: 'id',
    header: () => <h1>ID</h1>,
  },
  {
    accessorKey: 'title',
    header: 'Title',
  },
  {
    accessorKey: 'body',
    header: 'Body',
  },
];
設定したHTMLタグが反映されていることが確認できます。
cellプロパティによるヘッダーの加工
列の文字をすべて大文字にしたい場合は cell プロパティ を利用して行うことができます。 props の型が any になっているため TypeScript のエラーは表示されていますが下記の設定でセルの文字がすべて大文字になります。
{
  accessorKey: 'title',
  header: 'Title',
  cell: (props) => props.getValue().toUpperCase(),
},
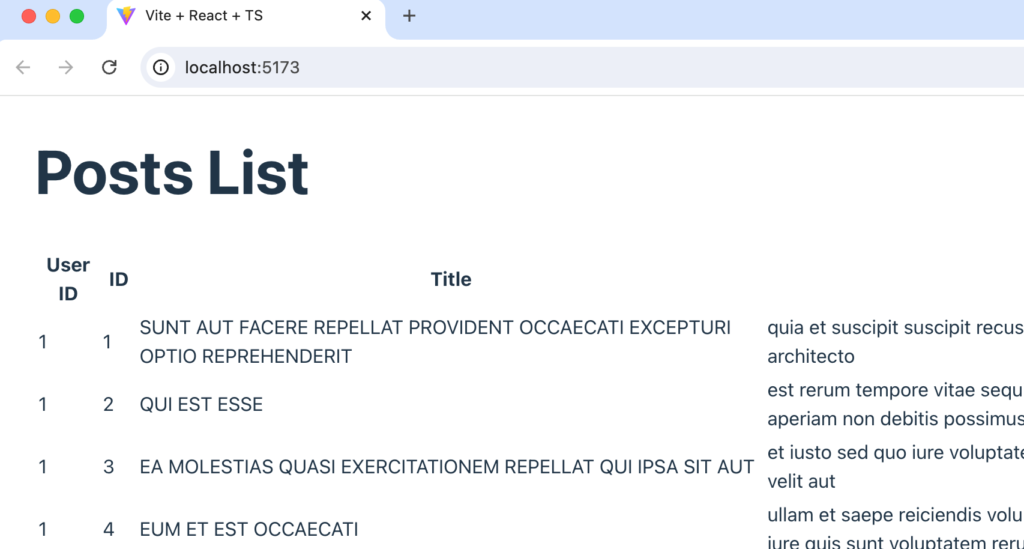
Title列に表示されている文字がすべて大文字になっていることがわかります。
columnHelper
columns を定義する際に columnHelper を利用することができます。cell プロパティを利用した際に先ほどは props の型が any になっていましたが createColumnHelper 関数で型の指定を行っているので props の型が設定されます。
import {
  flexRender,
  getCoreRowModel,
  useReactTable,
  createColumnHelper,
} from '@tanstack/react-table';
//略
const columnHelper = createColumnHelper<Post>();

const columns = [
  columnHelper.accessor('userId', {
    header: 'User ID',
  }),
  columnHelper.accessor('id', {
    header: () => 'ID',
  }),
  columnHelper.accessor('title', {
    header: 'Title',
    cell: (props) => props.getValue().toUpperCase(),
  }),
  columnHelper.accessor('body', {
    header: () => 'Body',
  }),
];
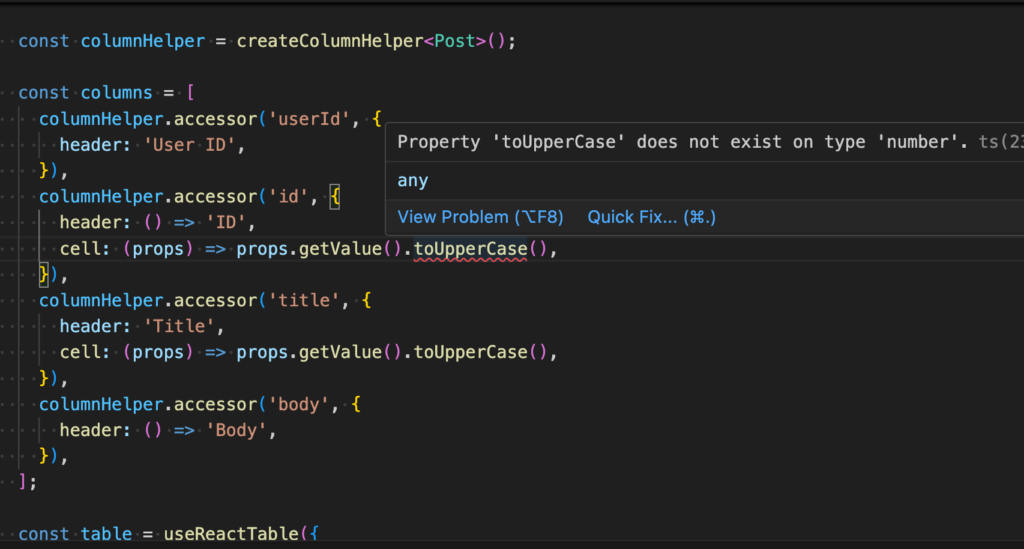
型が正しく設定されているので columnHelper を利用して id で同様の設定を行おうとする cell プロパティに関して型の問題でエラーとなります。id の number には toUpperCase メソッドは利用できないためです。
複数の列の情報をまとめたい場合
例えば firstName と lastName のプロパティを持つデータをテーブルにしたい場合は 2 つの列をまとめて fullName として表示させたい場合もあるかと思います。その場合は accessorFn 関数を利用することができます。
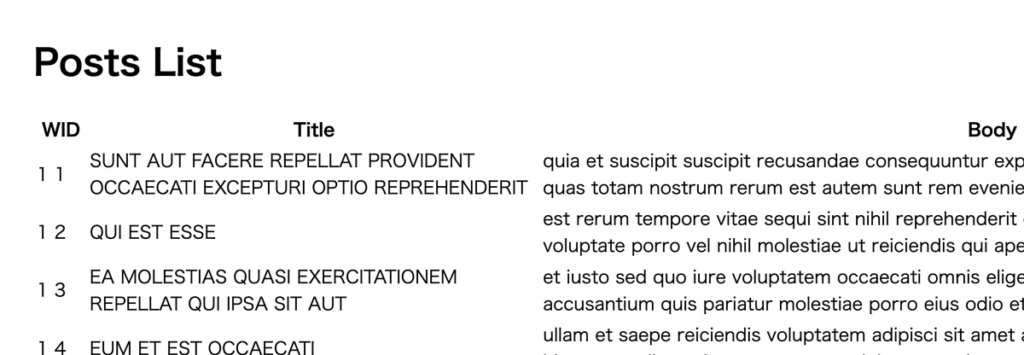
ここでの設定する例はあまり適切ではありませんが下記の例では WID という列名と rowId と id が一つのセルに表示されます。
const columns = [
  columnHelper.accessor((row) => `${row.userId} ${row.id}`, {
    id: 'WID',
  }),
  columnHelper.accessor('title', {
    header: 'Title',
    cell: (props) => props.getValue().toUpperCase(),
  }),
  columnHelper.accessor('body', {
    header: () => 'Body',
  }),
];
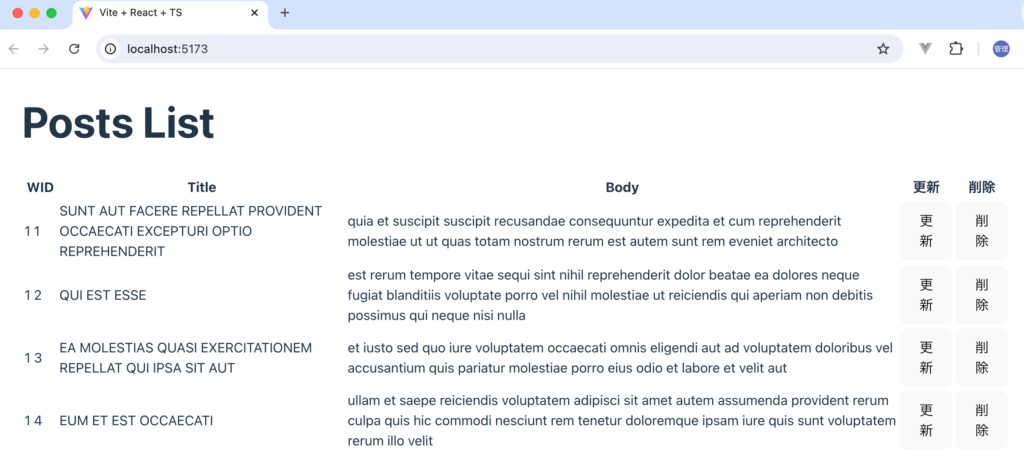
更新、削除列を追加したい場合
ここまでの設定では列を accessor 列として設定していましたが display 列に変更することができます。display 列を設定することでテーブルのデータに含まれない更新や削除列を追加することができます。
const updateRow = (id: number) => {
  console.log('update', id);
};

const deleteRow = (id: number) => {
  console.log('delete', id);
};

const columnHelper = createColumnHelper<Post>();

const columns = [
  columnHelper.accessor((row) => `${row.userId} ${row.id}`, {
    id: 'WID',
  }),
  columnHelper.accessor('title', {
    header: 'Title',
    cell: (props) => props.getValue().toUpperCase(),
  }),
  columnHelper.accessor('body', {
    header: () => 'Body',
  }),
  columnHelper.display({
    id: 'update',
    header: '更新',
    cell: (props) => (
      <button onClick={() => updateRow(props.row.original.id)}>更新</button>
    ),
  }),
  columnHelper.display({
    id: 'delete',
    header: () => '削除',
    cell: (props) => (
      <button onClick={() => deleteRow(props.row.original.id)}>削除</button>
    ),
  }),
];
設定した更新ボタンと削除ボタンが表示されます。ボタンをクリックするとブラウザのデベロッパーツールのコンソールにクリックしたボタンとidが表示されます。
Pagination の設定
これまではデータを表示するだけで表示するだけであればTanStack Tableを利用する意味はありません。ここではTanStack Tableが持つPaginationの機能の設定方法を確認します。
Pagination を利用するために getPaginationRowModel を import として userReactTable の引数のオブジェクトに追加します。
import {
  flexRender,
  getCoreRowModel,
  useReactTable,
  getPaginationRowModel,
} from '@tanstack/react-table';
import { useEffect, useState } from 'react';

type Post = {
  userId: number;
  id: number;
  title: string;
  body: string;
};

function App() {
  const [posts, setPosts] = useState<Post[]>([]);

  useEffect(() => {
    const getPosts = async () => {
      const response = await fetch(
        'https://jsonplaceholder.typicode.com/posts'
      );
      const data = await response.json();
      setPosts(data);
    };

    getPosts();
  }, []);

  const columns = [
    {
      accessorKey: 'userId',
      header: 'User ID',
    },
    {
      accessorKey: 'id',
      header: 'ID',
    },
    {
      accessorKey: 'title',
      header: 'Title',
    },
    {
      accessorKey: 'body',
      header: 'Body',
    },
  ];

  const table = useReactTable({
    data: posts,
    columns,
    getCoreRowModel: getCoreRowModel(),
    getPaginationRowModel: getPaginationRowModel(),
  });

  return (
    <div style={{ margin: '2em' }}>
      <h1>Posts List</h1>
      <table>
        <thead>
          {table.getHeaderGroups().map((headerGroup) => (
            <tr key={headerGroup.id}>
              {headerGroup.headers.map((header) => (
                <th key={header.id}>
                  {flexRender(
                    header.column.columnDef.header,
                    header.getContext()
                  )}
                </th>
              ))}
            </tr>
          ))}
        </thead>
        <tbody>
          {table.getRowModel().rows.map((row) => (
            <tr key={row.id}>
              {row.getVisibleCells().map((cell) => (
                <td key={cell.id}>
                  {flexRender(cell.column.columnDef.cell, cell.getContext())}
                </td>
              ))}
            </tr>
          ))}
        </tbody>
      </table>
    </div>
  );
}

export default App;
初期値の設定
posts データ一覧には 100 件のデータが含まれていましたが Pagination を設定すると 10 件の表示に変わります。表示数は pageSize と呼ばれデフォルトの初期値を変更したい場合は下記のように行うことができます。
const table = useReactTable({
  data: posts,
  columns,
  getCoreRowModel: getCoreRowModel(),
  getPaginationRowModel: getPaginationRowModel(),
  initialState: {
    pagination: {
      pageSize: 30,
    },
  },
});
pageSize の設定を行うとページ内に 30 件のデータが表示されるようになります。
ページ内の件数を変更することができましたここまでの設定ではそれ以外のデータを表示させることはできません。TanStack は Pagination の機能を持っていますがすぐに実装できるわけではありません。
Pagination に関する API
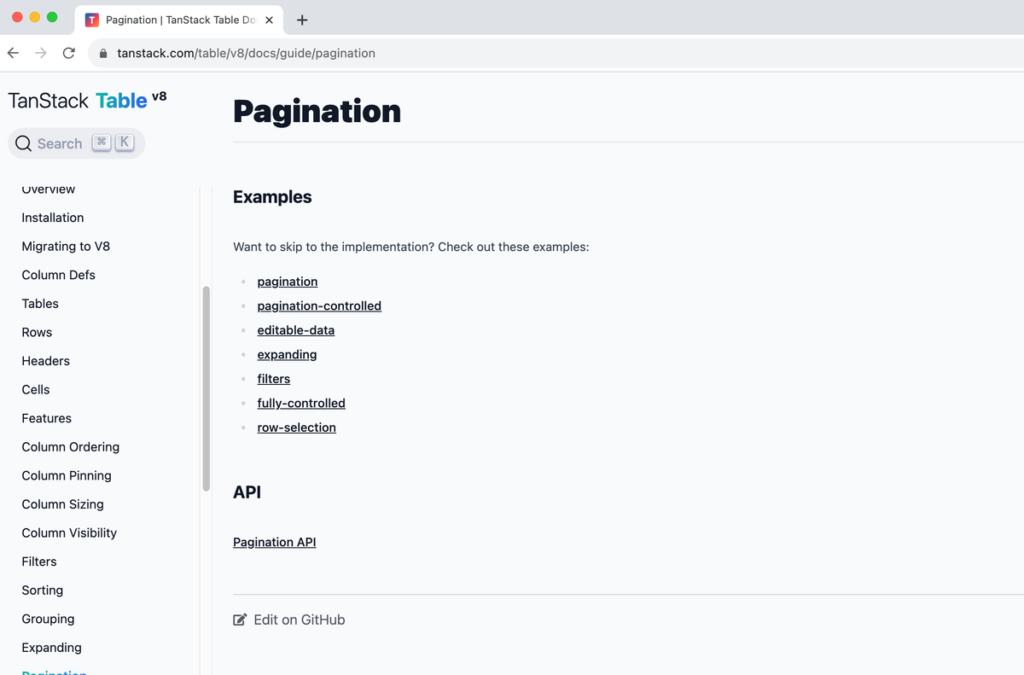
Pagination を含め、TanStack の機能を理解するためには API を理解する必要があります。API を使いこなすためにはドキュメントを参考にする必要があります。しかし個人的にどこに情報が掲載されているのかまたそれらの API はどこでどのように利用するのか最初分かりにくかったので API ページのアクセス方法と見方を確認しておきます。
サイドメニューの FEATURE GUIDESメニューの Pagination をクリックします。Pagination ページが開くので Examples ではなく下の Pagination API をクリックします。
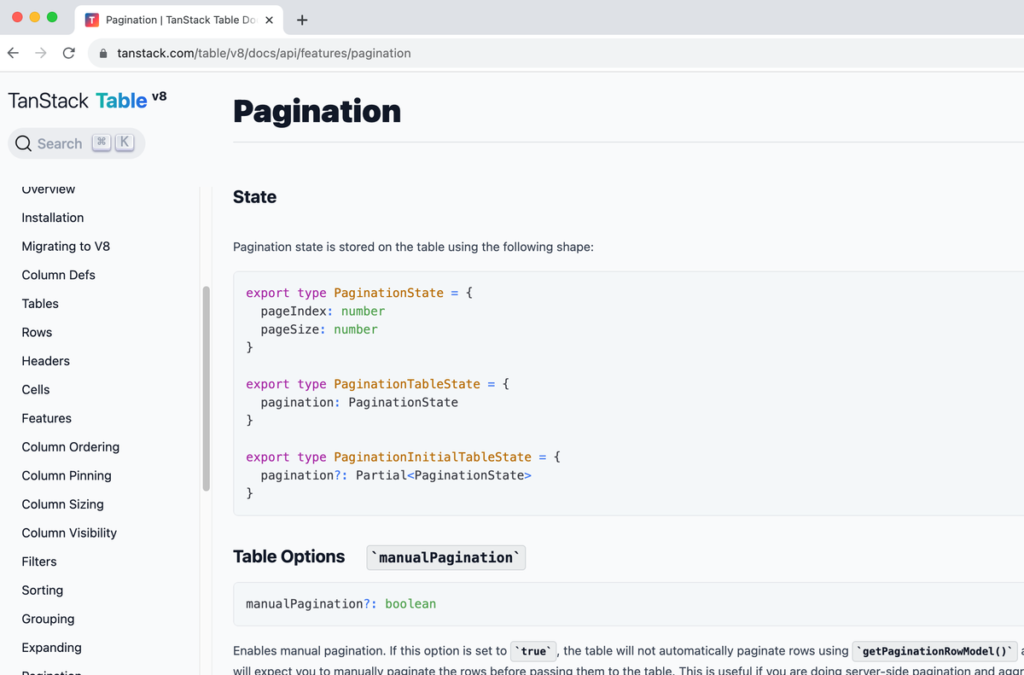
表示される Pagination の API 画面では “State”, “Table Options”, “Table API” の 3 のパートに分かれています。“State”に記載されている情報は Pagination が持つ状態で、table の getState メソッドを実行することでアクセスすることができます。“Table Options”には useTable の引数に設定することができるオプションが記載されています。最後の”Table API”が Pagination では最も重要で記載されている関数を利用して Pagination を実装していきます。table.関数名で実行することができます。
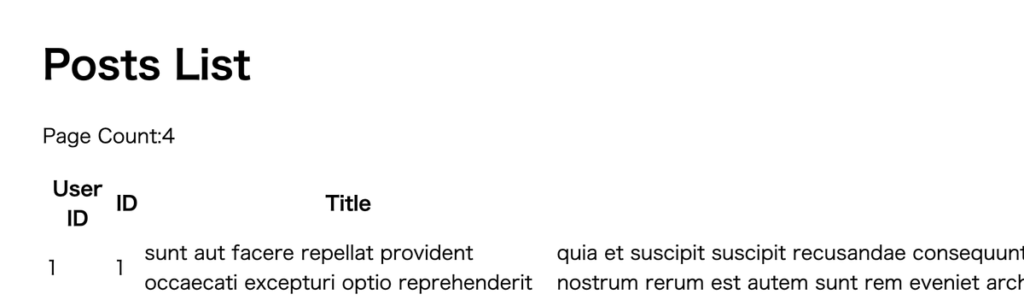
例えば Pagination のページ数を知りたいのであれば “Table API”に掲載されている getPageCount を利用することができます。
<div style={{ margin: '2em' }}>
  <h1>Posts List</h1>
  <p>Page Count:{table.getPageCount()}</p>
  <table>
ブラウザで確認すると Page Count は 4 と表示されます。100 件のデータで 1 ページは 30 件表示されているのでページ数は 4 となります。
Pagination の実装
Pagination の表示
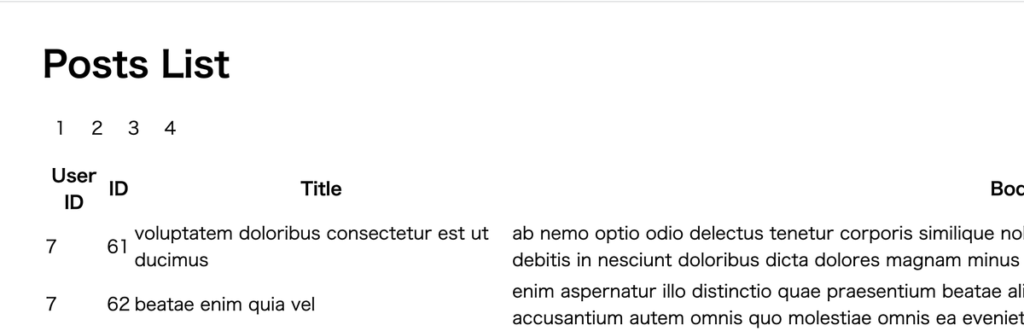
実際にドキュメントを参考にしながら Pagination の設定を行なっていきます。getPageCount でページ数がわかっているので getPageCount を利用してクリックするとクリックした数字のページに移動するための数字を表示させます。
<div style={{ margin: '2em' }}>
  <h1>Posts List</h1>
  <div style={{ display: 'flex', marginBottom: '1em' }}>
    {Array.from({ length: table.getPageCount() }, (_, i) => i).map(
      (index) => (
        <div
          key={index}
          style={{
            padding: '0 0.5em 0 0.5em',
            margin: '0 0.2em 0 0.2em',
            cursor: 'pointer',
          }}
        >
          {index + 1}
        </div>
      )
    )}
  </div>
ブラウザで確認すると以下のように表示されます。数字がページ番号と一致します。

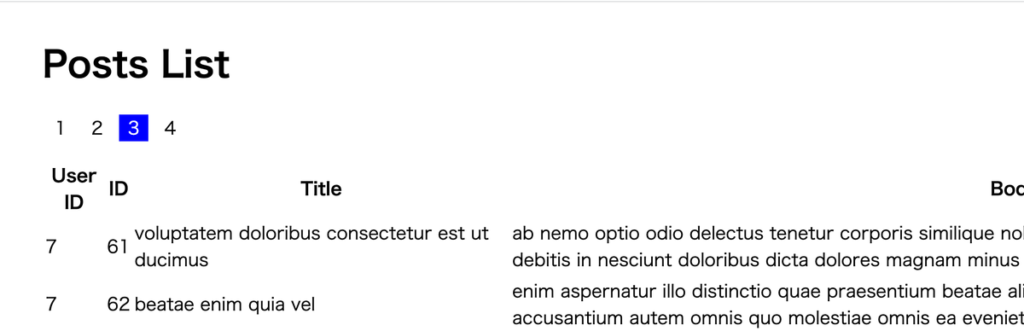
ページ番号をクリックすると別のページに移動できるようにクリックイベントに”Table API”の setPageIndex を設定します。setPageIndex の引数にページ番号を指定するとそのページのデータが表示されます。
<div style={{ display: 'flex', marginBottom: '1em' }}>
  {Array.from({ length: table.getPageCount() }, (_, i) => i).map(
    (index) => (
      <div
        key={index}
        style={{
          padding: '0 0.5em 0 0.5em',
          margin: '0 0.2em 0 0.2em',
          cursor: 'pointer',
        }}
        onClick={() => table.setPageIndex(index)}
      >
        {index + 1}
      </div>
    )
  )}
</div>
3 の数字をクリックすると 3 ページ目が表示されます。表示されている ID が 61 になっていることでページに移動できていることがわかります。ページ番号をクリックすることですべてのページを表示できるようになりました。
現在ページのスタイル設定
現在どのページを開いているか確認するためには現在のページの index を知る必要があります。Pagination の API を見ても現在の index を表示するための関数はありません。Pagination の API のページに State で pageIndex, pageSize を持つ情報が table に保存されていることがわかります。pageIndex へのアクセスは table.getState().pagination.pageIndex を利用することができます。
style 属性の中で table.getState().pagination.pageIndex を利用して pageIndex と index が一致する場合に背景色と文字の色を変更するように設定します。
<div style={{ display: 'flex', marginBottom: '1em' }}>
  {Array.from({ length: table.getPageCount() }, (_, i) => i).map(
    (index) => (
      <div
        key={index}
        style={{
          backgroundColor:
            table.getState().pagination.pageIndex === index ? 'blue' : '',
          color:
            table.getState().pagination.pageIndex === index
              ? 'white'
              : 'black',
          padding: '0 0.5em 0 0.5em',
          margin: '0 0.2em 0 0.2em',
          cursor: 'pointer',
        }}
        onClick={() => table.setPageIndex(index)}
      >
        {index + 1}
      </div>
    )
  )}
</div>
3 ページにアクセスしているので 3 の背景色と文字の色が変わっています。現在どのページを見ているのかがわかるようになります。
Previos, Next ボタンの追加
Pagenation の “Table API” には前後のページに移動できる previousPage と nextPage という関数があります。この 2 つの関数を活用するために Previous と Next ボタンを追加します。Previous ボタンにクリックイベントで previousPage, Next ボタンにクリックイベントで nextPage を設定しています。
<div style={{ display: 'flex', marginBottom: '1em' }}>
  <button onClick={() => table.previousPage()}>Privious</button>
  {Array.from({ length: table.getPageCount() }, (_, i) => i).map(
    (index) => (
      <div
        key={index}
        style={{
          backgroundColor:
            table.getState().pagination.pageIndex === index ? 'blue' : '',
          color:
            table.getState().pagination.pageIndex === index
              ? 'white'
              : 'black',
          padding: '0 0.5em 0 0.5em',
          margin: '0 0.2em 0 0.2em',
          cursor: 'pointer',
        }}
        onClick={() => table.setPageIndex(index)}
      >
        {index + 1}
      </div>
    )
  )}
  <button onClick={() => table.nextPage()}>Next</button>
</div>
Previous, Next ボタンを押してもページの移動ができるようになりました。
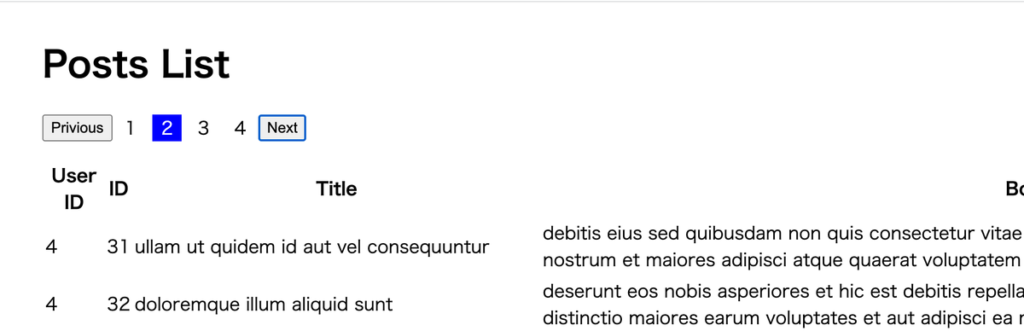
さらに “Table API”には getCanPreviousPage と getCanNextPage という関数があり次のページが存在するのかも確認することができます。4 ページを開いている場合に 5 ページ目が存在しないので getCanNextPage の戻り値は false になります。次のページがない場合にはボタンがクリックできないように disabled 属性を利用します。
<div style={{ display: 'flex', marginBottom: '1em' }}>
  <button
    disabled={!table.getCanPreviousPage()}
    onClick={() => table.previousPage()}
  >
    Privious
  </button>
  {Array.from({ length: table.getPageCount() }, (_, i) => i).map(
    (index) => (
      <div
        key={index}
        style={{
          backgroundColor:
            table.getState().pagination.pageIndex === index ? 'blue' : '',
          color:
            table.getState().pagination.pageIndex === index
              ? 'white'
              : 'black',
          padding: '0 0.5em 0 0.5em',
          margin: '0 0.2em 0 0.2em',
          cursor: 'pointer',
        }}
        onClick={() => table.setPageIndex(index)}
      >
        {index + 1}
      </div>
    )
  )}
  <button
    disabled={!table.getCanNextPage()}
    onClick={() => table.nextPage()}
  >
    Next
  </button>
</div>
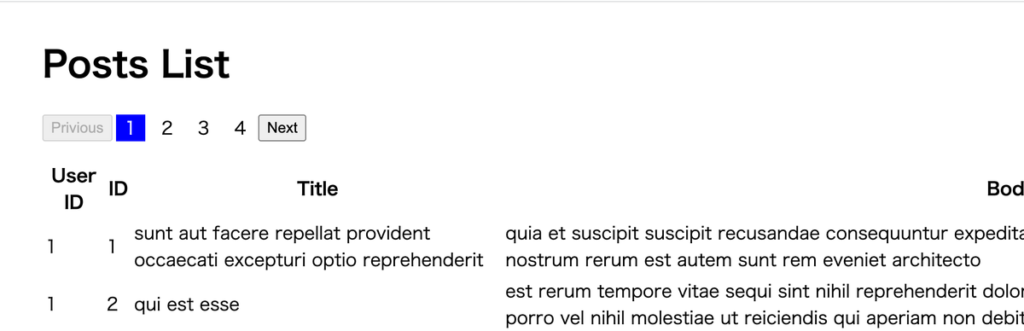
1 ページを表示している場合には前のページは存在しないため Previous ボタンをクリックすることはできません。
ページ数の変更
initialState を利用して pageSize のデフォルトの数を 10 から 30 に変更しましたが “Table API”の setPageSize を利用することで動的にページに表示する数を変更することができます。
表示数の pageSize を変更するために select 要素を利用します。useState Hook を利用して pageSize の値を保存します。onChange イベントによって選択を変更すると setPageSize を使って pageSize を変更しています。
const [pageSize, setPageSize] = useState<number>(30);

//略
<div style={{ margin: '2em' }}>
  <h1>Posts List</h1>
  <div style={{ marginBottom: '1em' }}>
    <div>Page Size</div>
    <select
      value={pageSize}
      onChange={(e) => {
        table.setPageSize(parseInt(e.target.value));
        setPageSize(parseInt(e.target.value));
      }}
    >
      <option value={10}>10</option>
      <option value={30}>30</option>
      <option value={50}>50</option>
      <option value={100}>100</option>
    </select>
  </div>
30 から 50 に変更すると Pagenation のページも 4 から 2 に変更されることも確認できます。変更後は 1 ページに 50 件のデータが表示されています。
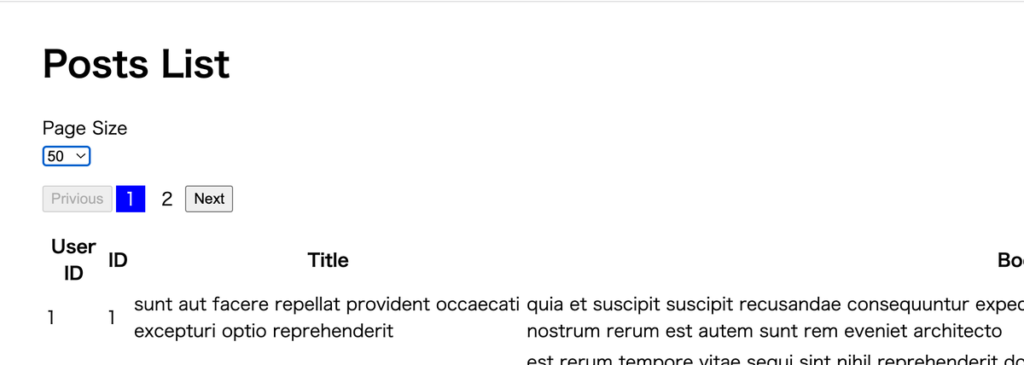
ここまでの Pagenation の設定でわかる通り使いこなすためには TanStack の API を理解する必要があるのでそれほど難易度が低いわけではありません。しかし各自が独自に実装するよりも短時間でPaginationを実装することができます。
Sorting の設定
テーブルでの利用頻度が高い列のデータの並び替えである Sorting の設定について確認していきます。
Sorting に関する API
Sorting の設定についても最初にドキュメントを確認しておきます。サイドメニューの”FEATURE API”から Sorting をクリックします。Sorting では主に”State”, “Sorting Functions”, “Column Def Options”, “Column API”, “Table Options”, “Table API”の 6 つのパートに分かれており、それぞれがどこに関連するのか理解しておく必要があります。
State は Sorting が持つ状態で table の getState メソッドを実行することでアクセスすることができます。Sorting Functions はソートに利用することができ”Column Def Options”で指定できます。“Column Def Options”は columns を定義する際に利用することができます。“Column Def Options”の例では Sorting を行いたくない列がある場合は enableSorting の値を false に設定することで Sorting 機能をその列だけ無効にすることができます。“Column API”は column オブジェクトが持っている関数です。”Table Options”は useTable の引数で設定できるオプションです。“Table API” は table が持つ関数です。table.関数名で実行することができます。
最初をドキュメントを読んでもほとんどの人が 6 つのパートのプロパティ、関数をどのように設定すればいいのかわからないと思います。ここから確認していきます。
Sorting の設定
Sorting の機能を利用するために getSortedRowModel を import して useTable のオプションに追加します。設定を行っても何も変化はありません。
import {
  flexRender,
  getCoreRowModel,
  useReactTable,
  getSortedRowModel,
} from '@tanstack/react-table';
import { useEffect, useState } from 'react';

type Post = {
  userId: number;
  id: number;
  title: string;
  body: string;
};

function App() {
  const [posts, setPosts] = useState<Post[]>([]);

  useEffect(() => {
    const getPosts = async () => {
      const response = await fetch(
        'https://jsonplaceholder.typicode.com/posts'
      );
      const data = await response.json();
      setPosts(data);
    };

    getPosts();
  }, []);

  const columns = [
    {
      accessorKey: 'userId',
      header: 'User ID',
    },
    {
      accessorKey: 'id',
      header: 'ID',
    },
    {
      accessorKey: 'title',
      header: 'Title',
    },
    {
      accessorKey: 'body',
      header: 'Body',
    },
  ];

  const table = useReactTable({
    data: posts,
    columns,
    getCoreRowModel: getCoreRowModel(),
    getSortedRowModel: getSortedRowModel(),
  });

  return (
    <div style={{ margin: '2em' }}>
      <h1>Posts List</h1>
      <table>
        <thead>
          {table.getHeaderGroups().map((headerGroup) => (
            <tr key={headerGroup.id}>
              {headerGroup.headers.map((header) => (
                <th
                  key={header.id}
                >
                  {flexRender(
                    header.column.columnDef.header,
                    header.getContext()
                  )}
                </th>
              ))}
            </tr>
          ))}
        </thead>
        <tbody>
          {table.getRowModel().rows.map((row) => (
            <tr key={row.id}>
              {row.getVisibleCells().map((cell) => (
                <td key={cell.id}>
                  {flexRender(cell.column.columnDef.cell, cell.getContext())}
                </td>
              ))}
            </tr>
          ))}
        </tbody>
      </table>
    </div>
  );
}

export default App;
列をクリックすると Sorting が行われるように”Column API”に記載されている getToggleSortingHandler 関数を利用します。“Column API”は column オブジェクトが持っている関数なので下記のように th タグに onClick イベントで設定することができます。
<h1>Posts List</h1>
<table>
  <thead>
    {table.getHeaderGroups().map((headerGroup) => (
      <tr key={headerGroup.id}>
        {headerGroup.headers.map((header) => (
          <th
            key={header.id}
            onClick={header.column.getToggleSortingHandler()}
          >
            {flexRender(
              header.column.columnDef.header,
              header.getContext()
            )}
          </th>
        ))}
      </tr>
    ))}
  </thead>
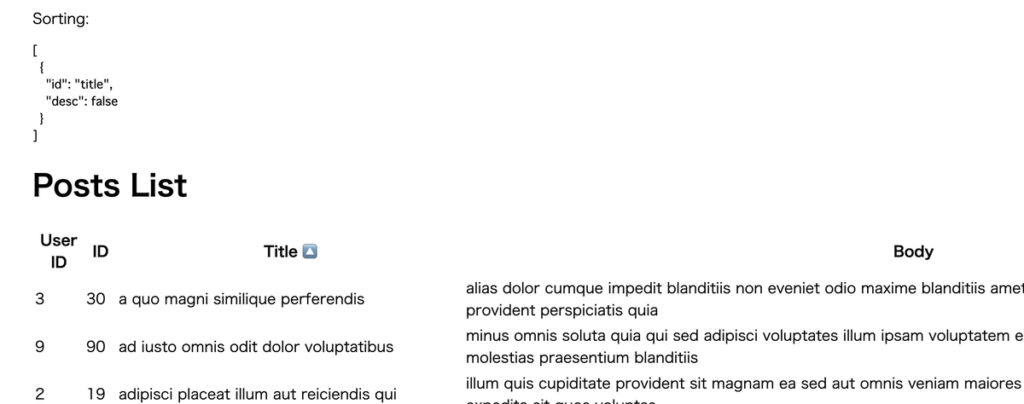
これだけの設定で Sorting 機能の実装は完了です。テーブルのヘッダーにある “Title”をクリックしてください。デフォルトでは Title の先頭は”sun aut…”で始まっていますがクリックするとアルファベット順(昇順)に並び替えられていることがわかります。
もう一度 Title をクリックするとアルファベットの逆の順番(降順)で表示されます。
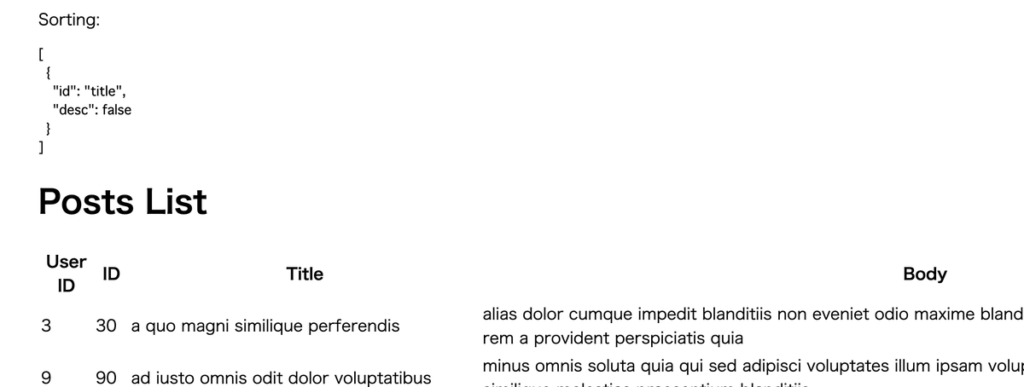
さらにクリックすると元の状態に戻ります。どの列をクリックしても Sorting が行われます。現在どの列で Sorting が行われているかは Sorting の”State”で確認することができます。
<div style={{ margin: '2em' }}>
  <div>
    Sorting:{<pre>{JSON.stringify(table.getState().sorting, null, 2)}</pre>}
  </div>
  <h1>Posts List</h1>
Sorting が行われていない時は空の配列となりますが、ヘッダーの列名をクリックすると id と desc プロパティが表示されます。
State を利用するとどの列が Sorting を行っているか確認することができますがテーブル上でも確認できるように”Column API”の getIsSorted 関数を利用します。getIsSorted は Sorting が行われていない場合は false, 昇順で Sorting されている場合は asc, 降順で Sorting されている場合は desc が戻されます。
<h1>Posts List</h1>
<table>
  <thead>
    {table.getHeaderGroups().map((headerGroup) => (
      <tr key={headerGroup.id}>
        {headerGroup.headers.map((header) => (
          <th
            key={header.id}
            onClick={header.column.getToggleSortingHandler()}
          >
            {flexRender(
              header.column.columnDef.header,
              header.getContext()
            )}
            {{
              asc: ' 🔼',
              desc: ' 🔽',
            }[header.column.getIsSorted() as string] ?? null}
          </th>
        ))}
      </tr>
    ))}
  </thead>
どの列で Sorting が行われているのかと昇順なのか降順なのかもわかるようになりました。
“Column Def Options”の enableSorting を設定することで特定の列の Sorting を停止することができます。
const columns = [
  {
    accessorKey: 'userId',
    header: 'User ID',
  },
  {
    accessorKey: 'id',
    header: 'ID',
  },
  {
    accessorKey: 'title',
    header: 'Title',
    sortDescFirst: false,
  },
  {
    accessorKey: 'body',
    header: 'Body',
  },
];
設定後は Title 列をクリックしても Sorting は行われません。また sortDescFirst を設定すれば最初のクリックで降順に Sorting させることができます。
{
  accessorKey: 'title',
  header: 'Title',
  sortDescFirst: false,
},
Filterの設定
下記のコードではtitle列に対してFilterを設定しています。
import {
  flexRender,
  getCoreRowModel,
  useReactTable,
  getFilteredRowModel,
  ColumnFiltersState,
} from "@tanstack/react-table";
import { useEffect, useState } from "react";

type Post = {
  userId: number;
  id: number;
  title: string;
  body: string;
};

function App() {
  const [posts, setPosts] = useState<Post[]>([]);

  const [columnFilters, setColumnFilters] = useState<ColumnFiltersState>([]);

  useEffect(() => {
    const getPosts = async () => {
      const response = await fetch(
        "https://jsonplaceholder.typicode.com/posts"
      );
      const data = await response.json();
      setPosts(data);
    };

    getPosts();
  }, []);

  const columns = [
    {
      accessorKey: "userId",
      header: "User ID",
    },
    {
      accessorKey: "id",
      header: "ID",
    },
    {
      accessorKey: "title",
      header: "Title",
    },
    {
      accessorKey: "body",
      header: "Body",
    },
  ];

  const table = useReactTable({
    data: posts,
    columns,
    getCoreRowModel: getCoreRowModel(),
    getFilteredRowModel: getFilteredRowModel(),
    state: {
      columnFilters,
    },
    onColumnFiltersChange: setColumnFilters,
  });

  return (
    <div style={{ margin: "2em" }}>
      <h1>Posts List</h1>
      <input
        type="text"
        placeholder="Search by title"
        value={(table.getColumn("title")?.getFilterValue() as string) ?? ""}
        onChange={(e) =>
          table.getColumn("title")?.setFilterValue(e.target.value)
        }
      />
      <table>
        <thead>
          {table.getHeaderGroups().map((headerGroup) => (
            <tr key={headerGroup.id}>
              {headerGroup.headers.map((header) => (
                <th key={header.id}>
                  {flexRender(
                    header.column.columnDef.header,
                    header.getContext()
                  )}
                </th>
              ))}
            </tr>
          ))}
        </thead>
        <tbody>
          {table.getRowModel().rows.map((row) => (
            <tr key={row.id}>
              {row.getVisibleCells().map((cell) => (
                <td key={cell.id}>
                  {flexRender(cell.column.columnDef.cell, cell.getContext())}
                </td>
              ))}
            </tr>
          ))}
        </tbody>
      </table>
    </div>
  );
}

export default App;
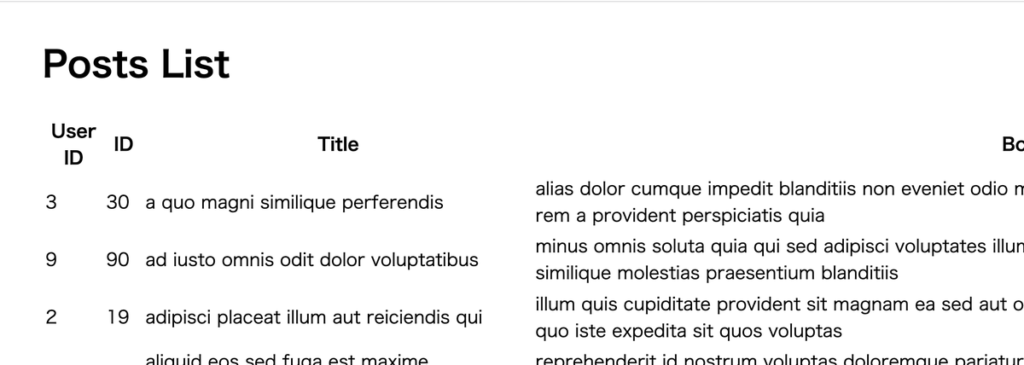
テーブルを実装する際に最も基本的な機能である Pagination, Sorting, Filter の設定方法を理解することができました。
TanStack Table にはまだまだ機能が存在します。ここまでの説明でドキュメントに記載されている情報の利用方法の理解が進んだと思いますのでドキュメントを参考にしながらぜひ他の機能の実装にもチャレンジしてみてください。