Zod、Yupのエラーメッセージを日本語化するための基礎(i18next)

入力フォームのバリデーションに Zod, Yup のどちらかのライブラリを利用していますか?
本文書は バリデーションライブラリである Zod, Yup を利用する時に Internationalization ライブラリの i18next を含めた日本語化設定についてのドキュメントが理解できなかった人またこれから日本語設定を行いたいという人を対象にどのように設定を行えばエラーメッセージを日本語化できるのかについて説明を行っています。

特定のフォームライブラリやフレームワークを利用した設定ではなく Node.js を利用し汎用的な方法で設定を行っています。
目次
環境の構築
Node.js の環境で動作させるために環境構築を行います。任意のフォルダを作成してください。ここでは zod_yup_translation フォルダを作成しています。フォルダを作成後、zod_yup_translation に移動して npm init -y コマンドで package.json ファイルを作成します。
 % mkdir zod_yup_translation
 % cd zod_yup_translation
 % npm init -y
Zod
Zodを利用するためにはライブラリのインストールが必要になります。
% npm install zod
コードの中では import 文を利用するので package.json の中に”type”:“module”を追加しておきます。
{
  "name": "zod_yup_translation",
  "version": "1.0.0",
  "description": "",
  "main": "index.js",
  "scripts": {
    "test": "echo \"Error: no test specified\" && exit 1"
  },
  "keywords": [],
  "author": "",
  "license": "ISC",
  "dependencies": {
    "zod": "^3.22.4"
  },
  "type": "module"
}
もし”type”:”module”を記述していない場合には警告メッセージがファイルを実行したターミナルに表示されます。
(node:4659) Warning: To load an ES module, set "type": "module" in the package.json or use the .mjs extension.
(Use `node --trace-warnings ...` to show where the warning was created)
基本的な設定方法(softParse)
Zod のドキュメントを参考にまず zod を利用したバリデーションの設定方法を確認します。index.js ファイルを作成してコードを記述していきます。
バリデーションを行う方法には parse と safeParse メソッド があります。大きな違いは parse はバリデーションエラーが発生するとエラーが throw されますが safeParse では エラー が throw されません。safeParse ではエラーが throw される代わりに実行後に戻される値にバリデーションが成功したかどうかを表す success プロパティが含まれています。どちらを利用しても日本語の設定に違いがありませんが本文書では safeParse を利用します。
import { z } from 'zod';

// creating a schema for strings
const mySchema = z.string();

//parsing
const result = mySchema.safeParse('tuna');

console.log(result);
コードの中では z.stirng()でスキーマを定義して safeParse メソッドを利用して引数に設定した値が文字列かどうかのバリデーションを行っています。
Node 環境で JavaScript ファイルを実行する際には”node ファイル名”で実行します。本文書では”node index.js”となります。
実行するとターミナルには safeParse からの戻り値が表示されバリデーションに成功した場合は success の値が true になっています。
{ success: true, data: 'tuna' }
safeParseの引数に数値を設定します。
import { z } from 'zod';

// creating a schema for strings
const mySchema = z.string();

//parsing
const result = mySchema.safeParse(12); // => { success: false; error: ZodError }

console.log(result);
safeParseから戻される場合はsuccessの値がfalseになり、引数に設定した値ではなくerrorプロパティにエラーが情報が含まれます。
{ success: false, error: [Getter] }
エラーメッセージの日本語化の設定を行っていくので Zod の GitHub ページのError Handlingを確認します。エラーの詳細は error.issues の中に含まれていると記載されているのでバリデーションエラー時の result.error.issues を確認します。
{ success: false, error: [Getter] }
error.issues の中には下記の情報が含まれています。これらの値は日本語化を行うために重要な情報となります。
[
  {
    code: 'invalid_type',
    expected: 'string',
    received: 'number',
    path: [],
    message: 'Expected string, received number'
  }
]
messageプロパティの値が’Expected string, received number’となっていますがこの文字列を日本語化する設定を行なっていきます。
pathは空の配列になっていましたがオブジェクトの値をバリデーションをした時にpath列に値が入ります。
import { z } from 'zod';

const mySchema = z.object({
  name: z.string(),
});

//parsing
const result = mySchema.safeParse({
  name: 12,
});

console.log(result.error.issues);
実行するとpathの中にオブジェクトのnameプロパティが含まれていることがわかります。
[
  {
    code: 'invalid_type',
    expected: 'string',
    received: 'number',
    path: [ 'name' ],
    message: 'Expected string, received number'
  }
]
エラーメッセージのカスタマイズ
エラーメッセージをカスタマイズする方法にはいくつかありますがその中でシンプルな方法がスキーマの定義時にstringメソッドの引数でカスタマイズしたエラーメッセージを設定することです。
const mySchema = z.string({
  invalid_type_error: '文字列ではなく数値が設定されています。',
});
設定後、実行すると設定したメッセージに変わっていることが確認できます。
[
  {
    code: 'invalid_type',
    expected: 'string',
    received: 'number',
    path: [],
    message: '文字列ではなく数値が設定されています。'
  }
]
ZodErrorMapを使った設定
ZodErrorMap ではスキーマの定義時に個別にメッセージをカスタマイズするのではなく Zod によって生成されるメッセージすべてをカスタマイズしたい場合に利用することができます。
Zod におけるエラー処理については Error Handling のページ(https://github.com/colinhacks/zod/blob/master/ERROR_HANDLING.md)で詳細に説明されているのでこのページを参考に設定を行います。
Error Handling としてページに掲載されているメッセージのカスタマイズ方法の例を確認します。最初は下のコードを見ると難しいそうかなと思うかもしれませんが全く難しい処理はないので安心してください。
import { z } from "zod";

const customErrorMap = (issue, ctx) => {
  if (issue.code === z.ZodIssueCode.invalid_type) {
    if (issue.expected === "string") {
      return { message: "bad type!" };
    }
  }
  if (issue.code === z.ZodIssueCode.custom) {
    return { message: `less-than-${(issue.params || {}).minimum}` };
  }
  return { message: ctx.defaultError };
};

z.setErrorMap(customErrorMap);
上記のコードではcustomErrorMapを定義してZodのsetErrorMap関数の引数にcustomErrorMapを設定しcustomeErrorMapで設定した内容をZodに反映させています。
上記のコードをこれまでに利用したsafeParseのコードにそのまま追加することができます。
import { z } from 'zod';

const mySchema = z.string();

const customErrorMap = (issue, ctx) => {
  if (issue.code === z.ZodIssueCode.invalid_type) {
    if (issue.expected === 'string') {
      return { message: 'bad type!' };
    }
  }
  if (issue.code === z.ZodIssueCode.custom) {
    return { message: `less-than-${(issue.params || {}).minimum}` };
  }
  return { message: ctx.defaultError };
};

z.setErrorMap(customErrorMap);

const result = mySchema.safeParse(12);

console.log(result.error.issues);
customErrorMapを追加したファイルを実行するとmessageが’Expected string, received number’から’bad type!’に変わっていることがわかります。
[
  {
    code: 'invalid_type',
    expected: 'string',
    received: 'number',
    path: [],
    message: 'bad type!'
  }
]
なぜmessegeの内容が変わったのか確認していきます。customeErrorMapの中ではissueに含まれるプロパティ(主にcode)を利用してif文による分岐が行われているのでcustomeErrorMapの引数であるissue, ctxを確認します。
import { z } from 'zod';

const mySchema = z.string();

const customErrorMap = (issue, ctx) => {
  console.log('issue', issue);
  console.log('ctx', ctx);
  return { message: ctx.defaultError };
};

z.setErrorMap(customErrorMap);

const result = mySchema.safeParse(12);
実行するとissueオブジェクトとctxオブジェクトに含まれる値が確認できます。
issue {
  code: 'invalid_type',
  expected: 'string',
  received: 'number',
  path: []
}
ctx { data: 12, defaultError: 'Expected string, received number' }
ctx オブジェクトの data プロパティには parse で指定した値、defaultError プロパティにはエラーメッセージの内容が含まれていることがわかります。
issue オブジェクトについては safePase を行った際のエラーに含まれている内容と同じです。issue オブジェクトに含まれる code について確認します。
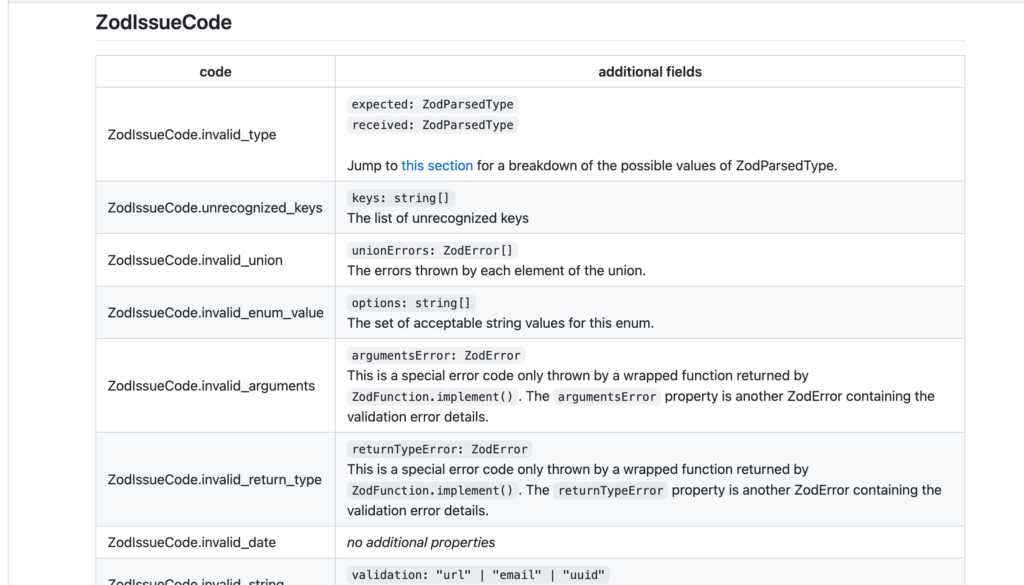
issue の code については ZodeIssueCode という項目でドキュメントに一覧表示されています。一覧表示されている内容を確認すると issue に含まれていた code の値である invalid_type は ZodIssueCode.invalid_type に対応しており追加フィールドとして expected と received が含まれていることがわかります。実際に code の invalid_type の場合には一緒に expected と received の値も issue の中に含まれています。

issue の code と ZodIssueCode の code をチェックすることでどのようなエラーメッセージを表示させるかを customErrorMap の中の分岐で行っています。さらにその後に expected の値をチェックしています。
if (issue.code === z.ZodIssueCode.invalid_type) {
  if (issue.expected === 'string') {
    return { message: 'bad type!' };
  }
}
ここまで読み進めていただければ理解できたと思いますが customErrorMap の中では issue の code が z.ZodIssueCode.invalid_type で、 issue の expected の値が string なので message プロパティにカスタマイズしたメッセージを設定してオブジェクトとして戻しているだけです。
customeErrorMap の内部での設定方法と code の一覧が分かってもそれぞれの code でどのような処理を行っていいのかわからないと思います。zod の内部で利用している node_modeles/zod/lib/locales にある en.js を参考にすることで独自の customeErrorMap を作成することができます。
"use strict";
Object.defineProperty(exports, "__esModule", { value: true });
const util_1 = require("../helpers/util");
const ZodError_1 = require("../ZodError");
const errorMap = (issue, _ctx) => {
    let message;
    switch (issue.code) {
        case ZodError_1.ZodIssueCode.invalid_type:
            if (issue.received === util_1.ZodParsedType.undefined) {
                message = "Required";
            }
            else {
                message = `Expected ${issue.expected}, received ${issue.received}`;
            }
            break;
        case ZodError_1.ZodIssueCode.invalid_literal:
            message = `Invalid literal value, expected ${JSON.stringify(issue.expected, util_1.util.jsonStringifyReplacer)}`;
            break;
//略
codeの値についてはif文での分岐ではなくswitch構文を利用して分岐を行っています。en.jsを参考にcustomErrorMapを更新します。すべて更新するのは大変なのでinvalid_type部分の処理を切り出してindex.jsで設定を行います。
実行するとメッセージが日本語化されていることがわかります。
import { z } from 'zod';

const mySchema = z.string();

const customErrorMap = (issue, ctx) => {
  let message;
  switch (issue.code) {
    case z.ZodIssueCode.invalid_type:
      if (issue.received === z.ZodParsedType.undefined) {
        message = '必須';
      } else {
        message = `${issue.expected}を期待していますが${issue.received}を入力しています`;
      }
      break;
    //略
    default:
      message = ctx.defaultError;
  }
  return { message };
};

z.setErrorMap(customErrorMap);

const result = mySchema.safeParse(12);

console.log(result.error.issues);


//実行結果
[
  {
    code: 'invalid_type',
    expected: 'string',
    received: 'number',
    path: [],
    message: 'stringを期待していますがnumberを入力しています'
  }
]
safeParseの引数を空白にして実行するとcustomErrorMapで設定した分岐により先ほどとは異なる日本語メッセージである”必須”が表示されます。
const result = mySchema.safeParse();
//結果
[
  {
    code: 'invalid_type',
    expected: 'string',
    received: 'undefined',
    path: [],
    message: '必須'
  }
]
invalid_typeのcodeの場合のメッセージしか設定しませんがその他のcodeの場合についてはen.jsを参考に作成する必要があります。customErrorMapを利用することでZodのエラーメッセージを日本語化することができます。
i18nextのインストール
18nはinternationalizationの略で国際化対応ということでアプリケーションを多言語に対応させることです。ここまでの設定では日本語の1つの言語にしか対抗できませんがi18nextを利用すると同時に複数の言語に対応させることができます。
i18nextで多言語に対応させることは可能ですが日本語対応させたい場合の設定を確認していきます。
それぞれの言語に対応する訳を追加していくことで多言語に対応できるので一つの言語の設定方法がわかれば対応する訳を作成することをのぞいて多言語化は難しいものではありません。
i18nextを利用するためにインストールを行います。
% npm install i18next
i18nextの基本的な設定方法
i18nextの基本的な動作確認を行うためにi18next.jsファイルを作成します。
import i18next from 'i18next';

i18next.init({
  lng: 'ja',
  debug: false,
  resources: {
    ja: {
      translation: {
        hello: 'こんにちは',
      },
    },
    en: {
      translation: {
        hello: 'Hello',
      },
    },
  },
});

console.log(i18next.t('hello'));
//こんにちは
実行すると”こんにちは”が表示されます。i18next.tメソッドの引数のhelloがキーとなりi18next.initメソッドの中で定義したtranslationオブジェクトのキーと一致するhelloの値の”こんにちは”が表示されています。jaとenの2つの言語のtranslationが設定されていますがlng(langの略)でjaを設定しているためjaのキーhelloの値が表示されます。
lngの値をenに設定します。実行すると”Hello”が表示されるようになります。他の言語と追加したい場合、例えばフランス語であれば”fr”を追加してjaとenに対応する設定を追加していけば可能です。
import i18next from 'i18next';

i18next.init({
  lng: 'en',
  debug: false,
  resources: {
    ja: {
      translation: {
        hello: 'こんにちは',
      },
    },
    en: {
      translation: {
        hello: 'Hello',
      },
    },
  },
});

console.log(i18next.t('hello'));
 % node i18next.js
Hello
initメソッドで設定したlngの値もchangeLanguageを利用してコードの途中で変更することもできます。lngで”en”を設定して、changeLanguageで”ja”に変更を行っています。
import i18next from 'i18next';

i18next.init({
  lng: 'en',
  debug: false,
  resources: {
    ja: {
      translation: {
        hello: 'こんにちは',
      },
    },
    en: {
      translation: {
        hello: 'Hello',
      },
    },
  },
});

i18next.changeLanguage('ja');

console.log(i18next.t('hello'));
 % node i18next.js
こんにちは
値を渡したい場合の設定も確認しておきます。
import i18next from 'i18next';

i18next.init({
  lng: 'ja',
  debug: false,
  resources: {
    ja: {
      translation: {
        hello: 'こんにちは {{ name }}',
      },
    },
    en: {
      translation: {
        hello: 'Hello {{ name }}',
      },
    },
  },
});

console.log(
  i18next.t('hello', {
    name: 'John',
  })
);
 % node i18next.js
こんにちは
nameという変数で値を渡せるように設定をしています。実行すると”こんにちは John”と表示されます。
ここまでの動作確認で i18next の基本的な設定方法を確認することができました。
Zod+i18nextの設定
i18next の基本設定を理解することができたので index.js の中に i18next の設定を追加します。下記ではコードを前半と後半に分けています。実行する時は両方のコードを合わせて実行してください。
前半では i18next.init で lng や translation の設定を行います。キーには”invalid_type”と”required”を設定してそれぞれのメッセージを設定しています。
import { z } from 'zod';
import i18next from 'i18next';

const mySchema = z.string();

i18next.init({
  lng: 'ja',
  debug: false,
  resources: {
    ja: {
      translation: {
        invalid_type:
          '{{ expected }}を期待していますが{{ received }}を入力しています。',
        required: '必須',
      },
    },
    en: {
      translation: {
        invalid_type: 'Expected {{expected}}, received {{received}}',
        required: 'Required',
      },
    },
  },
});
後半部分では customErrorMap の設定を行いますが、Zod 単独では customErrorMap の中で日本語のメッセージを設定していましたが日本語のメッセージ部分を i18next.t メソッドで置き換えています。i18next.t メソッドの引数にはキーと渡したい値を設定しています。
const customErrorMap = (issue, ctx) => {
  let message;
  switch (issue.code) {
    case z.ZodIssueCode.invalid_type:
      if (issue.received === z.ZodParsedType.undefined) {
        message = i18next.t('required');
      } else {
        message = i18next.t(issue.code, {
          expected: issue.expected,
          received: issue.received,
        });
      }
      break;
    //略
    default:
      message = ctx.defaultError;
  }
  return { message };
};

z.setErrorMap(customErrorMap);

const result = mySchema.safeParse(12);

console.log(result.error.issues);
実行するとエラーメッセージが日本語で表示されます。
[
  {
    code: 'invalid_type',
    expected: 'string',
    received: 'number',
    path: [],
    message: 'stringを期待してますがnumberを入力しています。'
  }
]
もし英語で表示させたい場合にはchangeLanguageを追加することで日本語から英語のメッセージに変わります。
i18next.changeLanguage('en');
enで設定した値が表示されます。
[
  {
    code: 'invalid_type',
    expected: 'string',
    received: 'number',
    path: [],
    message: 'Expected string, received number'
  }
]
i18nextを利用して日本語化する方法を理解することができました。
customErrorMap 側で指定したキーが i18next の translation で定義されていない場合もあります。その場合には customeErrorMap の中で defaultValue を設定することで defaultValue に設定した値をエラーメッセージとして表示させることができます。
動作確認のためキーを”require”(“required”ではない)に変更すると”require”のキーが i18next の translation の中で定義されていないため defaultValue で設定した”必須項目です。“が表示されます。defaultValue を設定してもキー存在する”required”に戻すと”必須”と表示されます。キーに”require”を設定して defaultValue を設定していない場合にはキーがエラーメッセージになります。
const customErrorMap = (issue, ctx) => {
  let message;
  switch (issue.code) {
    case z.ZodIssueCode.invalid_type:
      if (issue.received === z.ZodParsedType.undefined) {
        message = i18next.t('require', {
          defaultValue: '必須項目です。',
        });
      } else {
        message = i18next.t(issue.code, {
          expected: issue.expected,
          received: issue.received,
        });
      }
      break;
    //略
    default:
      message = ctx.defaultError;
  }
  return { message };
};

z.setErrorMap(customErrorMap);

const result = mySchema.safeParse();

console.log(result.error.issues);
[
  {
    code: 'invalid_type',
    expected: 'string',
    received: 'undefined',
    path: [],
    message: 'require'
  }
]
Yup
Yupを利用するためにはライブラリのインストールが必要になります。
% npm install yup
基本的な設定方法
YupのGithubのページでは”localization and i18n”という項目が存在するためその項目で利用されている例を元に基本的な動作確認を行います。
index.jsファイルに以下のコードを記述します。バリデーションを行うschema.validateを実行するとPromiseが戻されるのでawait関数とtry/catch構文を利用してエラー内容を表示させています。
import yup from 'yup';

// creating a schema for object
let schema = yup.object().shape({
  name: yup.string(),
  age: yup.number().min(18),
});

//validate
try {
  const result = await schema.validate({ name: 'jimmy', age: 19 });
  console.log(result)
} catch (err) {
  err.errors.map((err) => console.log(err));
}
実行してバリデーションに成功した場合はresultにはvalidateの引数に指定したオブジェクトが表示されます。
{ name: 'jimmy', age: 18 }
バリデーションに失敗した場合の動作確認を行うためageプロパティの値を10に設定します。
const result = await schema.validate({ name: 'jimmy', age: 10 });
実行するとターミナルにエラーメッセージが表示されます。表示されているメッセージを日本語化する設定を行なっていきます。
age must be greater than or equal to 18
エラーメッセージのカスタマイズ
エラーメッセージをカスタマイズする方法にはいくつかありますがその中でシンプルな方法がスキーマの定義時にminメソッドの第二引数でエラーメッセージを設定することです。
let schema = yup.object().shape({
  name: yup.string(),
  age: yup.number().min(18, 'ageは18以上の値を設定する必要があります'),
});
実行すると指定したメッセージが表示されます。
ageは18以上の値を設定する必要があります
setLocalでの設定
setLocalではスキーマの定義時に個別にメッセージをカスタマイズするのではなくYupによって生成されるメッセージをカスタマイズする時に利用することができます。
yup.setLocale({
  mixed: {
    default: '不正な値が設定されています',
  },
  number: {
    min: ({ path, min }) => `${path}は${min}以上の値を設定する必要があります`,
    // min: '正しい値を設定してください',
    max: ({ path, max }) => `${path}は${max}以下の値を設定する必要があります`,
  },
});
number().min()のバリデーションに失敗した場合にはminプロパティで設定したメッセージが表示されます。minプロパティには文字列でも関数でも利用することができますが動的な値を利用したい場合には関数を利用します。
実行すると下記のエラーメッセージが表示されます。
ageは18以上の値を設定する必要があります
下記のようにminに対応するメッセージがない場合はデフォルトの英語のメッセージが表示されます。
yup.setLocale({
  mixed: {
    default: '不正な値が設定されています',
  },
  number: {
    max: ({ path, max }) => `${path}は${max}以下の値を設定する必要があります`,
  },
});
age must be greater than or equal to 18
setLocal関数を利用した日本語化の方法を確認することができました。min, maxのみsetLocaleを設定していますが日本語化に必要なバリデーションメソッドの設定をsetLocaleの中で定義していく必要があります。
Yup + i18nextの設定
i18next のインストールと基本的な設定方法については Zod の箇所で説明を行っているのでそちらを参照してください。
先ほど setLocale を設定したコードに i18next の設定を追加します。
前半では i18next.init で lng や translation の設定を行います。キーには”min”を設定してそれぞれのメッセージを設定しています。
import yup, { setLocale } from 'yup';
import i18next from 'i18next';

i18next.init({
  lng: 'ja',
  debug: false,
  resources: {
    ja: {
      translation: {
        min: '{{ path }}は{{ min }}以上の値を設定する必要があります',
      },
    },
    en: {
      translation: {
        min: '{{ path }} must be greater than or equal to {{ min }}',
      },
    },
  },
});
後半部分ではsetLocalの設定を行いますが、Yup単独ではsetLocalの中で日本語のメッセージを利用していましたが日本語の部分をi18next.tメソッドで置き換えています。
setLocale({
  mixed: {
    default: 'field_invalid',
  },
  number: {
    min: ({ path, min }) => i18next.t('min', { min, path }),
    max: ({ path, max }) => i18next.t('max', { max, path }),
  },
});

let schema = yup.object().shape({
  name: yup.string(),
  age: yup.number().min(18),
});

try {
  await schema.validate({ name: 'jimmy', age: 10 });
} catch (err) {
  err.errors.map((err) => console.log(err));
}
実行するとエラーメッセージが日本語で表示されます。
ageは18以上の値を設定する必要があります
もし英語で表示させたい場合にはchangeLanguageを追加することで日本語から英語のメッセージに変わります。
i18next.changeLanguage('en');
enで設定した値が表示されます。
age must be greater than or equal to 18
setLocal側で指定したキーがi18nextのtranslationで定義されていない場合もあります。その場合にはdefaultValueを設定することでdefaultValueに設定した値をエラーメッセージとして表示させることができます。
キーにmi(minではない)に変更するとmiのキーがi18nextで定義されていないためdefaultValueで設定した”field too short”が表示されます。
setLocale({
  mixed: {
    default: 'field_invalid',
  },
  number: {
    min: ({ path, min }) =>
      i18next.t('mi', { min, path, defaultValue: 'field too short' }),
    max: ({ path, max }) => i18next.t('max', { max, path }),
  },
});
defaultValueを設定しても存在する”min”にすると”ageは18以上の値を設定する必要があります”と表示されます。miを設定してdefaultValueを設定していない場合にはキーmiがエラーメッセージになります。
YupでのsetLocaleを利用したメッセージのカスタマイズ方法とi18nextを組み合わせた日本語化の基本設定を行うことができるようになりました。
Zod, Yupに関しての多言語のライブラリも多数存在するので本文書の基本設定が理解できればそれらのライブラリの活用もスムーズに行えるかと思います。


