Laravel Jetstream入門 Inertia.js編

Laravel8から認証機能を備えたJetstreamが新たに登場しました。Jetstreamを利用したい場合にはInertiaかLivewireという技術が利用されているためどちらかを選択する必要があります。Inertiaを選択したけどインストールした後に何をしていいのかわからないまたIneriatがインストール後にどの部分で利用されているのか知りたいという人も多いかと思います。本文書ではJetstreamと一緒にインストールされるInertiaがLaravelでどのような処理に関わっているかコードを利用して説明しています。
Inertia.jsで作成されたページのコードを理解するためにはprops, slot,ディレクティブ, イベントなどのVue.jsの基礎知識が必要となります。本文書ではVue.jsの知識があることを前提に説明を行っています。
Inetria.jsではなくLivewireを使ってアプリケーションを構築するのでLivewireについて知りたい方は下記を参考にしてください。


Laravel環境の構築
動作確認を行うLaravelをMacを利用して構築しています。
Laravelをインストール時に一緒にInertia.jsをインストールを行いたい場合はlaravel newコマンドに–jetオプションを付与して実行します。ここではLaravelのプロジェクト名をlaravel10_inertiaにしていますが、任意の名前をつけてください。実行後inertiaかlivewireの選択が出てくるのでinetiaを選択してください。teamのインストールも確認されますが、どちらを選択しても構いません。
 % laravel new laravel10_inertia --jet
    |     |         |
    |,---.|--- ,---.|--- ,---.,---.,---.,-.-.
    ||---'|    `---.|    |    |---',---|| | |
`---'`---'`---'`---'`---'`    `---'`---^` ' '


Which Jetstream stack do you prefer?
  [0] livewire
  [1] inertia
 > 1

 Will your application use teams? (yes/no) [no]:
 >

//略

Application ready! Build something amazing.
Laravelインストール後にJetstreamをインストールすることも可能です(–jetのオプションをつけずにインストールした場合)。その場合はパッケージをインストールして、php artisanにinertiaを指定します。
% composer require laravel/jetstream
% php artisan jetstream:install inertia
jetstreamインストール後にnpm install && npm run devを実行するようにメッセージが表示されるので実行してください。
% npm install && npm run dev

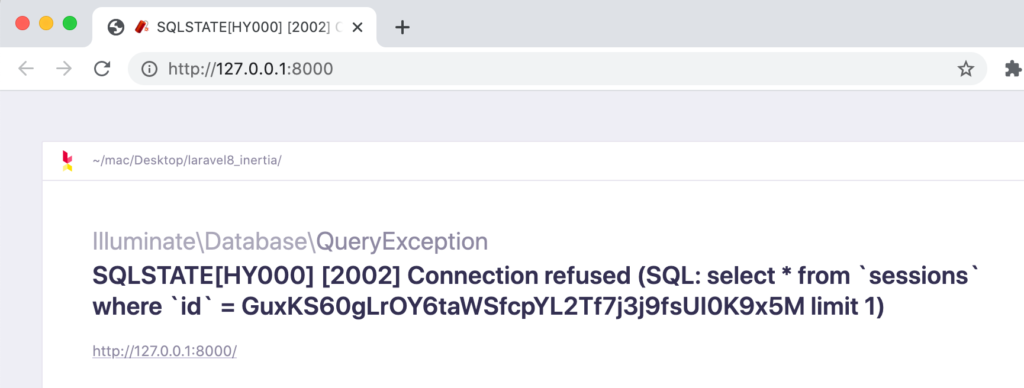
どちらの場合もインストール後にphp artisan serveコマンドで開発サーバを起動してブラウザでアクセスすると下記のConnection Refusedエラーが表示されます。設定不備により接続が拒否されたわけではなくデータベースが未作成のため接続できないことがエラーの原因です。JetstreamのInertia.jsを利用するためにはデータベースの作成が必須となります。
本文書では動作確認を行うことが目的なので簡易的なsqliteデータベースを利用します。
.envファイルでDB_CONNECTIONをsqliteに変更し、その他のDBに関連する環境変数を削除します。削除する環境変数うは先頭にDB_がついているものです。
DB_CONNECTION=sqlite
これでデータベースの設定が完了できたので、php artisan migrateコマンドを実行してください。SQLiteはファイルベースのデータベースなのでファイルが存在しない場合には警告が表示され、ファイルを作成するか聞かれるので”Yes”を選択します。実行が完了すると6つのテーブルが作成されます。
 % php artisan migrate

   WARN  The SQLite database does not exist: database/database.sqlite.

 ┌ Would you like to create it? ────────────────────────────────┐
 │ Yes                                                          │
 └──────────────────────────────────────────────────────────────┘

   INFO  Preparing database.

  Creating migration table ................................. 8ms DONE

   INFO  Running migrations.

  2014_10_12_000000_create_users_table ...................... 3ms DONE
  2014_10_12_100000_create_password_reset_tokens_table ...... 1ms DONE
  2014_10_12_200000_add_two_factor_columns_to_users_table ... 3ms DONE
  2019_08_19_000000_create_failed_jobs_table ................ 2ms DONE
  2019_12_14_000001_create_personal_access_tokens_table ..... 3ms DONE
  2024_01_17_041021_create_sessions_table ................... 2ms DONE
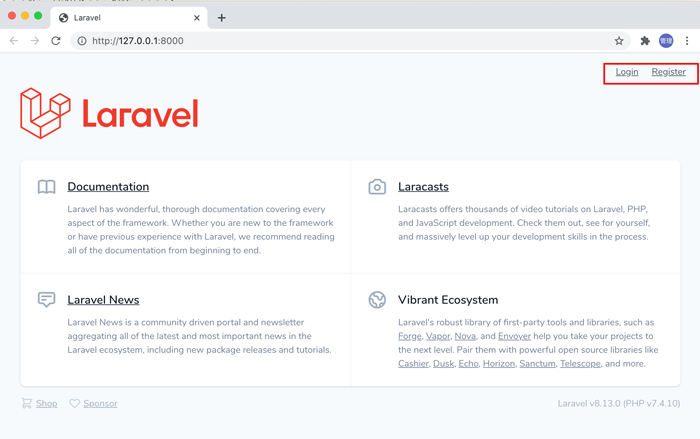
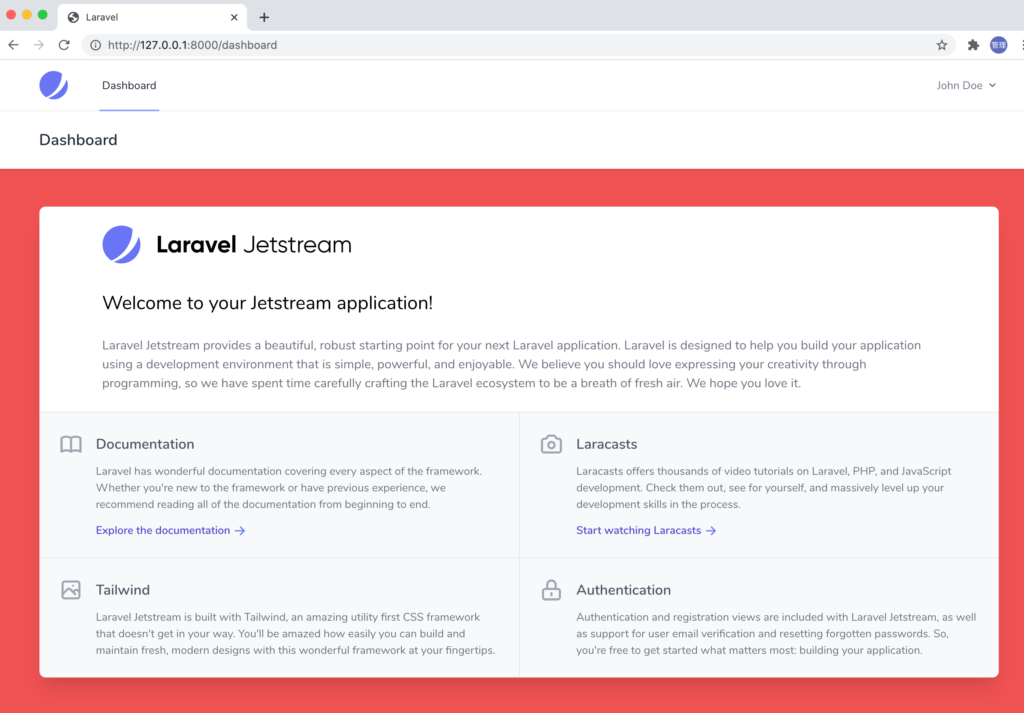
php artisan serveコマンドで開発サーバを起動し、アクセスを行うと初期画面が表示されます。JetStreamは認証機能を持っているため右上には”Login”と”Register”のリンクが表示されます。

これでInertia.jsで動作確認するためのLaravel環境の構築は完了です。
Inertia.jsで作成されたページを表示
ルーティングファイルのweb.phpファイルを確認します。”/”にアクセスした場合もInertiaが利用されていることが確認できます。
Route::get('/', function () {
    return Inertia::render('Welcome', [
        'canLogin' => Route::has('login'),
        'canRegister' => Route::has('register'),
        'laravelVersion' => Application::VERSION,
        'phpVersion' => PHP_VERSION,
    ]);
});
Inertia::renderで第一引数に指定しているWelcomeのファイルはresouces¥js¥Pagesの下に存在するWelcome.vueファイルです。名前の通り、vueファイルであることがわかります。
Bladeファイルであればファイルの保存先はresources¥viewsの下ですがInertia.jsを利用した場合はresources¥jsの下に保存され、ファイルの拡張子は.vueになります。拡張子を確認することで改めてvue.jsを利用していることがわかります。Inertia.jsを選択した場合ログイン画面などを含めvueファイルで作成されています。
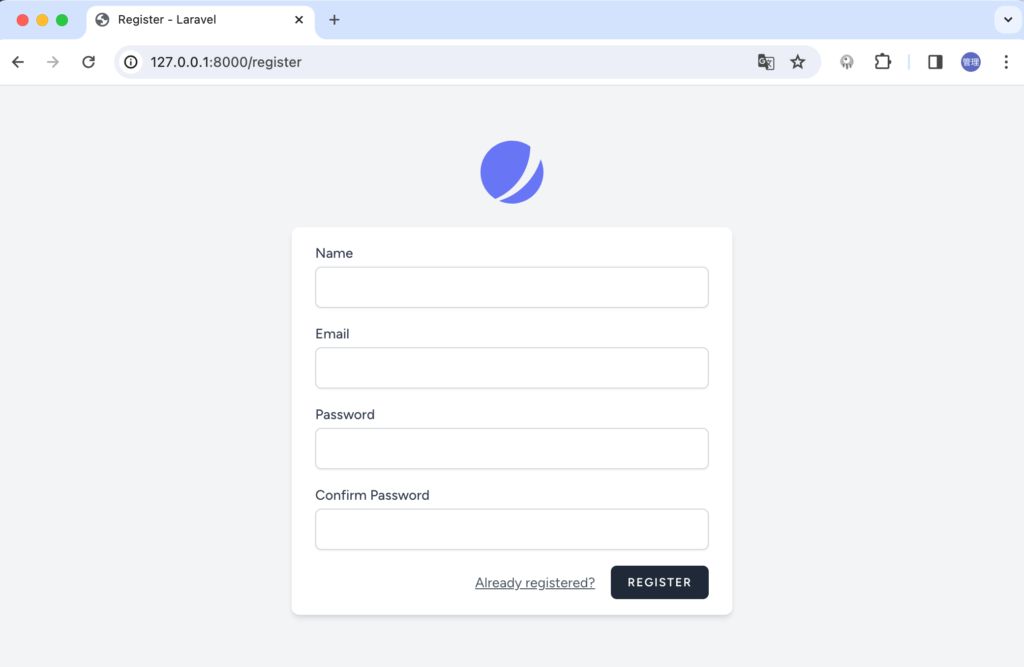
ユーザ登録は右上のリンクから行うことができます。
ユーザ登録画面を構成するvueファイルはresource¥js¥Pages¥Auth¥Register.vueファイルです。
ユーザ登録を行うと登録と同時にログイン処理が行われ、ダッシュボードにリダイレクトされます。
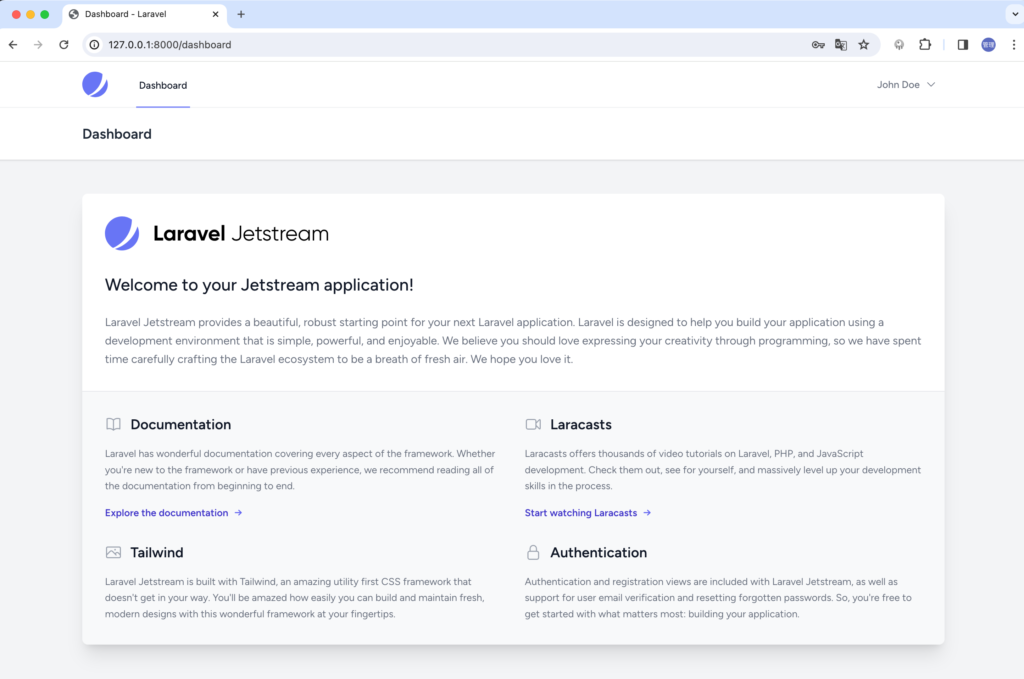
ルーティングのweb.phpファイルを開くとダッシュボードのルーティングを確認することができます。render関数で指定しているDashboard.vueファイルの内容が表示されます。
Route::middleware([
    'auth:sanctum',
    config('jetstream.auth_session'),
    'verified',
])->group(function () {
    Route::get('/dashboard', function () {
        return Inertia::render('Dashboard');
    })->name('dashboard');
});
resouces¥js¥Pagesの下にあるDashboard.vueを開いてみましょう。vueファイルなのでtemplateとscriptタグで構成されています。CSSについてはTailwind CSSを利用していためstyleタグは利用していません。

Dashboard.vueではimportを利用してDashboard.vueからさらに別のコンポーネントをインポートしているのがわかります。vue.jsに慣れている人にとっては見慣れたコードです。Vue.jsのOptions APIではなくCompositions APIを利用して記述されています。
<script setup>
import AppLayout from '@/Layouts/AppLayout.vue';
import Welcome from '@/Components/Welcome.vue';
</script>

<template>
    <AppLayout title="Dashboard">
        <template #header>
            <h2 class="font-semibold text-xl text-gray-800 leading-tight">
                Dashboard
            </h2>
        </template>

        <div class="py-12">
            <div class="max-w-7xl mx-auto sm:px-6 lg:px-8">
                <div class="bg-white overflow-hidden shadow-xl sm:rounded-lg">
                    <Welcome />
                </div>
            </div>
        </div>
    </AppLayout>
</template>
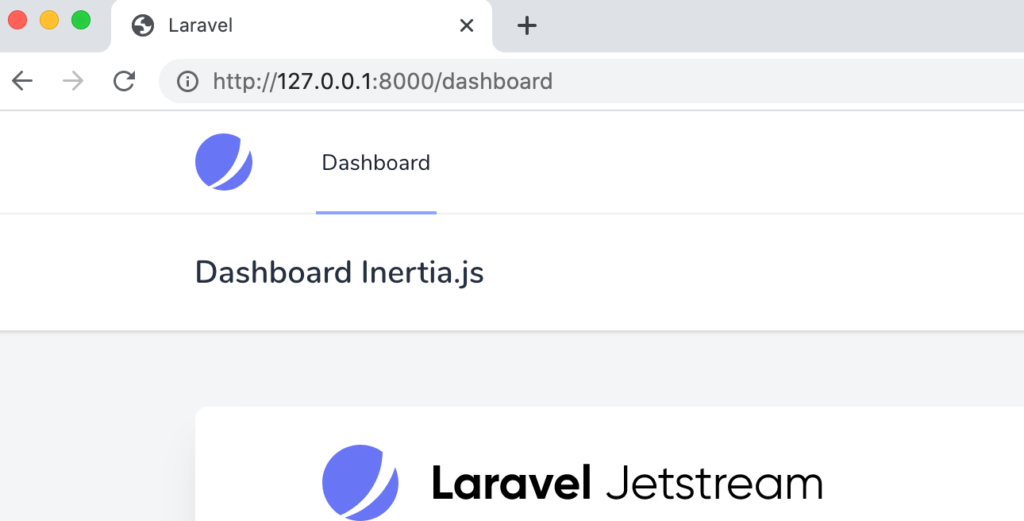
Dashboardの文字列にInertia.jsを追加することでブラウザに表示されているダッシュボードの画面に反映されるか確認します。
<h2 class="font-semibold text-xl text-gray-800 leading-tight">
    Dashboard Inertia.js
</h2>
しかしリロードしても変更は反映されていません。Bladeファイルではなくvueファイルなのでビルドが必要となるります。vueファイルを更新して反映させるためには、npm run devコマンドを実行しておく必要があります。npm run devコマンドについてはpackage.jsonファイルのscriptsで確認することができます。
% npm run dev
ビルドが完了すると更新が反映されます。
AppLayout.vueファイルの更新
Dashboard.vueでimportしているAppLayout.vueがページ全体のデザインを構成するコンポーネントなのでこのファイルを更新することで全体のイメージを変更することができます。
CSSはTailwind CSSを利用しているので背景色を変更したい場合は背景色を設定しているclassのbg-gray-100を別のclassに変えることで変更が可能です。例えばbg-red-500に変更すると背景色が赤になります。
<template>
    <div class="min-h-screen bg-gray-100">
        <nav class="bg-white border-b border-gray-100">
            <!-- Primary Navigation Menu -->
//略
ブラウザで確認すると以下のように変更が確認できます。AppLayout.vueページ全体のデザイン変更を行うことがわかりました。
ここまでの確認では通常のVue.jsとの違いがわかりません。JetStreamの機能の一つであるプロファイル画面の更新を通してInertia.jsがどのように利用されているのか確認していきましょう。
プロファイル画面
プロファイル画面へは右上の名前をクリックして表示されるドロップダウンメニューから移動することができます。
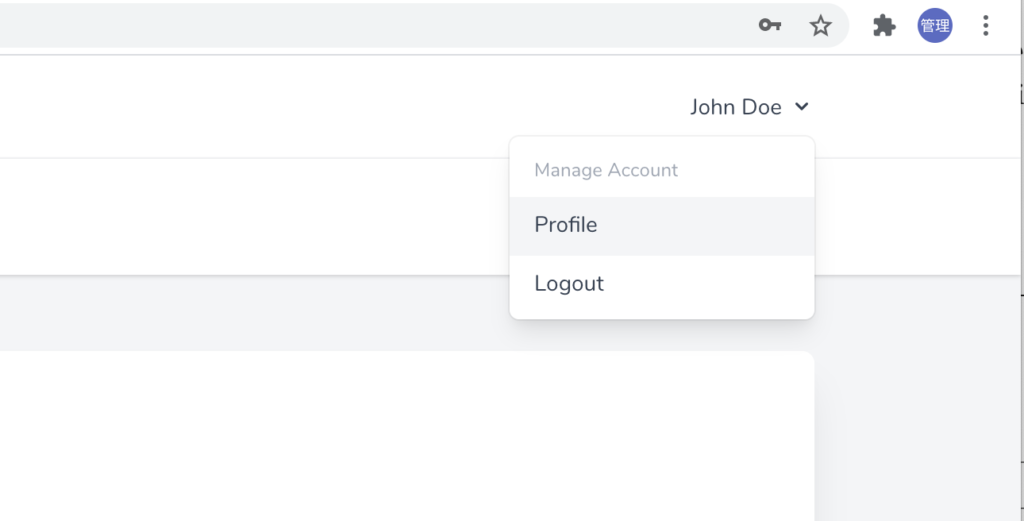
Profileをクリックするとページの再読み込みを行うことなくスムーズにDashboardからProfileのページを移動することができます。
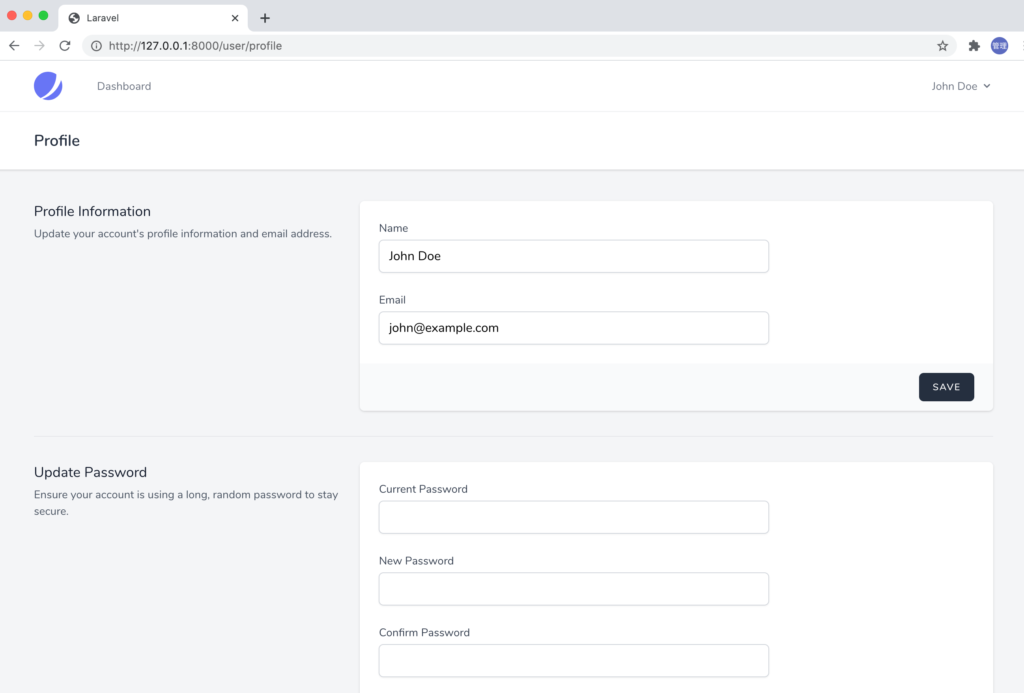
URLが/dashboardから/user/profileに変わりましたが、ルーティングweb.phpファイルには/user/profileのルーティングが登録されていません。
/user/profileのルーティングの登録を確認するためにはJetStreamのサービルプロバイダーファイルであるvendor¥laravel¥jetstream¥src¥JetStreamServiceProvider.phpファイルを確認する必要があります。
JetStreamServiceProvider.phpファイルのbootメソッドのconfigureRoutesメソッドでルーティングの登録が行われています。
protected function configureRoutes()
{
    if (Jetstream::$registersRoutes) {
        Route::group([
            'namespace' => 'Laravel\Jetstream\Http\Controllers',
            'domain' => config('jetstream.domain', null),
            'prefix' => config('jetstream.path', null),
        ], function () {
            $this->loadRoutesFrom(__DIR__.'/../routes/'.config('jetstream.stack').'.php');
        });
    }
}
loadRoutesFromメソッドのconfigに指定されているjetstream.stackはconfigディレクトリのJetstreamの設定ファイルであるjetstream.phpから取得されます。stackの値はinertiaに設定されているのでルーティング情報はvendor¥laravel¥jetstream¥routes/inertia.phpファイルから読み込まれていることがわかります。
inertia.phpファイルの中で/user/profileのルーティングを確認することができます。Jetstreamで利用されているルーティングもInertia.jsで確認することができます。
Route::group(['middleware' => array_values(array_filter([$authMiddleware, $authSessionMiddleware]))], function () {
    // User & Profile...
    Route::get('/user/profile', [UserProfileController::class, 'show'])
        ->name('profile.show');
//略
/user/profileにアクセスした際に実行されるControllerファイルはUserProfileController.phpのshowメソッドでvendor¥laravel¥jetstream¥src¥Http¥Controllers¥Inertiaの下に保存されています。
UserProfileController.phpのshowメソッドを確認するとrenderメソッドが実行されています。
/**
 * Show the general profile settings screen.
 *
 * @param  \Illuminate\Http\Request  $request
 * @return \Inertia\Response
 */
public function show(Request $request)
{
    $this->validateTwoFactorAuthenticationState($request);

    return Jetstream::inertia()->render($request, 'Profile/Show', [
        'confirmsTwoFactorAuthentication' => Features::optionEnabled(Features::twoFactorAuthentication(), 'confirm'),
        'sessions' => $this->sessions($request)-'gt;all(),
    ]);
}
//略
renderメソッドの中身から/user/profileにアクセスするとresouces¥js¥Pages¥ProfileのShow.vueファイルであることがわかります。bladeファイルではviewメソッドを利用してBladeファイルを指定していましたが、Inertia.jsではrenderメソッドを利用してvueファイルを指定します。
Profile Informationの確認
Show.vueファイルを使って表示される画面の中でInertia.jsの動作確認を行うために赤線で囲まれた上部のProfile Informationに注目します。Profile Infomationではユーザ名とメールアドレスを変更することができます。
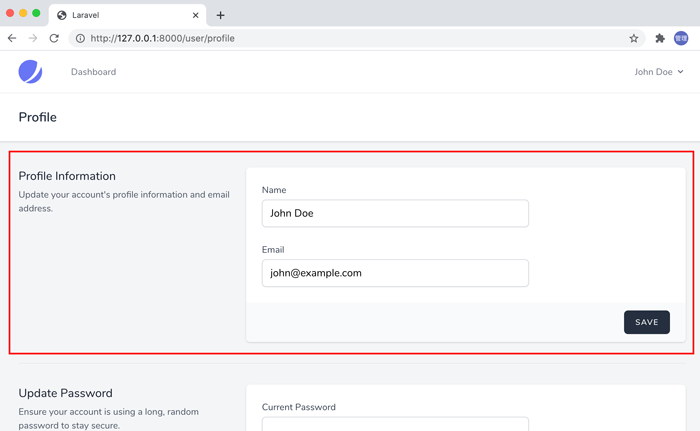
Show.vueのコードのUpdateProfileInformationFormタグがProfile Informationの表示部分に対応します。タグで表示される内容はPages/Profile/Partials/UpdateProfileInformationForm.vueファイルが対応します。
UpdateProfileInformationFormタグにはpropsのuserで$page.props.auth.userが渡されています。$pageはInertia.jsに関係しているため$pageがどこで設定されているのか確認する必要があります。
//略
<template>
    <AppLayout title="Profile">
        <template #header>
            <h2 class="font-semibold text-xl text-gray-800 leading-tight">
                Profile
            </h2>
        </template>

        <div>
            <div class="max-w-7xl mx-auto py-10 sm:px-6 lg:px-8">
                <div v-if="$page.props.jetstream.canUpdateProfileInformation">
                    <UpdateProfileInformationForm :user="$page.props.auth.user" />

                    <SectionBorder />
                </div>
//略
変数$pageとは
先ほどAppLayout.vueを確認した時に触れませんでしたが、AppLayout.vueファイルの中でも$pageが使われています。$pageが各ページで利用されていることを考えるとなにかデータ共有の仕組みが備わっていることが予想できます。
Laravelの公式ドキュメント中ではInertia.jsの共有に関する情報を見つけることはできませんでしたが、InertiaのドキュメントからShared dataとしてすべてのページでデータ共有できる仕組みがある事がわかります。
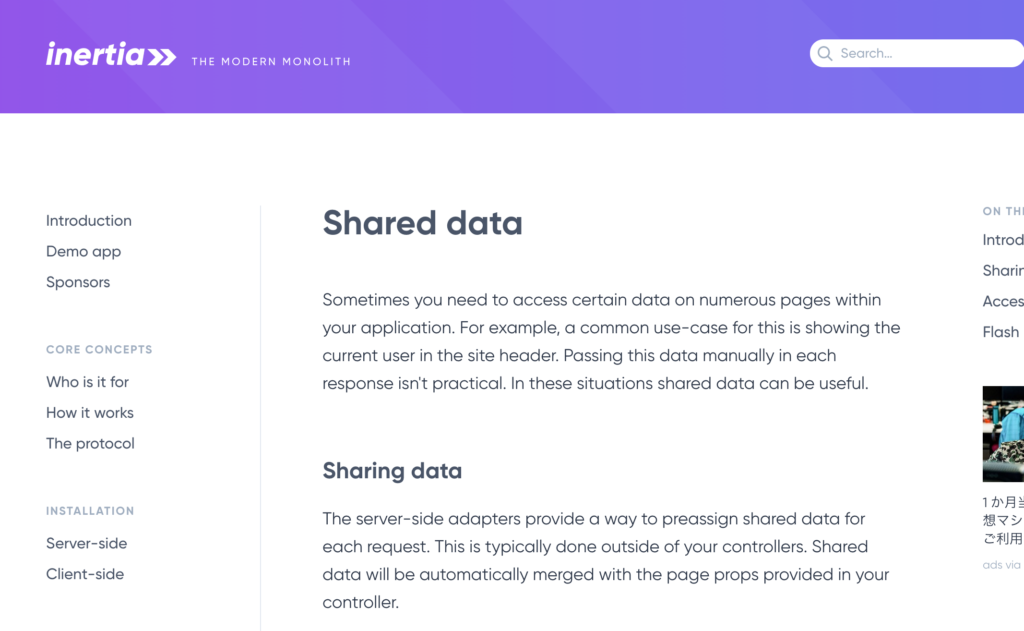
Inertia.jsではデータの共有方法は下記のようにshareメソッドを使って行います。共有したデータについては$pageを使ってアクセスすることができます。
Inertia::share('appName', config('app.name'));
どこでデータの共有処理を行っているのか見つけないといけませんが全ページで共有ということなのでサービスプロバイダーで何か登録を行っていないか確認してみましょう。
サービスプロバイダーファイルのJetstreamServiceProvider.phpのbootメソッドの中でjetstream.stackがinertiaの場合のみbootInertiaが実行されていることが確認できます。
public function boot()
{
    Fortify::viewPrefix('auth.');

//略

     if (config('jetstream.stack') === 'inertia' && class_exists(Inertia::class)) {
         $this->bootInertia();
     }

//略
}
bootInertiaメソッドの中でmiddlewareにShareInertiaDataをappendしているメソッドを見つけることができます。ShareInertiaDataという名前からもデータ共有の処理に関連していることがわかります。
protected function bootInertia()
{
    $kernel = $this->app->make(Kernel::class);

    $kernel->appendMiddlewareToGroup('web', ShareInertiaData::class);
    $kernel->appendToMiddlewarePriority(ShareInertiaData::class);
//略
ShareInertiaDataはvendor¥laravel¥jetstream¥src¥Http¥Middlewareの中にあり、middlewareなのでhandleメソッドの中で処理が行われ、Inertia::shareを見つけることができます。
class ShareInertiaData
{
    /**
     * Handle the incoming request.
     *
     * @param  \Illuminate\Http\Request  $request
     * @param  callable  $next
     * @return \Illuminate\Http\Response
     */
    public function handle($request, $next)
    {
        Inertia::share(array_filter([
            'jetstream' => function () use ($request) {
                return [
                  //略
                ];
            },
            'auth' => [
                'user' => function () use ($request) {
                    if (! $user = $request->user()) {
                        return;
                    }

                    $userHasTeamFeatures = Jetstream::userHasTeamFeatures($user);

                    if ($user && $userHasTeamFeatures) {
                        $user->currentTeam;
                    }

                    return array_merge($user->toArray(), array_filter([
                        'all_teams' => $userHasTeamFeatures ? $user->allTeams()->values() : null,
                    ]), [
                        'two_factor_enabled' => Features::enabled(Features::twoFactorAuthentication())
                            && ! is_null($user->two_factor_secret),
                    ]);
                },
            ],
            'errorBags' => function () {
                return
    //略
        ]));

        return $next($request);
    }
}
共有するデータとして大きくauth, jetstream, errorbagsの3つに分類されています。共有されてデータにはusePage Hookを利用してscriptタグの中でアクセスすることができます。Pages¥Profile¥Show.vueファイルの中でアクセスしてみます。
//略

import { usePage } from "@inertiajs/vue3";

const page = usePage();

console.log(page.props);
//略
authで共有される内容には下記のuser情報が含まています。
{
    "user": {
        "id": 1,
        "name": "John Doe",
        "email": "john@example.com",
        "email_verified_at": null,
        "current_team_id": null,
        "profile_photo_path": null,
        "created_at": "2024-01-17T04:41:29.000000Z",
        "updated_at": "2024-01-17T04:41:29.000000Z",
        "two_factor_confirmed_at": null,
        "profile_photo_url": "https://ui-avatars.com/api/?name=J+D&color=7F9CF5&background=EBF4FF",
        "two_factor_enabled": false
    }
}
jetstreamで共有される内容は下記となります。jetstream.php、fortify.phpファイルでJestreamのサービスを有効・無効を設定することができます。この設定値にアクセスすることでサービスに関連する情報を表示するかさせないかの分岐を行っています。
{
    "canCreateTeams": false,
    "canManageTwoFactorAuthentication": true,
    "canUpdatePassword": true,
    "canUpdateProfileInformation": true,
    "hasEmailVerification": false,
    "flash": [],
    "hasAccountDeletionFeatures": true,
    "hasApiFeatures": false,
    "hasTeamFeatures": false,
    "hasTermsAndPrivacyPolicyFeature": false,
    "managesProfilePhotos": false
}
errorbagsには何も入っていません。
データの共有処理が行われることで$page.props.auth.userで上記のuserの値にアクセスすることができます。
UpdateProfileInformationFormコンポーネントに渡していたpropsのuserの中身が特定できたのでUpdateProfileInformationFormコンポーネントを確認します。
UpdateProfileInformationFormコンポーネント
UpdateProfileInformationForm.vueを開くとその中のコンテンツはFormSectionタグにwrapされていることがわかります。
<template>
    <FormSection @submitted="updateProfileInformation">
        <template #title>
            Profile Information
        </template>
//略
FormSectionは@/Components/FormSection.vueファイルです。resources¥js¥Componentsの下にあるFormSection.vueファイルを確認します。
FormSection.vueの中身は4つの名前付きSlot(title, description, form, actions)が設定されていおり、UpdateProfileInformationForm.vueのFormSectionタグ内のコンテンツが各名前付き Slotの中に挿入されます。
例えば下記のUpdateProfileINformationForm.vueのtitleとdescriptionは、FromSection.vueの名前付きSlotに挿入されます。
<template #title>
    Profile Information
</template>

<template #description>
    Update your account's profile information and email address.
</template>
さらにFormSection.vueではSlotで受け取ったtitleととdescriptionをSectionTitle.vueにSlotで渡しています。
<SectionTitle>
    <template #title>
        <slot name="title" />
    </template>
    <template #description>
        <slot name="description" />
    </template>
</SectionTitle>
コンポーネントの関係は単純な2層ではなく孫コンポーネントをもつような多層構造をしています。
FormSectionコンポーネント
FormSection.vueの中で注目するのはsubmitイベントで、$emitを使って親コンポーネントにsubmittedイベントを渡しています。
<form @submit.prevent="$emit('submitted')">
form内のボタンがクリックされると親コンポーネントにsubmittedイベントが伝えられ、親コンポーネントがそのイベントを受け取って処理を行います。
親コンポーネントのUpdateProfileInformationForm.vueを確認するとsubmittedイベントを受け取りupdateProfileInformationメソッドが実行されることがわかります。
<FromSection @submitted="updateProfileInformation">
updateProfileInformationメソッドはUpdateProfileImformationForm.vueファイルのscriptタグの中に記述されています。
<script setup>

const form = useForm({
    _method: 'PUT',
    name: props.user.name,
    email: props.user.email,
    photo: null,
});

const verificationLinkSent = ref(null);
const photoPreview = ref(null);
const photoInput = ref(null);

const updateProfileInformation = () => {
    if (photoInput.value) {
        form.photo = photoInput.value.files[0];
    }

    form.post(route('user-profile-information.update'), {
        errorBag: 'updateProfileInformation',
        preserveScroll: true,
        onSuccess: () => clearPhotoFileInput(),
    });
};
updateProfileInformationメソッドの中では、useForm Hookを利用して定義されているformのpostメソッドを利用してuser-profile-information.updateに対してPUTリクエストが送信されています。
user-profile-information.updateについて
routeメソッドに設定されているuser-profile-information.updateがどこ場所なのかルーティングを確認する必要があります。登録されているルーティングはphp artisan route:listコマンドで確認することができます。
 % php artisan route:list

//略
  GET|HEAD  user/profile .................................... profile.show › Laravel\Jetstream › UserProfileController@show
  PUT       user/profile-information user-profile-information.update › Laravel\Fortify › ProfileInformationController@update
  DELETE    user/profile-photo ............ current-user-photo.destroy › Laravel\Jetstream › ProfilePhotoController@destroy
//略
実行される処理はProfileInformationController.phpファイルのupdateメソッドであることがわかります。ファイルはvendor¥laravel¥fortify¥src¥Http¥Controllersの下に保存されています。
ProfileInformationController.phpのupdateメソッドの中では、$updaterのupdateメソッドが実行されていることはわかりますが、その処理を理解するためにはDependency InjectionのUpdateUserProfileInformationが何かを確認する必要があります。
class ProfileInformationController extends Controller
{
    /**
     * Update the user's profile information.
     *
     * @param  \Illuminate\Http\Request  $request
     * @param  \Laravel\Fortify\Contracts\UpdatesUserProfileInformation  $updater
     * @return \Laravel\Fortify\Contracts\ProfileInformationUpdatedResponse
     */
    public function update(Request $request,
                           UpdatesUserProfileInformation $updater)
    {
        if (config('fortify.lowercase_usernames')) {
            $request->merge([
                Fortify::username() => Str::lower($request->{Fortify::username()}),
            ]);
        }

        $updater->update($request->user(), $request->all());

        return app(ProfileInformationUpdatedResponse::class);
    }
}
UpdateUserProfileInformationはインターフェイスなのでサービスコンテナに対応するクラスが登録されているはずなのでそれを探す必要があります。
まずapp¥Providers¥FortifyServiceProvider.phpファイルのbootメソッドでUpdateUserProfileInformationを見つけることができます。
public function boot()
{
    Fortify::createUsersUsing(CreateNewUser::class);
    Fortify::updateUserProfileInformationUsing(UpdateUserProfileInformation::class);
    Fortify::updateUserPasswordsUsing(UpdateUserPassword::class);
    Fortify::resetUserPasswordsUsing(ResetUserPassword::class);
}
vendor¥laravel¥fortify¥src¥Fortify.phpファイルのstaticメソッドのupdateUserProfileInformationUsingを確認するとsingletonでApp¥Actions¥Fortify¥UpdateUserProfileInformationクラスがUpdatesUserProfileInformationとして登録されていることがわかります。
public static function updateUserProfileInformationUsing(string $callback)
{
    return app()->singleton(UpdatesUserProfileInformation::class, $callback);
}
ProfileInformationController.phpファイルのupdateメソッドの$updaterの実体がApp¥Actions¥Fortify¥UpdateUserProfileInformationであることがわかりました。
updateメソッドではPOSTリクエストで受け取った値を渡すことでバリデーションが行われ、バリデーション後に$user情報を更新しています。
/**
 * Validate and update the given user's profile information.
 *
 * @param  array<string, mixed>  $input
 */
public function update(User $user, array $input): void
{
    Validator::make($input, [
        'name' => ['required', 'string', 'max:255'],
        'email' => ['required', 'email', 'max:255', Rule::unique('users')->ignore($user->id)],
        'photo' => ['nullable', 'mimes:jpg,jpeg,png', 'max:1024'],
    ])->validateWithBag('updateProfileInformation');

    if (isset($input['photo'])) {
        $user->updateProfilePhoto($input['photo']);
    }

    if ($input['email'] !== $user->email &&
        $user instanceof MustVerifyEmail) {
        $this->updateVerifiedUser($user, $input);
    } else {
        $user->forceFill([
            'name' => $input['name'],
            'email' => $input['email'],
        ])->save();
    }
}
Email Verification(メール検証)の機能を利用している場合は$userがMustVerifyEmailのインスタンスかチェックを行い、MustVerifyEmailのインスタンスの場合はメール検証を行う処理が実行されます。

このバリデーション内容については自由に更新することが可能です。必要であれば更新を行ってください。
user-profile-information.updateにPUTリクエストが送信されてからユーザ情報が更新されるまでの流れがわかりました。
Form / Validationヘルパー
Profile Informationの更新処理の中でまだ説明を行っていない箇所が下記のデータの更新に関わる処理です。どのようにuser-profile-information.updateに対してデータを送信するのかが記述されており、Inertia.jsを利用する中で最も重要な部分です。この部分が理解できないとデータの追加、更新、削除処理を行うことができません。
data() {
    return {
        form: this.$inertia.form({
            '_method': 'PUT',
            name: this.user.name,
            email: this.user.email,
            photo: null,
        }, {
            bag: 'updateProfileInformation',
            resetOnSuccess: false,
        }),

        photoPreview: null,
    }
},

methods: {
    updateProfileInformation() {
        if (this.$refs.photo) {
            this.form.photo = this.$refs.photo.files[0]
        }

        this.form.post(route('user-profile-information.update'), {
            preserveScroll: true
        });
    },
データプロパティのformを理解することがポイントで、formについてはLaravel Jetsteamの公式ドキュメントに解説が記載されています。理解するためにはドキュメントを確認しておく必要があります。

解説によるとフォーム処理とバリデーション結果のエラー表示を効率的に行うためにlaravel-jetsteamというパッケージがJetstreamインストール時に一緒にインストールされています。追加パッケージがインストールされていることでデータプロパティのformの中の処理についてはInertia.jsの単独の機能ではなくLaravel Jetstream用に機能追加が行われています。
$inertiaオブジェクトでformメソッドを追加し、引数にdata、optionsを設定することで新たにinertiaFormオブジェクトを作成します。
this.$inertia.form(data, options) → intriaFormオブジェクト
dataについて
dataではHTTPメソッドと送信するデータの設定を行うことができます。ここではHTTPメソッドにPUTメソッドを設定しています。
form: this.$inertia.form({
    '_method': 'PUT',
    name: this.user.name,
    email: this.user.email,
    photo: null,
}, options),
optionsについて
optionsでは、bag、resetOnSuccessが設定されています。
form: this.$inertia.form(data, {
    bag: 'updateProfileInformation',
    resetOnSuccess: false,
}),
bagプロパティでupdateProfileInformationを指定していますが、これは更新処理を行うapp¥Actions¥Fortify¥UpdateUserProfileInformation.phpのvalidateWithBagで指定したupdateProfileInformationと一致させています。bagとvalidataWithBagの値を一致させることでerrorBag(バリデーションエラーで発生したエラーが保存されるオブジェクト)からエラー情報を取得する際にvalidateWithBagで指定したupdateProfileInformationを明記しなくてもform.error(‘email’)のような短いコードでエラー情報を取得することができます。
resetOnSuccessはfalseに設定することでputリクエストで更新が完了した後に更新後の値がinput要素に入ります。resetOnsuccessをtrue(デフォルト)に設定した場合は更新が完了した後に更新する前の値がinput要素に入ります。
postメソッド
dataとoptionsを利用して作成したInertiaFormオブジェクトでpostメソッドを実行します。postメソッドではURLとoptionsを設定することができます。
this.form.post(URL, options)
URLには更新処理を行うURLを設定し、optionsにはInertis.jsのオプションを設定します。
this.form.post(route('user-profile-information.update'), {
            preserveScroll: true
        });
Inertis.jsのオプションであるpreservScrollをtrueにすることでブラウザをスクロールをしてフォームを表示している場合に更新後もスクロールした位置でフォームを表示させることができます。preserveScrollを設定しない場合は、更新後にページの上部から表示されるため入力時に見ていた画面のスクロール位置とは異なる場所が表示されます。
ここまでの説明でどのようにuser-profile-information.updateに対してデータを送信するのかを理解することができました。次はリクエスト送信後に戻ってきた情報をtemplateタグの中でどのように利用しているかを確認していきます。
templateタグの中身
InertiaFormオブジェクトには内部にprocessing, successful, recentlySuccessfulといった変数を持っています。これらの値を利用しながらUIに変化を加えています。
どのように利用しているかを確認していくために入力フォームに関するタグを見ていきます。
<!-- Name -->
<div class="col-span-6 sm:col-span-4">
    <jet-label for="name" value="Name" />
    <jet-input id="name" type="text" class="mt-1 block w-full" v-model="form.name" autocomplete="name" />
    <jet-input-error :message="form.error('name')" class="mt-2" />
</div>

<!-- Email -->
<div class="col-span-6 sm:col-span-4">
    <jet-label for="email" value="Email" />
    <jet-input id="email" type="email" class="mt-1 block w-full" v-model="form.email" />
    <jet-input-error :message="form.error('email')" class="mt-2" />
</div>
</template>

<template #actions>
<jet-action-message :on="form.recentlySuccessful" class="mr-3">
    Saved.
</jet-action-message>

<jet-button :class="{ 'opacity-25': form.processing }" :disabled="form.processing">
    Save
</jet-button>
</template>
v-modelディレクティブの設定
NameとEmailのinput要素ではvue.jsのv-modelディレクティブを利用して入力値とformのnameとemailをバインディングしています。
エラー設定
エラーについては先ほど説明した通り、InertiaFormの設定のおかげでform.error(‘name’)といったシンプルなコードで取得することが可能で<jet-input-error>タグにpropsのmessageを使ってエラーの内容を渡しています。
<jet-input-error>タグに対応するinputError.vueでは受け取ったmessageに値が入っているかどうかをv-showでチェックして表示・非表示を制御しています。
<template>
    <div v-show="message">
        <p class="text-sm text-red-600">
            {{ message }}
        </p>
    </div>
</template>

<script>
    export default {
        props: ['message']
    }
</script>
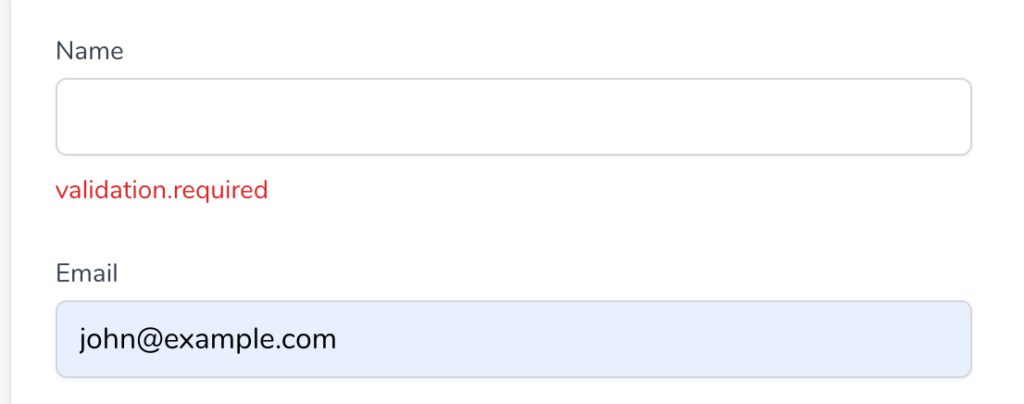
エラーが発生した場合は下記のようにinput要素の下にバリデーションのエラーメッセージが表示されます。
Nameに何もいれなかったのでvalidation.requiredが表示されます。バリデーションの変更はApp¥Actions¥Fortify¥UpdateUserProfileInformationで可能です。
InertiaFormの内部変数
inertiaFormオブジェクトのrecentrlySuccessfullとprocessingが利用されているslotのactionの中身を詳しくみていきましょう。
<template #actions>
<jet-action-message :on="form.recentlySuccessful" class="mr-3">
    Saved.
</jet-action-message>

<jet-button :class="{ 'opacity-25': form.processing }" :disabled="form.processing">
    Save
</jet-button>
</template>
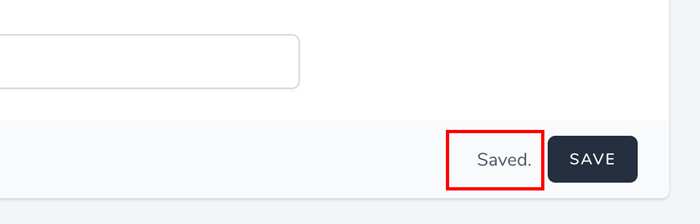
recentlySuccessfulは更新が成功後2000ms(2秒間)だけtrueになるようにlaravel-jetsteamパッケージのの中で設定が行われています。
recentlySuccessfullはjet-action-messageタグにpropsのonで渡されているのでActionMessage.vueファイルを確認します。v-showディテクティブとpropsのonの値を利用して、onがtrueの場合のみslotタグでSaved.が表示されるように設定が行われています。Slotに渡されている値はjet-sction-messageタグの間に挿入されている文字列Saved.です。
<template>
    <div>
        <transition leave-active-class="transition ease-in duration-1000" leave-class="opacity-100" leave-to-class="opacity-0">
            <div v-show="on" class="text-sm text-gray-600">
                <slot />
            </div>
        </transition>
    </div>
</template>

<script>
    export default {
        props: ['on'],
    }
</script>
recentlySuccessfulの値を利用することで、SAVEボタンをクリックして更新が成功した場合にボタンの左側にSaved.のメッセージが一時的に表示されます。
form.processingについては更新中には値がtrueになるため、SAVEボタンをクリックするとopacityの設定によりボタンが薄くなり、disabledによりボタンをクリックすることができなくなります。更新内容によっては即座に完了するためボタンの変化がわかりにくいかもしれません。
このようにInertiaFormオブジェクトの変数recentlySuccessful, processingを利用してUIに変化を加えています。
まとめ
Profile Infromationを中心にInertia.jsがどのようにLaravelで利用されていることを説明してきました。
Profile Informationの部分がInartia.jsを利用してどのように処理されているのかは理解ができたかと思います。この知識を使って次は各自でInertia.jsを利用したページ作成にチャレンジしてみてください。